Preparing CMP-Compatible Templates (Proxmox VE)
Before StackConsole / CMP can provision VMs on Proxmox, prepare at least one cloud-init-ready template on the Proxmox node.
This guide uses Ubuntu 22.04 (Jammy) minimal cloud image as an example. The same pattern applies to other cloud-init images with small adjustments.
A Proxmox VM template that supports:
- Cloud-init (password / SSH key injection)
- QEMU Guest Agent
- Password authentication over SSH where CMP requires it
- A resized root disk suitable for cloning
Template requirements (CMP)
| Requirement | Required | Notes |
|---|---|---|
| Cloud-init ready | Yes | Password and/or SSH key injection at first boot |
| QEMU Guest Agent | Yes | Install in the image; enable agent on the VM |
| SSH server | Yes | Enable PasswordAuthentication / ssh_pwauth when password login is needed |
| Unique machine-id cleared | Yes | Avoid identical IDs on clones |
| Converted to Proxmox Template | Yes | CMP clones from templates |
Prerequisites
- Root (or equivalent) access to the Proxmox node
- Open the node Shell from the Proxmox UI (select the node → Shell)

- On the Proxmox host, ensure
libguestfs-toolsis installed (needed forvirt-customize):
dpkg -l | grep libguestfs-tools
If it is missing:
apt install -y libguestfs-tools
1. Download and prepare the cloud image
Work in a directory on the Proxmox node (for example /var/lib/vz/template/qemu or /root).
Download Ubuntu 22.04 minimal cloud image:
wget https://cloud-images.ubuntu.com/minimal/releases/jammy/release/ubuntu-22.04-minimal-cloudimg-amd64.img
Rename and change the extension to .qcow2:
mv ubuntu-22.04-minimal-cloudimg-amd64.img ubuntu-22.04-jammy.qcow2
Resize the image to the minimum root disk you want for the template (example 32G):
qemu-img resize ubuntu-22.04-jammy.qcow2 32G
2. Customize the image (virt-customize)
virt-customize edits the .qcow2 offline on disk. There is no VM boot and no network required for these steps — think of it as mounting the image and editing it safely.
Use your renamed file consistently: ubuntu-22.04-jammy.qcow2.
Install QEMU Guest Agent
virt-customize -a ubuntu-22.04-jammy.qcow2 --install qemu-guest-agent
Clear machine-id (for clean clones)
virt-customize -a ubuntu-22.04-jammy.qcow2 \
  --run-command 'echo > /etc/machine-id' \
  --run-command 'ln -sf /etc/machine-id /var/lib/dbus/machine-id'
Adjust cloud-init users section (as needed)
virt-customize -a ubuntu-22.04-jammy.qcow2 \
  --run-command 'sed -i "/^users:/,/^[^[:space:]]/d" /etc/cloud/cloud.cfg'
Enable SSH password auth, guest agent, and cloud-init cleanup
virt-customize -a ubuntu-22.04-jammy.qcow2 \
  --install openssh-server \
  --run-command 'sed -i "s/^#\?PasswordAuthentication.*/PasswordAuthentication yes/" /etc/ssh/sshd_config' \
  --run-command 'sed -i "s/^#\?UsePAM.*/UsePAM yes/" /etc/ssh/sshd_config' \
  --run-command 'systemctl enable ssh' \
  --run-command 'systemctl enable qemu-guest-agent' \
  --run-command 'sed -i "s/^ssh_pwauth:.*/ssh_pwauth: true/" /etc/cloud/cloud.cfg || echo "ssh_pwauth: true" >> /etc/cloud/cloud.cfg' \
  --run-command 'cloud-init clean --logs'
3. Create a VM in Proxmox (UI)
Create an empty VM shell that will receive the customized disk.
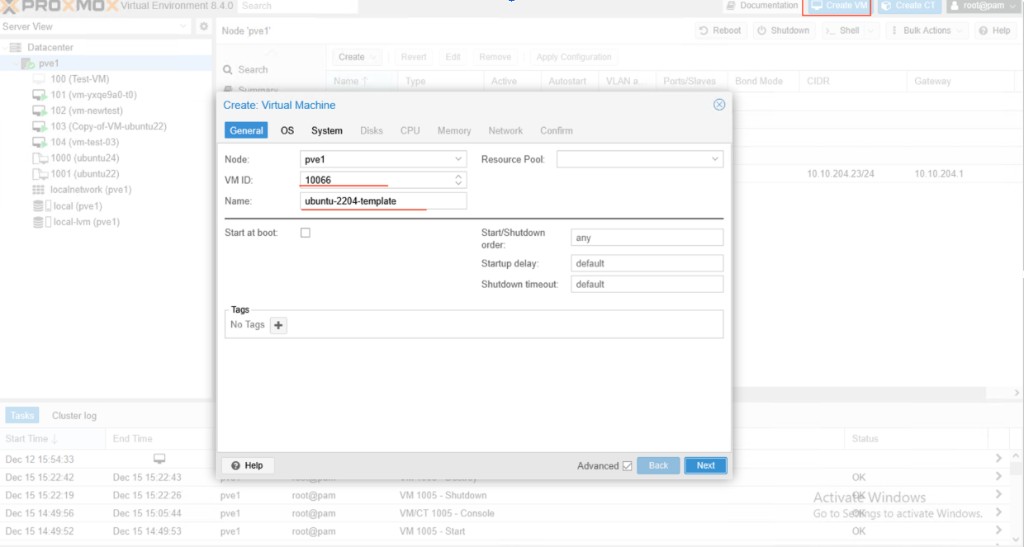
- Click Create VM
- General — choose Node, set VM ID and Name (for example
ubuntu-2204-template)
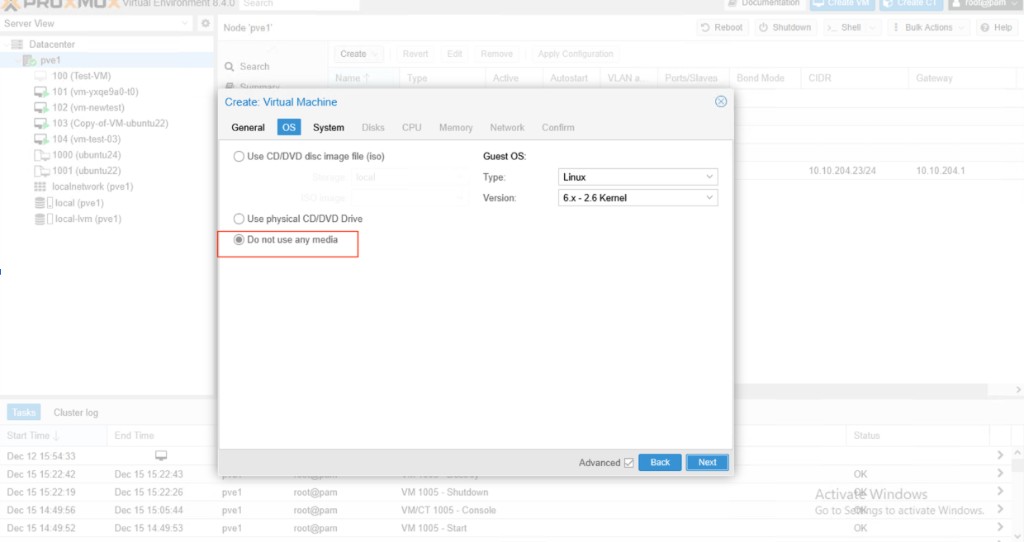
- OS — select Do not use any media; Guest OS Linux / 6.x - 2.6 Kernel
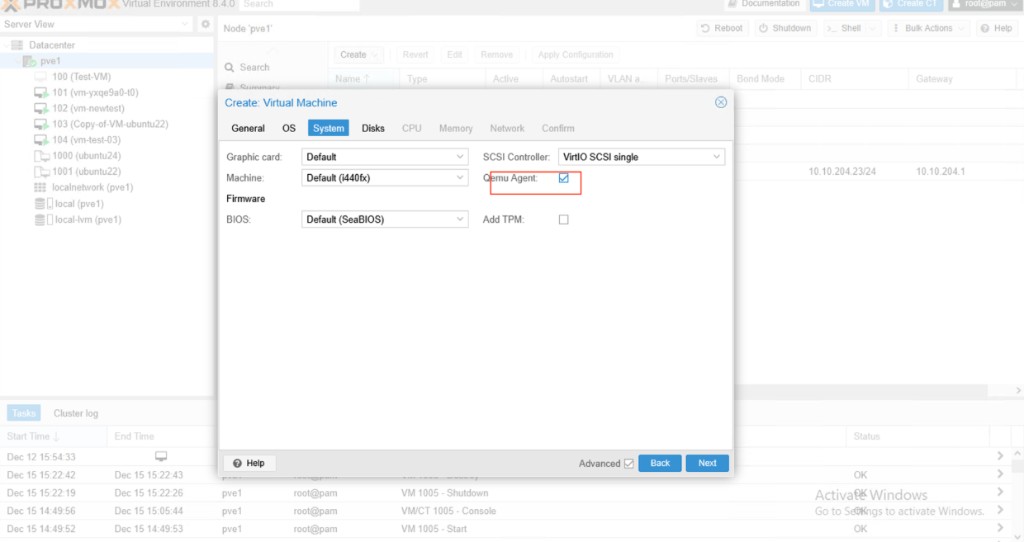
- System — enable Qemu Agent
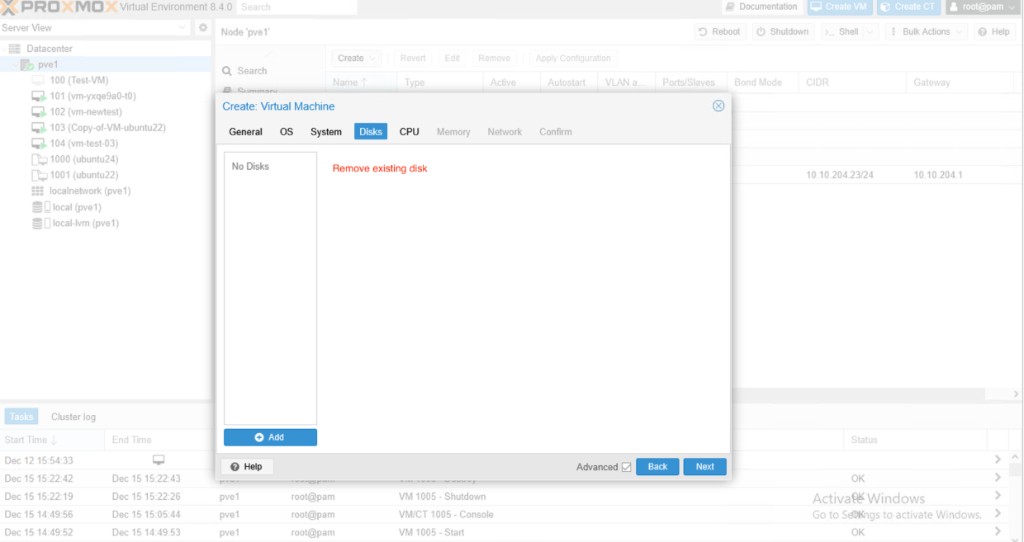
- Disks — remove any default disk so the list shows No Disks (you will import the qcow2 next)
- CPU — set cores as needed for the template baseline
- Memory — for example 1024 MiB
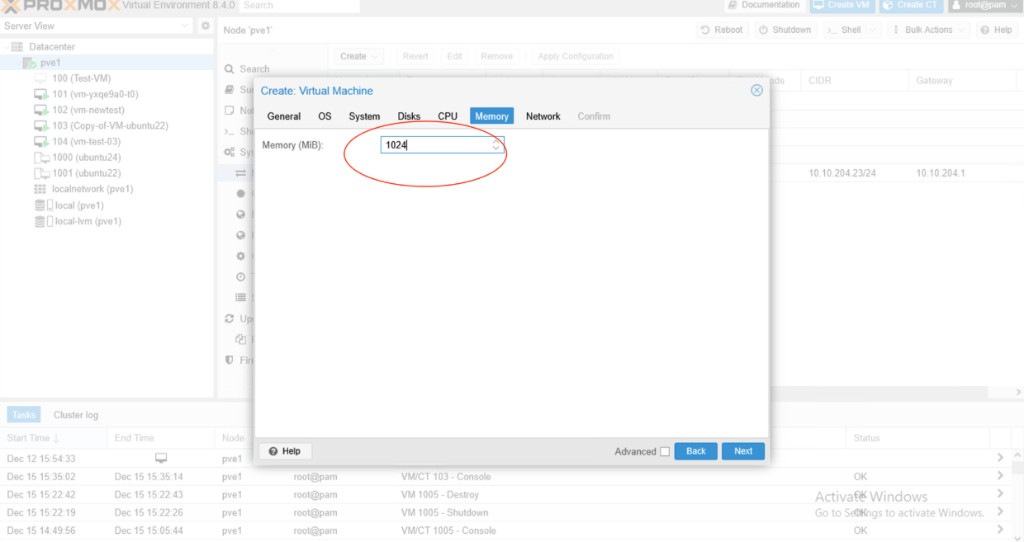
- Network — bridge (for example
vmbr0), model VirtIO (paravirtualized)
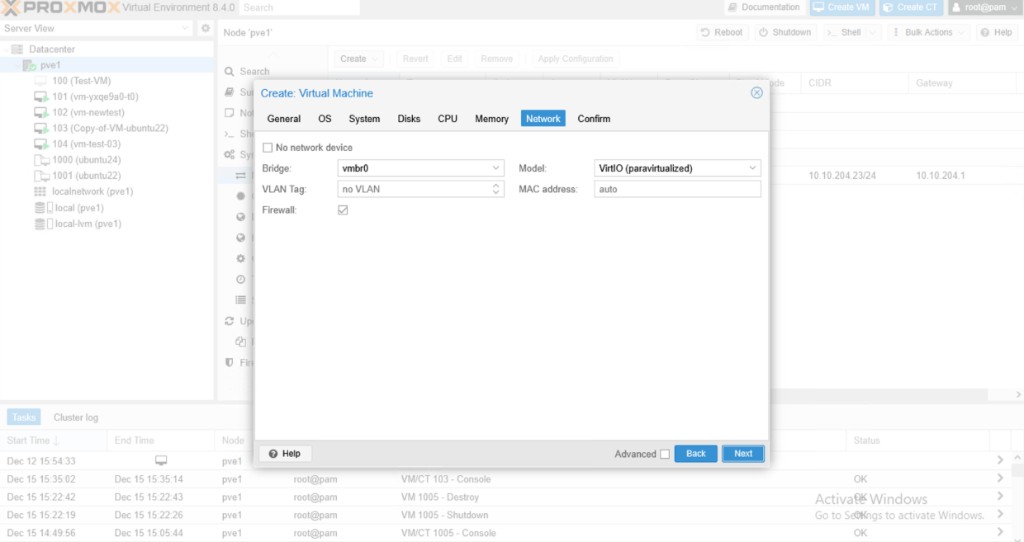
- Confirm and create the VM. Note the VM ID (examples below use
<VM_ID>).
4. Import the image and attach hardware
On the Proxmox node Shell, replace <VM_ID> with your VM ID.
Add serial console
qm set <VM_ID> --serial0 socket --vga serial0
Import the qcow2 into storage
Example storage: local-lvm (use your target storage name):
qm importdisk <VM_ID> ubuntu-22.04-jammy.qcow2 local-lvm
Attach the unused disk (UI)
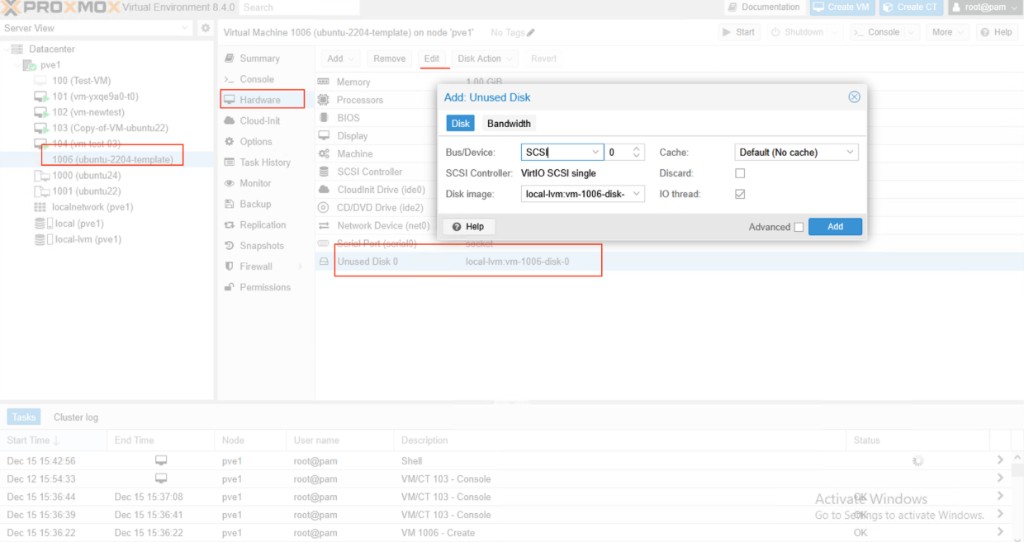
- Open the VM → Hardware
- Select Unused Disk 0 → Edit / Add
- Bus/Device: SCSI
0, SCSI Controller: VirtIO SCSI single - Enable IO thread
- If the storage is SSD, also enable Discard and SSD emulation
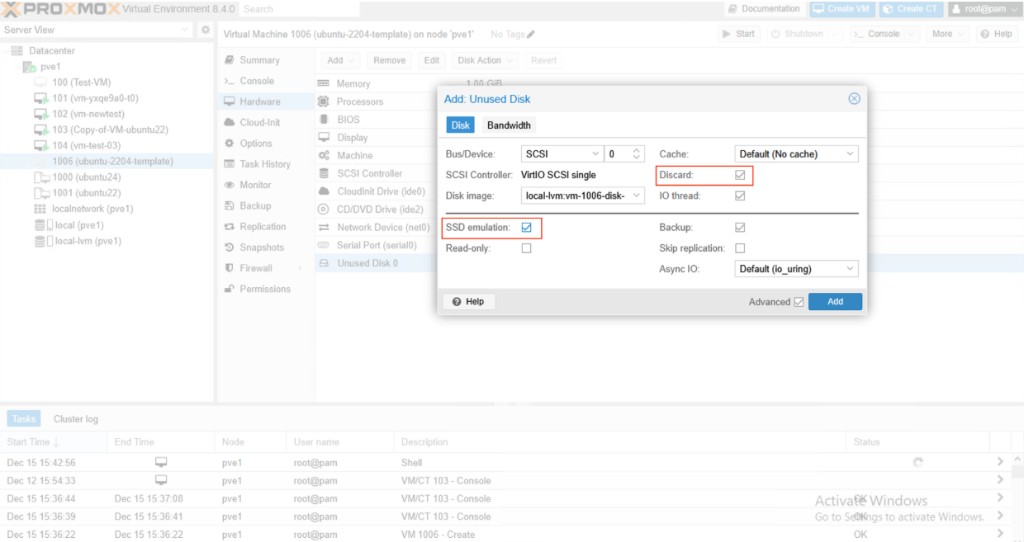
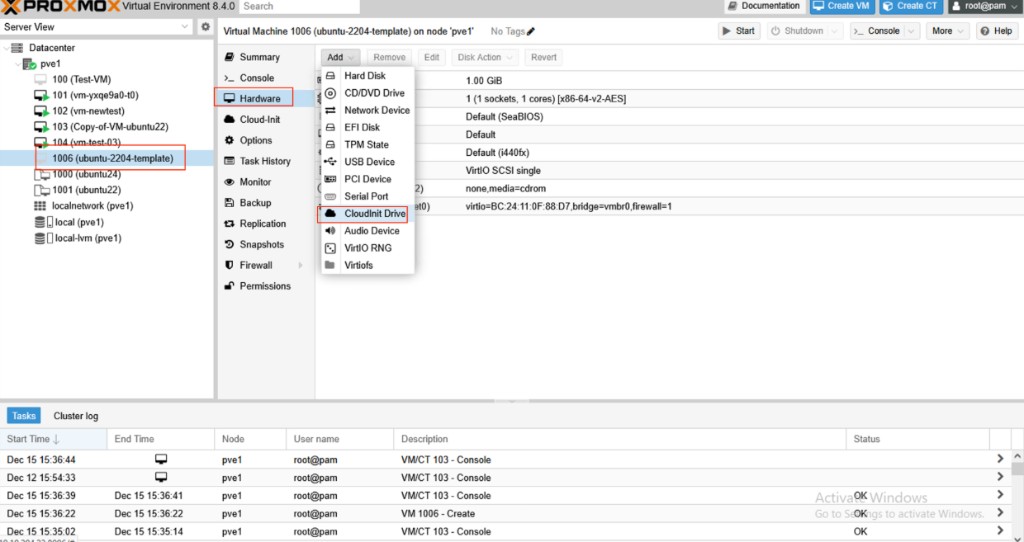
Add CloudInit Drive (UI)
Hardware → Add → CloudInit Drive
Boot order (UI)
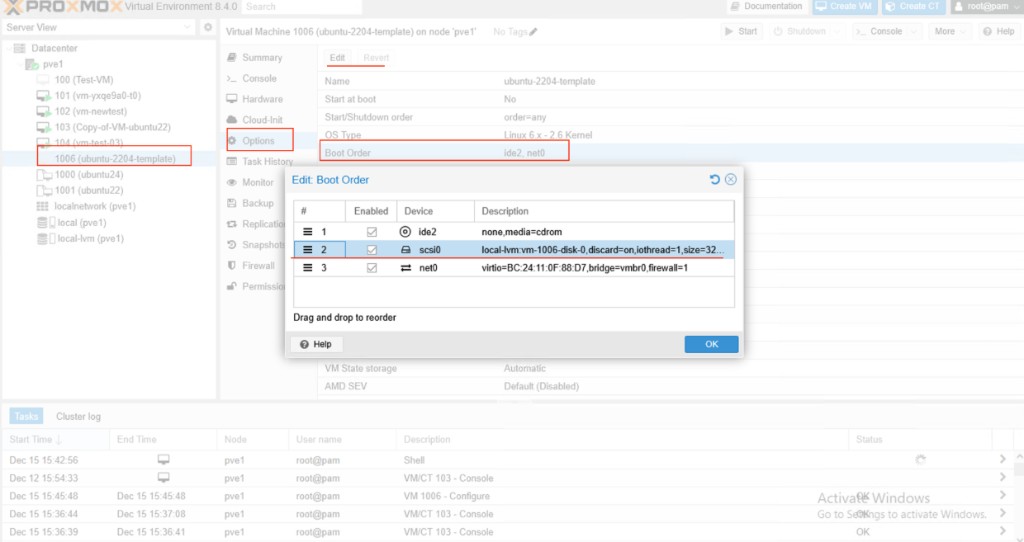
Options → Boot Order — enable the imported disk (scsi0) and set boot order so the guest disk boots (reorder as needed).
Start at boot (optional)
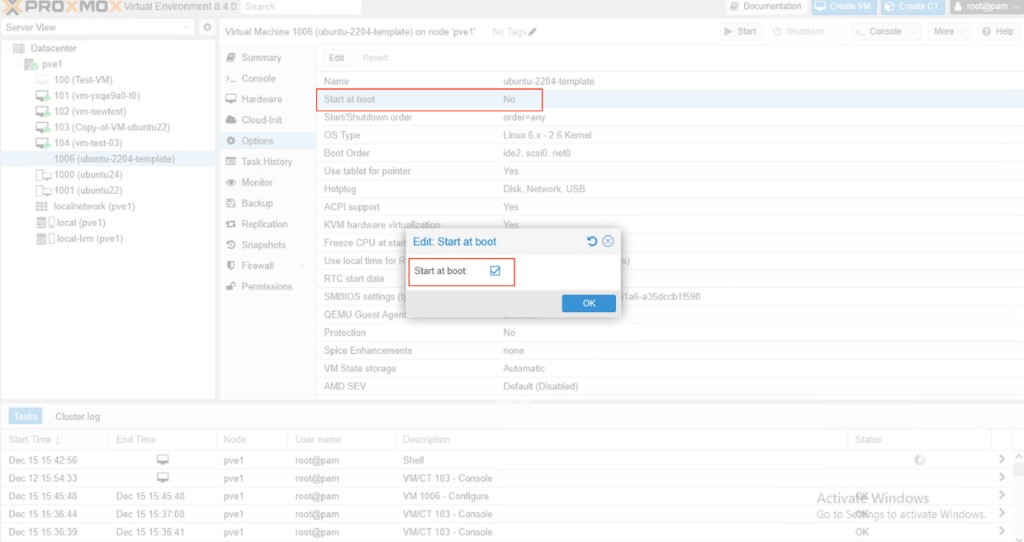
Options → Start at boot — enable if you want the reference VM to start automatically (usually off for a pure template after conversion).
5. First boot and cloud-init check
- Start the VM and open the console
- Confirm cloud-init status:
cloud-init status --long
- Before converting to a template, clean cloud-init state and machine-id again:
sudo cloud-init clean --logs
sudo truncate -s 0 /etc/machine-id
- Shut down the VM cleanly:
qm stop <VM_ID> --skiplock
6. Convert to template
In the Proxmox UI: right-click the VM → Convert to template (or use qm template <VM_ID>).
After conversion, configure the template in CMP (template mapping / packages) so customers can provision from it. See Proxmox Requirements.
Checklist
-
libguestfs-toolsinstalled on the Proxmox host - Cloud image downloaded, renamed to
.qcow2, and resized -
virt-customizeinstalled qemu-guest-agent, SSH password settings, and cloud-init cleanup - VM created with no media, Qemu Agent on, no disks initially
- Disk imported with
qm importdiskand attached (SSD options if applicable) - CloudInit Drive added; boot order includes
scsi0 - Cloud-init verified; machine-id / cloud-init cleaned; VM stopped
- VM converted to Template
References
- Ubuntu cloud images — Jammy minimal
- LearnLinuxTV — Proxmox Ubuntu 22.04 template
- YouTube — Proxmox template walkthrough
Related
- Proxmox Templates
- Proxmox VE
- Proxmox Requirements
- CloudStack — Preparing CMP-compatible templates — same CMP goals on another orchestrator