Networks and IPAM (Proxmox)
After Connecting CMP to Proxmox, configure network categories, import Proxmox networks, and manage IP address pools (IPAM) so CMP can allocate and track IPs for customer VMs.
- Networks (Proxmox) — sync only; CMP does not provision networks on Proxmox
- IPAM (Proxmox) — CMP-level IP pools and allocation
| CMP path | Purpose |
|---|---|
| Settings → Orchestrator → Network Categories | Admin labels for grouping networks |
| Settings → Orchestrator → Networks | Import / sync Proxmox networks into CMP |
| Settings → Orchestrator → Networks IP Address | View and manage available / allocated IPs |
- Proxmox provider setup and zone are complete — Connecting CMP to Proxmox
- Proxmox Linux bridges exist (for example
vmbr0) and are usable for VM NICs — see Linux bridge vs physical NIC - For multi-node clusters, networks must be available on nodes that can receive VMs — see Node Selection Algorithm
Proxmox SDN is not available in CMP yet. It is under development and will be available in an upcoming version. Use bridge-based networks here. Details: Upcoming — Proxmox SDN.
Linux bridge vs physical NIC
In Proxmox VE, a VM cannot normally use a physical network device (such as eno1, eth0) directly as its network bridge. A physical NIC is a network interface, not a virtual Layer-2 switch.
Proxmox uses a Linux bridge (for example vmbr0):
VM → Virtual NIC → vmbr0 (Linux Bridge) → Physical NIC → Network Switch
The Linux bridge acts like a virtual switch and allows multiple VMs and the Proxmox host to share the physical network interface.
| Interface | Role |
|---|---|
Physical NIC (for example eno1, eth0) | Provides physical network connectivity |
Linux Bridge (for example vmbr0) | Virtual switch attached to the physical NIC |
| VM virtual NIC | Connects the guest to the Linux bridge |
Example
eno1/eth0= physical network devicevmbr0= Linux bridge connected to that NIC- VM network Bridge =
vmbr0(noteno1/eth0)
Typical host configuration:
auto eno1
iface eno1 inet manual

auto vmbr0
iface vmbr0 inet static
        address 192.168.1.10/24
        gateway 192.168.1.1
        bridge-ports eno1
        bridge-stp off
        bridge-fd 0
On the VM (and when importing into CMP), use:
Bridge: vmbr0
not:
Bridge: eno1
In the Proxmox UI, open the node → System → Network. Prefer interfaces whose Type is Linux Bridge (vmbr0, vmbr1, …). Do not import a row whose type is only Network Device (physical NIC) for CMP VM networking.
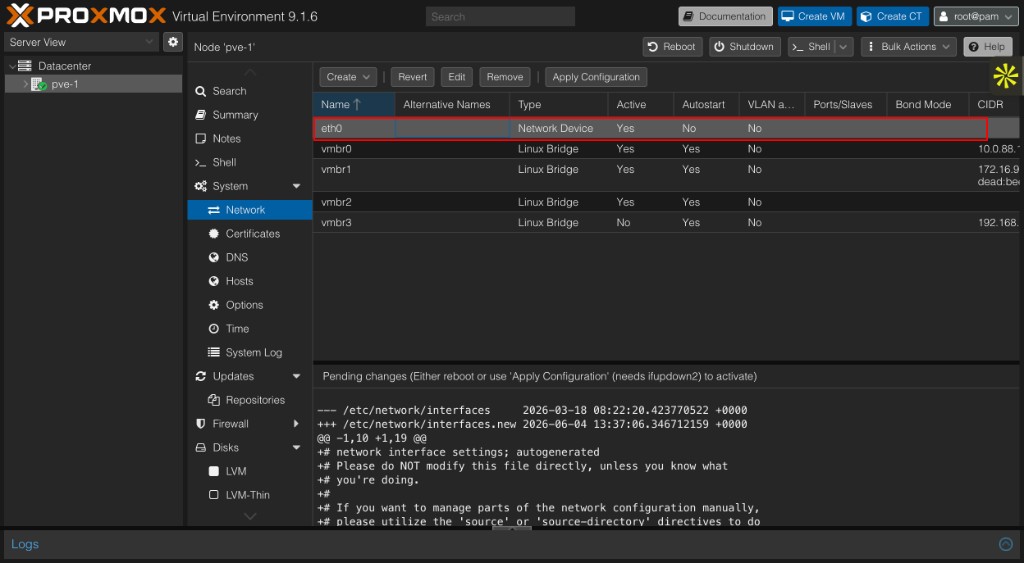
In Settings → Orchestrator → Networks → Import, select the Linux bridge (for example vmbr0), not the underlying physical NIC (eth0 / eno1). Using a physical device as the VM bridge often causes provisioning or start failures.
QEMU exit code 1 and wrong bridge
Messages such as QEMU exited with code 1 only mean QEMU failed to start the VM. That exit code is generic — it is not the root cause.
Check the Proxmox task log for the real error, for example:
- bridge does not exist
- failed to add TAP interface to bridge
- unable to create/configure network interface
- failed to connect the VM’s virtual NIC to the specified bridge
When the configured network is only a physical device and not a Linux bridge, Proxmox/QEMU may fail to create the VM network attachment, which surfaces as a QEMU startup failure.
Network categories
CMP path: Settings → Orchestrator → Network Categories
Create categories such as high-performing networks, slow networks, public networks, or private networks — whatever grouping you need.
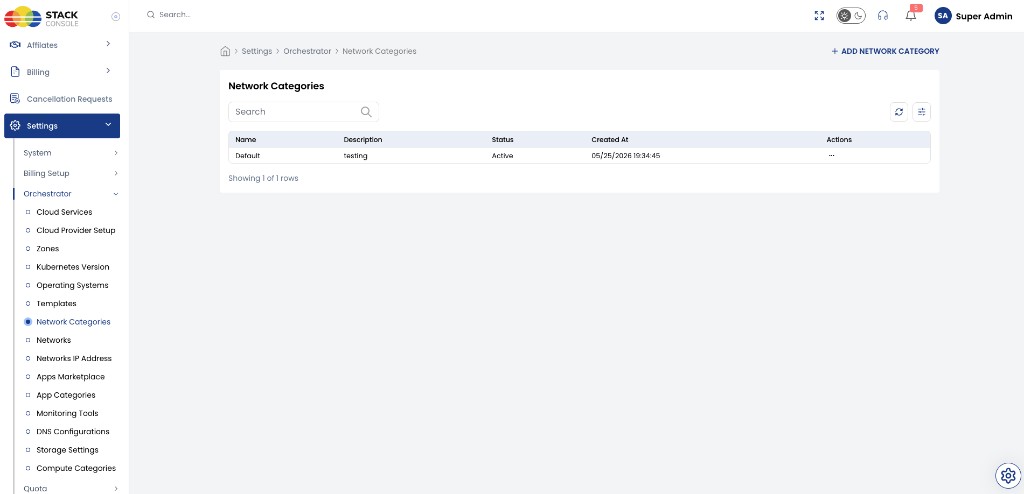
Network categories are used internally for admin purposes (organising and selecting networks in CMP). They are not a separate customer-facing product catalogue by themselves.
- Click + Add Network Category
- Enter Name, Description, and Status (Active when ready)
- Save — categories appear in the Category dropdown when you import or update a network
Networks list
CMP path: Settings → Orchestrator → Networks
Imported networks appear here (Proxmox bridge, category, zone, IP billing, IP type, status).
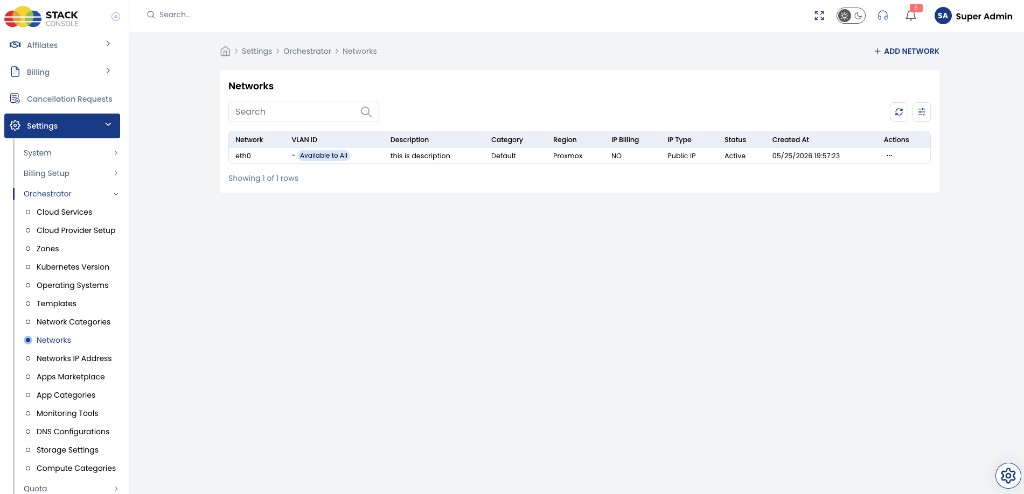
Use + Add Network (or Import / Sync) to pull a network from Proxmox into CMP.
Import or sync networks
CMP path: Settings → Orchestrator → Networks → Add / Import Networks
Map a Proxmox network (for example vmbr0) to CMP, set availability and billing, and define subnet / IP pool details.
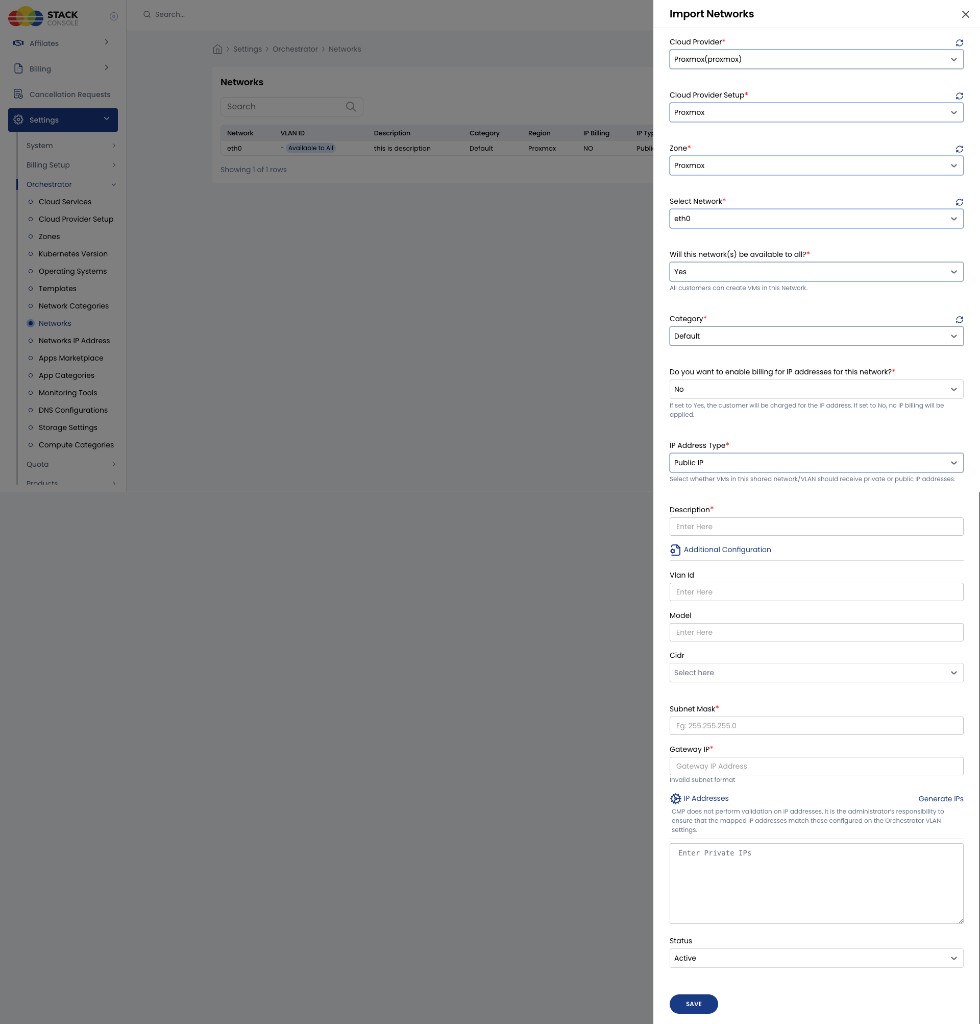
Core selection
Cloud Provider
Required. Select Proxmox (proxmox).
Cloud Provider Setup
Required. The Proxmox setup from Connecting.
Zone
Required. CMP zone mapped to this Proxmox setup.
Select Network
Required. Proxmox Linux bridge to import (for example vmbr0). Do not select a physical NIC (eth0, eno1). See Linux bridge vs physical NIC.
Access, category, and billing
Will this network(s) be available to all?
Required.
| Value | Behaviour |
|---|---|
| Yes | All customers can create VMs on this network. CMP automatically creates this network for each new account and assigns it to the first project in that account. |
| No | Network is not auto-shared. An admin must manually allocate it to specific customers from the account details page — see Allocate network to a customer. |
When Yes, CMP:
- Automatically creates this network for each new account
- Assigns it to the first project within that account
Category
Required. Network category from Network categories (for example Default).
Do you want to enable billing for IP addresses for this network?
Required.
| Value | Behaviour |
|---|---|
| Yes | Customers are charged for IP addresses on this network using the IP Address package (subject to your rate card). CMP creates an IP subscription when the IP is acquired (for example VM create or network attach). |
| No | No IP billing is applied for this network; no IP subscription is created. |
IP Address Type
Required. Whether VMs on this shared network / VLAN receive Public IP or Private IP addresses (controls how CMP shows the IP and related acquire-IP options).
Subscription create/cancel rules and customer UI behaviour: Shared Network IP Billing (Proxmox).
Description
Required. Admin-facing description of the network.
Additional configuration
Vlan Id
Optional. VLAN ID when the Proxmox / CMP mapping requires it.
Model
Optional. NIC model or related Proxmox model value when used in your environment.
Cidr
Required for IP generation (when shown on Import). CIDR for the subnet. Together with Subnet Mask and Gateway IP, this drives the allocatable IP range when you submit the form.
Subnet Mask
Required. Subnet mask for the IP pool (for example 255.255.255.0 or 255.0.0.0). Must be consistent with Cidr, Gateway IP, and the IPs CMP generates or you map.
Gateway IP
Required. Gateway address for the network (for example 10.0.0.1). Must be consistent with Cidr and Subnet Mask.
If CMP shows Invalid subnet format, correct Cidr, Subnet Mask, and Gateway IP so they form a valid subnet before saving.
IP addresses (IPAM mapping)
Generate IPs
CMP builds the allocatable IP list from Cidr, Subnet Mask, and Gateway IP when you submit (save) the Import / network form — not as a separate offline step. Use Generate IPs in the UI when available to preview or fill the list from those subnet fields; you can also enter addresses manually.
After a successful submit, the generated (or entered) IPs appear under Networks IP Address (IPAM).
CMP does not validate that mapped IP addresses match the orchestrator VLAN / bridge configuration. Ensure IPs match what is configured on Proxmox for that network.
Enter Private IPs (or IP list)
Optional if Generate IPs / submit already fills the pool. Comma-separated or listed IPs that CMP should track when you enter them manually instead of (or in addition to) generated values.
Status
Required. Set to Active when the network should be usable.
Save / submit to create the CMP network record and generate the IP pool from the subnet fields above.
Update network
Edit an existing imported network from the Networks list (… → Edit or equivalent).
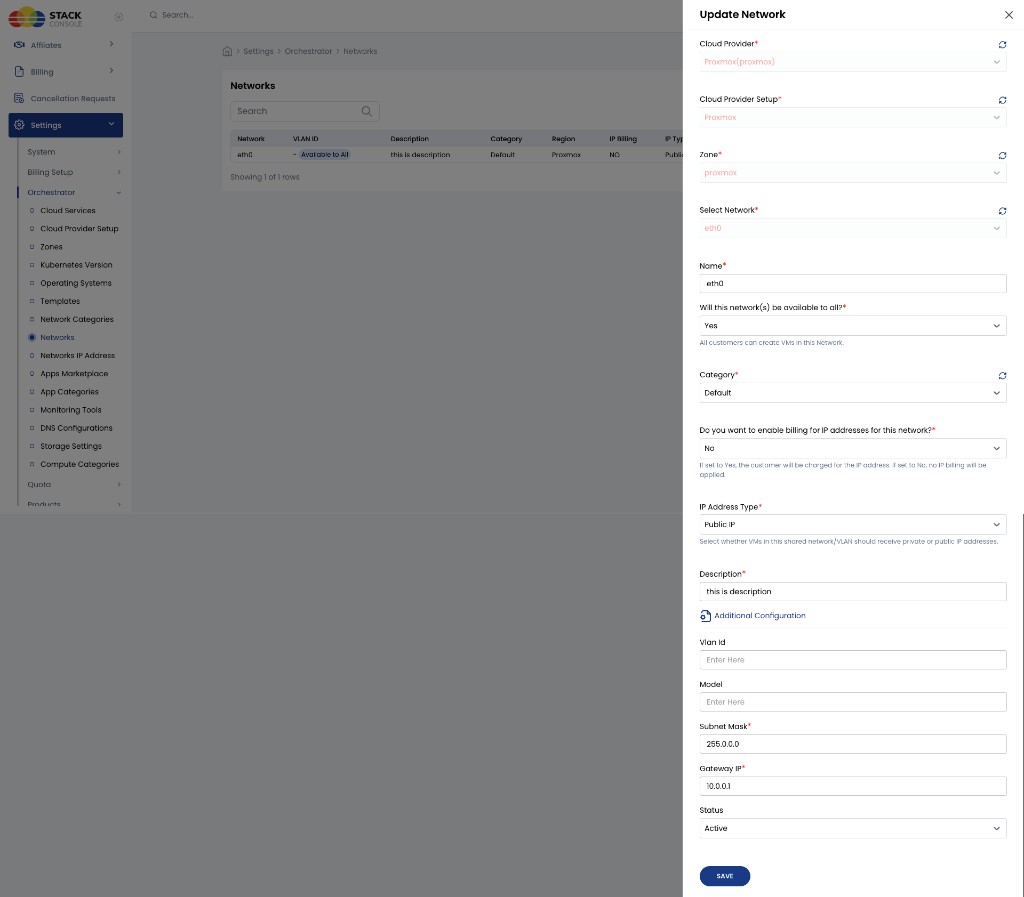
Fields match Import, plus:
Name
Required. Display / CMP name for the network (often the same as the Proxmox interface, for example vmbr0).
You can change availability, category, IP billing, IP type, description, VLAN / model, subnet mask, gateway, and status after import. Re-check IP pools under Networks IP Address if you change the subnet.
Allocate network to a customer (Available to all = No)
When Will this network(s) be available to all? is No, customers do not get the network automatically. An admin assigns it per account.
CMP path: Clients → [Account] → Allocate Networks
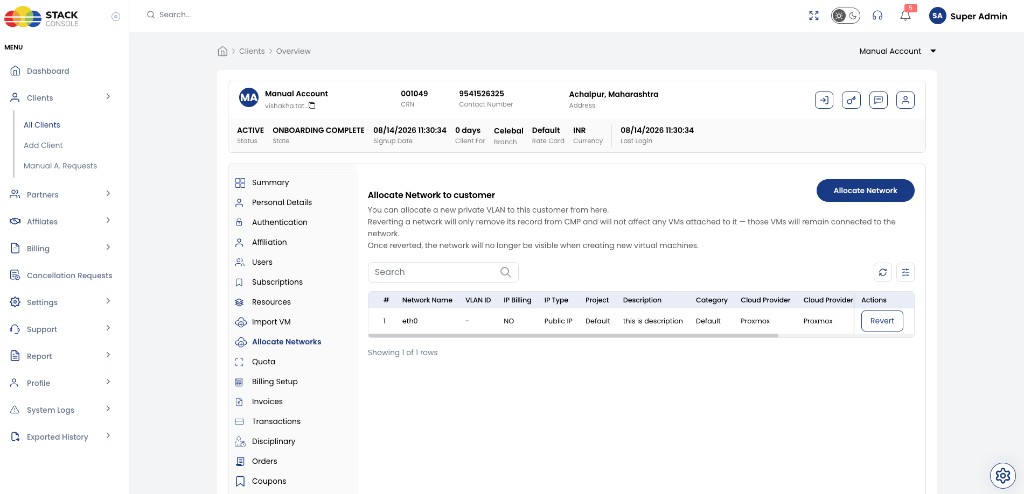
The page lists networks already allocated to that customer. You can allocate a network (for example a private VLAN / bridge) so the customer can use it when creating VMs.
Revert removes the network allocation record from CMP only. It does not affect VMs already attached to that network. After revert, the network is no longer offered when creating new VMs for that customer.
Allocate Network to customer
- Open the customer account → Allocate Networks
- Click Allocate Network
- Complete the drawer and click Import
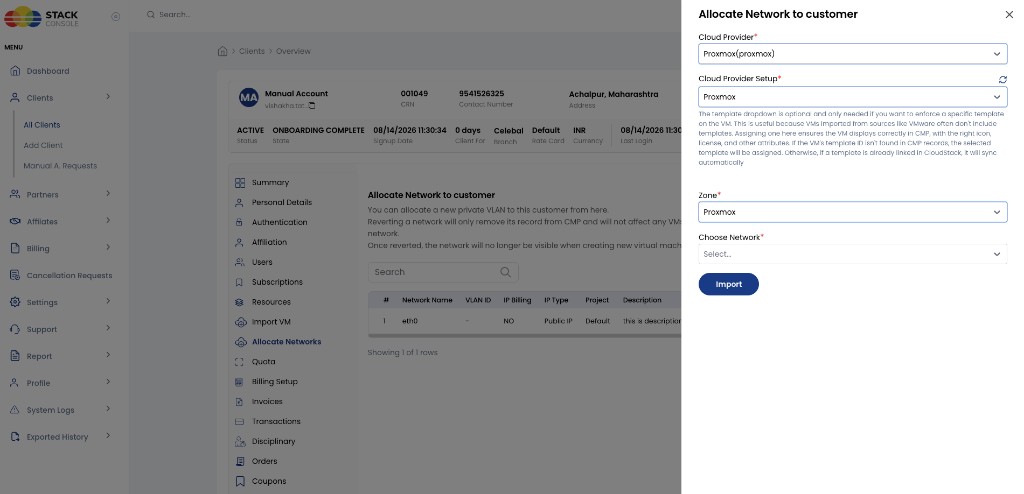
Cloud Provider
Required. Select Proxmox (proxmox).
Cloud Provider Setup
Required. The Proxmox setup that owns the network.
Zone
Required. Zone where the network was imported.
Choose Network
Required. Select the CMP network to assign to this customer (networks imported with Available to all = No, or otherwise eligible for manual allocation).
After Import, the network appears in the allocated list (with project, IP billing, IP type, and Revert).
Networks IP Address (IPAM)
CMP path: Settings → Orchestrator → Networks IP Address
CMP tracks which IPs are Available vs Allocated (and which VM holds an allocated IP).
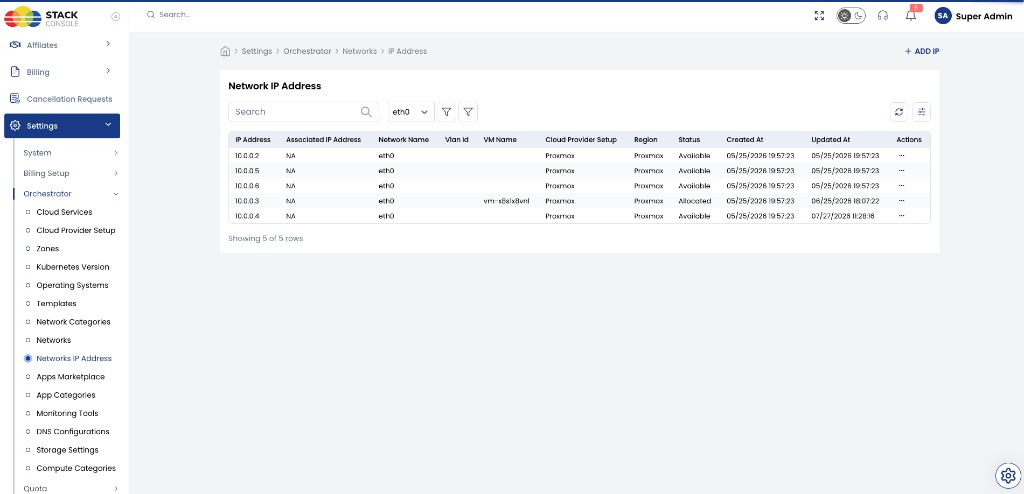
Typical columns:
| Column | Meaning |
|---|---|
| IP Address | Address in the CMP pool (typically the private IP on the Proxmox network) |
| Associated IP Address | Optional public IP shown next to that private IP for customer display (NAT representation). Often NA when unused — see Associated IP Address (NAT representation) |
| Network Name | CMP network (for example vmbr0) |
| VM Name | VM using the IP when Allocated |
| Cloud Provider Setup / Region | Proxmox setup and zone |
| Status | Available or Allocated |
Filter by network (for example vmbr0) to review a single pool.
Associated IP Address (NAT representation)
When the network’s IP pool is private and Proxmox (or an upstream firewall / edge) NATs those private IPs to public IPs, an admin can set Associated IP Address on each private IP row to the matching public address.
| Purpose | Detail |
|---|---|
| What it is for | Representation only in CMP — so the end customer can see which public IP corresponds to their private IP |
| What CMP does | Nothing on the network path — CMP does not create, change, or verify NAT rules |
| Who owns NAT | The administrator (and the Proxmox / firewall / ISP edge configuration) |
Typical flow:
- Import the network and generate/map private IPs (Cidr / Subnet Mask / Gateway IP)
- Configure NAT on Proxmox or an external gateway (outside CMP)
- In Networks IP Address, edit each private IP and enter the public address in Associated IP Address
CMP does not perform NAT or sync NAT mappings from Proxmox. Keeping private ↔ public associations accurate in CMP is an admin task today. Ideas for future automation are on the Proxmox roadmap — Associated IP / NAT mapping.
Add or update an IP
Use + Add IP or edit a row to adjust a single address.
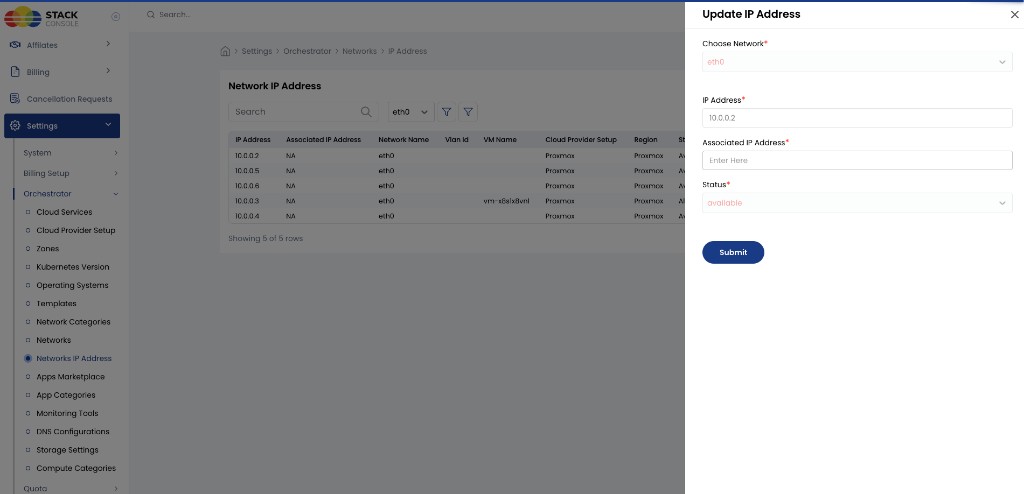
Choose Network
Required. Network that owns this IP (for example vmbr0).
IP Address
Required. The address in the pool (usually the private IP).
Associated IP Address
Optional. Public IP linked to this private IP for display to the customer when NAT is used. Leave empty or NA when there is no public mapping. See Associated IP Address (NAT representation).
Status
Required. For example available when the IP should return to the free pool (subject to whether a VM still holds it).
Related
- Connecting CMP to Proxmox
- IP Address — Configure pricing · Shared Network IP Billing
- Proxmox Requirements — public / private networks on Proxmox
- Upcoming & Roadmap — SDN and backup destinations under development; Associated IP / NAT automation on roadmap
- Node Selection Algorithm
- Orchestrator Features — Proxmox — Networks · IPAM