Connecting CMP to Proxmox
Connect CMP to Proxmox VE so CMP can authenticate to the Proxmox API and provision VMs, storage categories, networks, and related services.
CMP path: Settings → Orchestrator → Provider Setup → Configure
- Proxmox Requirements completed (API reachability on port 8006, templates, networks)
- Proxmox API user in the UserAdmin group (or equivalent) — see Configure Proxmox Permissions
- At least one CMP-compatible template on Proxmox
- CMP Super Admin access
Wizard overview
| Step | Name | Purpose |
|---|---|---|
| 1 | Provider Setup | API endpoint, credentials, services |
| 2 | Provider Config | Realm, permission group, override disk, unused defaults |
| 3 | Zone | CMP zone for this Proxmox setup |
| 4 | Template | Map Proxmox templates into CMP |
| 5 | Storage Setting | Storage categories for packages |
| 6 | Global Quota | Default platform quotas |
| 7 | Success | Finish |
Before the wizard — Proxmox-side prep
Configure Proxmox Permissions
CMP requires a Proxmox user in a group with specific roles. Create the group, assign roles at path /, then add the CMP API user to that group.
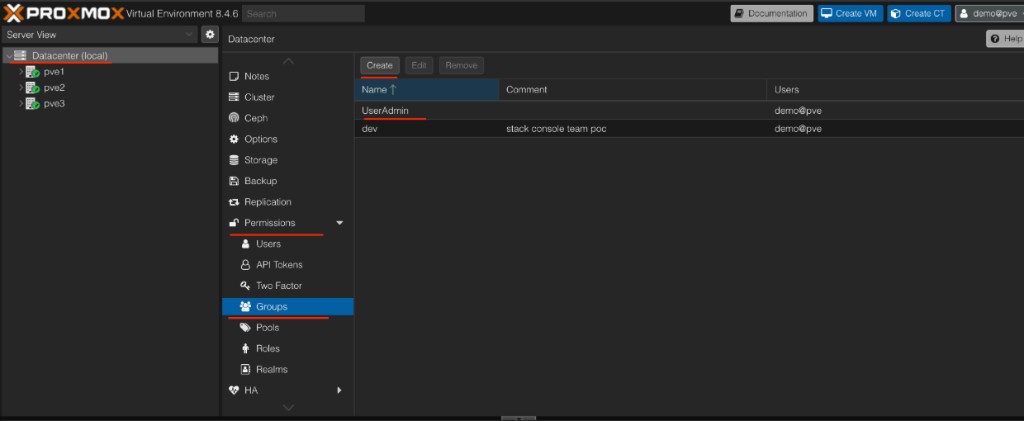
Create a group
- In the Proxmox UI, go to Datacenter → Permissions → Groups
- Select Create
- Create a new group — default name: UserAdmin
Assign group permissions
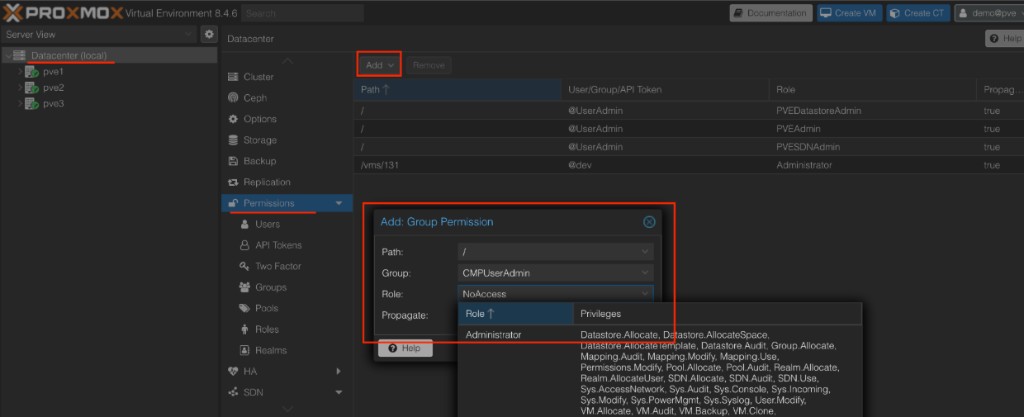
- Go to Datacenter → Permissions
- Select Add → Group Permission
- Configure:
| Field | Value |
|---|---|
| Path | / |
| Group | UserAdmin (or the group name you created) |
| Role | Add each of the roles below (repeat Add if the UI assigns one role per entry) |
| Propagate | Enabled (so permissions apply under /) |
Required roles:
| Role | Purpose |
|---|---|
| PVEVMAdmin | VM allocate, configure, and lifecycle operations |
| PVEDatastoreAdmin | Datastore / storage operations used for disks and templates |
| PVESDNAdmin | SDN / network operations used by CMP |
Assign the CMP user to the group
Add the Proxmox user that CMP will use (realm @pve or your chosen realm) to the UserAdmin group so it inherits the permissions above.
Use that user's username only (without @pve) and password as API Key (Username) and API Secret (Password) in Wizard Step 1.
User realm (for auto-created users)
CMP can auto-create Proxmox users under a realm. Confirm the realm in Datacenter → Permissions → Users (for example pve).
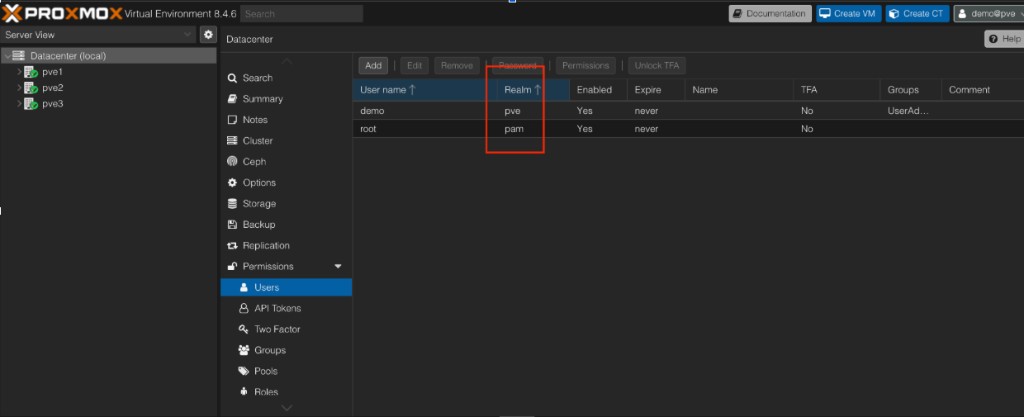
Use that realm value later as Default User Realm on Provider Config.
Proxmox SDN (upcoming version)
Proxmox SDN is not available in CMP yet. It is under development and will be available in an upcoming version. Do not rely on SDN zones or vnets for CMP networking today.
Details: Upcoming — Proxmox SDN.
Current networking uses Proxmox bridges / interfaces mapped in Networks and IPAM. Wizard Step 3 still requires a CMP zone for the provider setup; that is not full SDN product support.
Storage IDs on Proxmox (reference)
In Proxmox, open Datacenter → Storage to see storage IDs such as local and local-lvm.
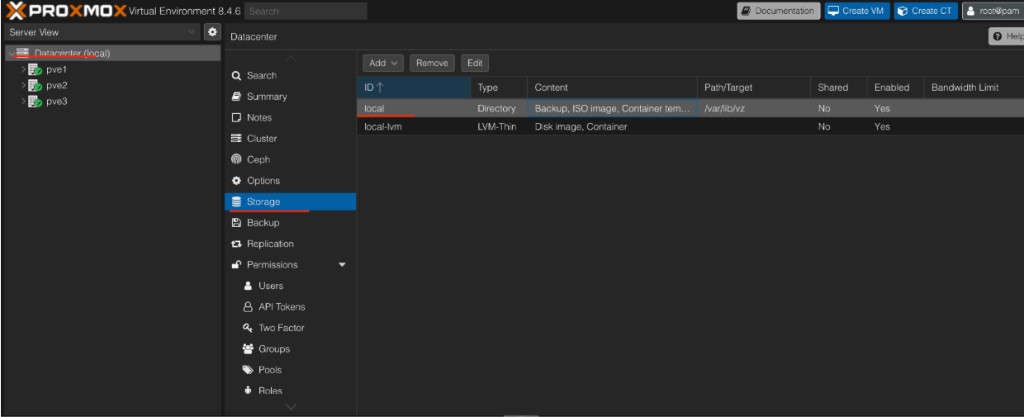
Storage Id on CMP Storage Settings is deprecated. CMP uses the Node Selection Algorithm at provision time to choose the node (and available storage) instead of pinning a fixed Storage Id. You still create storage categories (for example SSD) in Step 5 for packages and customer choice.
Wizard Step 1 — Provider Setup
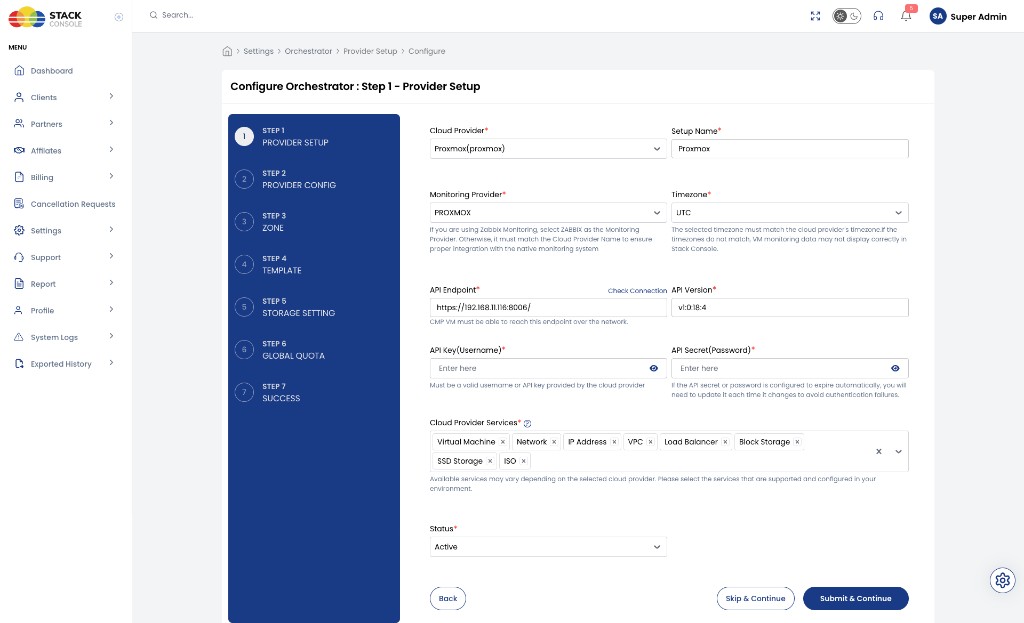
Cloud Provider
Required. Select Proxmox (proxmox).
Setup Name
Required. Display name for this connection (for example Proxmox).
Monitoring Provider
Required. Select PROXMOX so CMP uses native Proxmox monitoring. The value must match the cloud provider for metrics to integrate correctly.
Zabbix is not supported for Proxmox in CMP. It is deprecated. Do not select ZABBIX as the Monitoring Provider.
Timezone
Required. Must match the Proxmox / cloud timezone. Mismatched timezones can break VM monitoring display in CMP.
API Endpoint
Required. Proxmox API base URL, for example:
https://<your-proxmox-host>:8006/
Use Check Connection after entry. The CMP server must reach this host on port 8006.
API Version
Required. Value returned / expected for your Proxmox build (example format: v1.0.18:4).
API Key (Username)
Required. Proxmox username for CMP (member of the UserAdmin group). Example: demo or cmpuser — not cmpuser@pve.
Enter the username only — do not include @pve or any other realm suffix in this field.
| Enter in Provider Setup | Do not enter |
|---|---|
cmpuser | cmpuser@pve |
demo | demo@pve |
CMP combines this username with Default User Realm from Provider Config (for example pve). If you type cmpuser@pve here, authentication fails.
API Secret (Password)
Required. Password for that user. If the password rotates, update this field or API calls fail.
Cloud Provider Services
Required. Multi-select only services you support on this Proxmox cloud (for example Virtual Machine, Network, IP Address, Block Storage, SSD Storage, ISO). Available options depend on the provider.
Status
Required. Set to Active when this setup should be usable.
Click Submit & Continue.
Wizard Step 2 — Provider Config
Configure Proxmox-specific defaults used when CMP creates users and applies permissions.
Default User Realm
Required for auto-created users. Proxmox authentication realm used when CMP creates users — for example pve. Match Datacenter → Permissions → Users → Realm.
Default Permission Group
Required. Same group created in Configure Proxmox Permissions — default UserAdmin. New Proxmox users created by CMP inherit this group.
Default Node
Not in use. Historically the first Proxmox node; placement is handled by the Node Selection Algorithm on multi-node clusters. Leave at the default or ignore.
Default Network ID
Not in use. Leave empty / ignore. Public IP allocation is driven by Networks and IPAM instead.
Default Network Name
Not in use. Leave empty / ignore.
Enable Override Disk Offering
Required / as shown on Provider Config. Controls whether root disk is billed inside the VM package or separately.
| Value | Behaviour |
|---|---|
| Yes (recommended) | Storage is configured separately via Volumes packages (root disk at create, plus optional additional volumes). On VM packages, configure CPU and memory pricing only. |
| No | Root disk size and storage cost are part of the VM package (set Storage (In GB) and include storage in the package price). Volume packages can still be used for additional attachable disks if you offer them. |
- Prefer Enable Override Disk Offering = Yes so compute and storage can be priced and stopped independently (for example stoppable compute vs ongoing storage). Align with Virtual Machine packages — Override disk. Custom package sizing uses Unit Pricing.
Click Submit & Continue.
Wizard Step 3 — Zone
Add at least one CMP zone for this Proxmox setup. Zones are what customers see when provisioning.
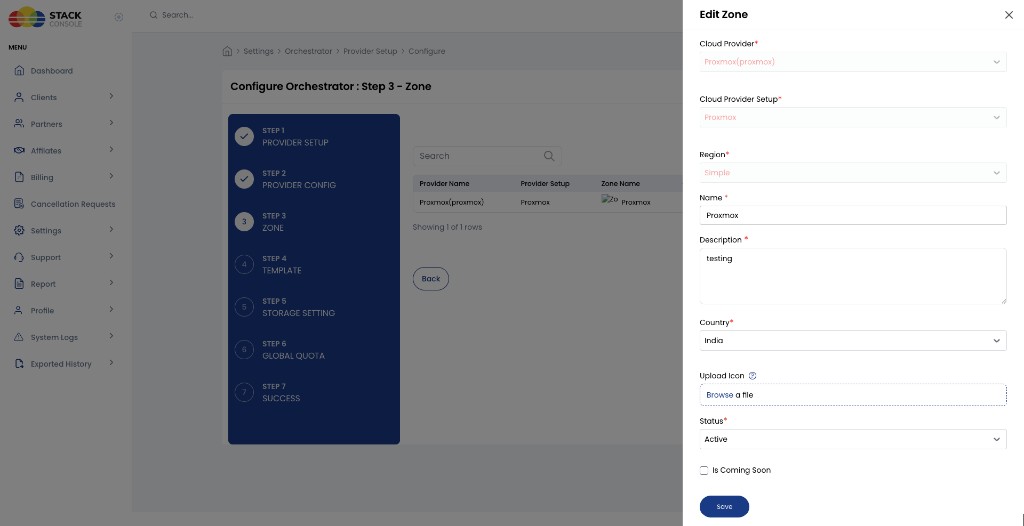
Cloud Provider / Cloud Provider Setup
Required. Proxmox provider and the setup from Step 1.
Region
Required. Select the region / zone value CMP loads for this Proxmox setup (often Simple in the UI). This is a CMP zone mapping field — it is not Proxmox SDN support. SDN is under development for an upcoming version — see Upcoming — Proxmox SDN.
Name
Required. Zone display name (for example Proxmox).
Description
Required. Short description for admins.
Country
Required. Country for this zone.
Upload Icon
Optional. Zone icon in the customer portal.
Status
Required. Active when ready for use.
Is Coming Soon
Optional. Show the zone to customers before it is ready for provisioning. Same behaviour as other orchestrators — see Is Coming Soon.
Save the zone, then click Submit & Continue.
Wizard Step 4 — Template
Map Proxmox templates into CMP. Prepare images first:
👉 Preparing CMP-compatible templates
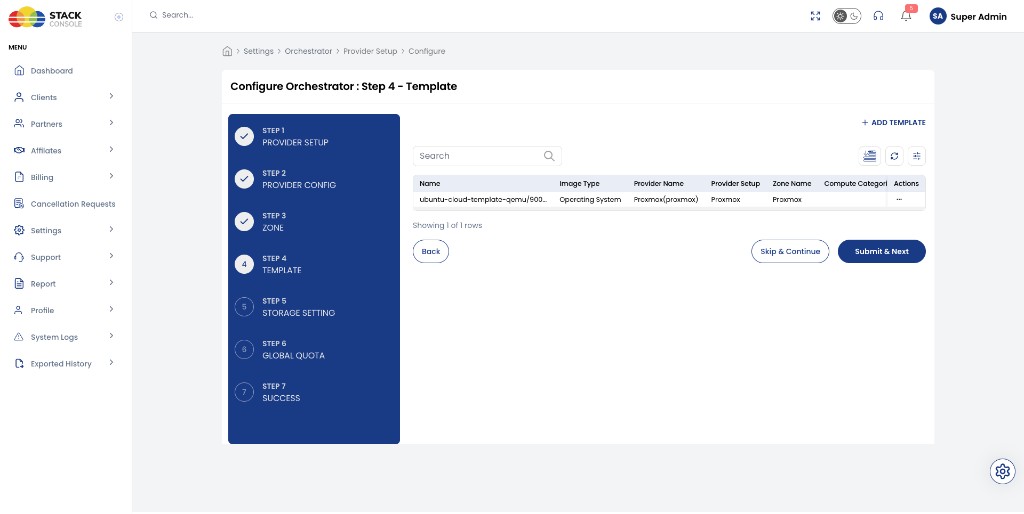
- Click + Add Template (or later: Settings → Orchestrator → Templates)
- Associate with your Proxmox provider, setup, and zone
- Set Template Type to Image — ISO is not supported for Proxmox VM templates in CMP
- Select the specific Proxmox template VM
For Proxmox, use Image (template VM), not ISO, when adding templates in CMP.
Click Submit & Next when templates are listed.
Wizard Step 5 — Storage Setting
Define storage categories customers and packages use (for example SSD Storage).
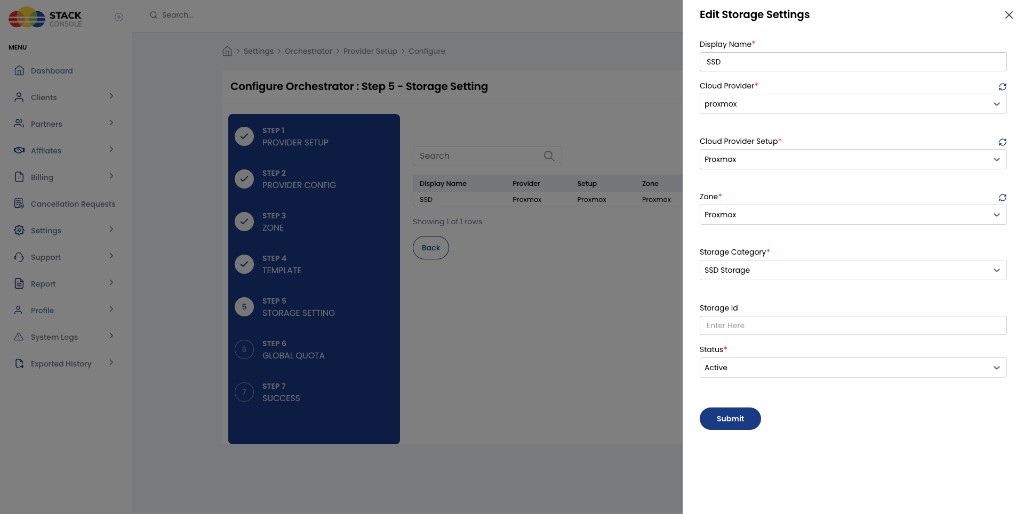
Display Name
Required. Label shown in CMP (for example SSD).
Cloud Provider / Cloud Provider Setup / Zone
Required. Tie this storage setting to the Proxmox setup and zone.
Storage Category
Required. Category used by rate-card packages (for example SSD Storage).
Storage Id
Deprecated — not in use for placement. Do not rely on this field to pin local, local-lvm, or similar. Node and storage selection at provision time uses the Node Selection Algorithm. You may leave it blank or ignore historical values.
Status
Required. Active when ready.
Add one row per storage category you offer. Click Submit & Next.
Wizard Step 6 — Global Quota
Set default global quotas for this Proxmox provider setup (instances, CPU, memory, storage, networks, and so on).
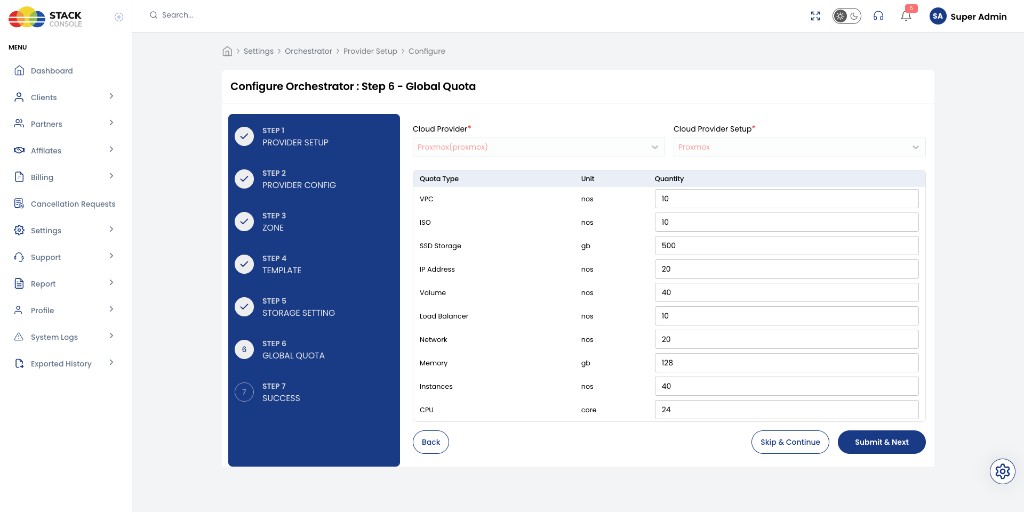
Adjust quantities to match your capacity and commercial limits, then Submit & Next. You can refine quotas later under quota management.
Wizard Step 7 — Success
Confirm the setup completed. The Proxmox cloud provider is ready for package mapping and customer use once templates, storage categories, and networks are complete.
Networking configuration in CMP
Networks and IPAM (categories, import / sync, IP pools) are documented separately:
Related
- Proxmox Requirements — connectivity, checklist
- Preparing CMP-compatible templates
- Networks and IPAM
- Upcoming & Roadmap — SDN and backup destinations under development; Associated IP / NAT automation on roadmap
- Node Selection Algorithm
- Orchestrator Features — Proxmox