Connecting CMP to PowerDNS
This guide walks through connecting CMP to a PowerDNS DNS backend so customers can manage DNS domains through the portal.
In CMP the provider appears as Dns(dns). CMP uses the PowerDNS REST API for zone and record operations.
CMP does not support purchasing or registering domain names. Customers must already own a domain (registered elsewhere) before using CMP DNS.
Supported today: DNS record management for existing domain names — zones and records on your PowerDNS deployment (your infrastructure).
Roadmap: Options to purchase domain names directly from CMP are planned for a future release.
PowerDNS is independent of compute orchestrators (CloudStack, VMware, and others). You can run it alongside any compute setup to offer DNS-as-a-Service.
Complete PowerDNS Requirements first:
- PowerDNS 4.8.3+
- API enabled in
pdns.confwith a strong API key - Web server port reachable from the CMP VM (default 8081)
- Authoritative name servers (for example
ns1.yourcompany.com,ns2.yourcompany.com) ready to add in Provider Config
Overview
CMP admin wizard
        │
        ▼
Provider Setup  ──▶  API endpoint + API key + port + Dns Domain service
        │
        ▼
Provider Config ──▶  Nameservers added to all customer zones
        │
        ▼
Zone mapping    ──▶  CMP zone ↔ DNS region
        │
        ▼
Customers       ──▶  Manage DNS records for existing domains via CMP
| In CMP | On PowerDNS |
|---|---|
| Dns Domain service | Zones and records via REST API |
| Nameservers (Provider Config) | NS records added to customer-created zones |
| Zone mapping | Logical region customers select when creating DNS domains |
Feature documentation for customer DNS flows: DNS Operations (Customer Portal).
Admin setup overview
| Step | Task | Documentation |
|---|---|---|
| 1 | Cloud Services — enable Dns Domain | Step 1 — Cloud Services |
| 2 | Cloud Provider Setup — API endpoint, key, port | Wizard Step 1 — Provider Setup |
| 3 | Provider Configuration — nameservers | Wizard Step 2 — Provider Config |
| 4 | Region mapping — map DNS zone to CMP zone | Wizard Step 3 — Zone |
| 5 | Success — provider ready | Wizard Step 5 — Success |
CMP path: Settings → Orchestrator → Cloud Provider Setup → Add Cloud Provider (or open an existing setup → Configure)
The Cloud Provider wizard covers Steps 2–5 above. Step 1 (Cloud Services) is configured separately.
The wizard may show a Storage Setting step between Zone and Success. Storage Setting does not apply to DNS — use Skip & Continue on that step. DNS uses the Dns Domain service only; there are no storage categories or tiers to configure.
Step 1 — Cloud Services
Enable the Dns Domain service so CMP can provision and manage DNS domains.
Path: Settings → Orchestrator → Cloud Services
Enable Dns Domain for the DNS cloud provider. Keep this aligned with Dns Domain selected in Cloud Provider Setup (Wizard Step 1).
If you change DNS services later, confirm Dns Domain remains enabled in both Cloud Services and Cloud Provider Setup.
Cloud Provider wizard
The wizard shows five screens. For DNS, only these apply:
| Wizard screen | Applies to DNS? |
|---|---|
| 1. Provider Setup | Yes |
| 2. Provider Config | Yes |
| 3. Zone | Yes |
| 4. Storage Setting | No — skip |
| 5. Success | Yes |
Wizard Step 1 — Provider Setup
Establish the connection from CMP to your PowerDNS API.
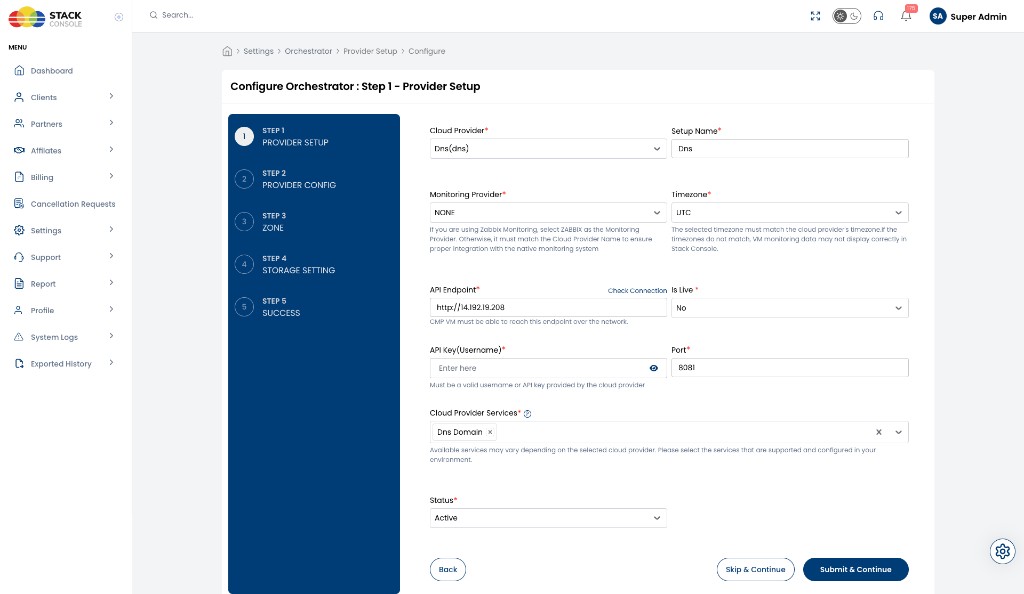
Configure the fields below in the order shown, then click Submit & Continue.
Cloud Provider
Required. Select Dns(dns) from the dropdown.
Setup Name
Required. A unique name for this DNS connection in CMP — for example, Dns.
Monitoring Provider
Required. Select NONE for DNS integrations.
Timezone
Required. Select the timezone that matches the DNS / PowerDNS environment — for example, UTC.
The selected timezone must match the PowerDNS environment timezone.
API Endpoint
Required. Base URL of the PowerDNS host — for example, http://14.192.19.208 or https://dns.yourcompany.com.
The CMP VM must be able to reach this endpoint over the network. Use Check Connection to verify reachability before continuing.
Is Live
Required. Set to Yes when the DNS backend is production-ready, or No during staging / testing.
API Key (Username)
Required. PowerDNS API key from pdns.conf (api-key=…). Must be a valid key provided by the DNS backend.
Generate a strong key on the PowerDNS server — see Generate a secure API key.
Port
Required. PowerDNS web server port — default 8081 (webserver-port in pdns.conf).
CMP appends this port when calling the REST API unless your endpoint URL already includes a port.
Cloud Provider Services
Required. Select Dns Domain.
Available services vary by provider. For DNS integration, Dns Domain must be enabled.
Status
Required. Set to Active to enable this provider, or Inactive to save configuration without making it live.
Click Submit & Continue (or Skip & Continue only if you intentionally defer saving this step).
Wizard Step 2 — Provider Config
Configure nameservers for customer DNS zones.
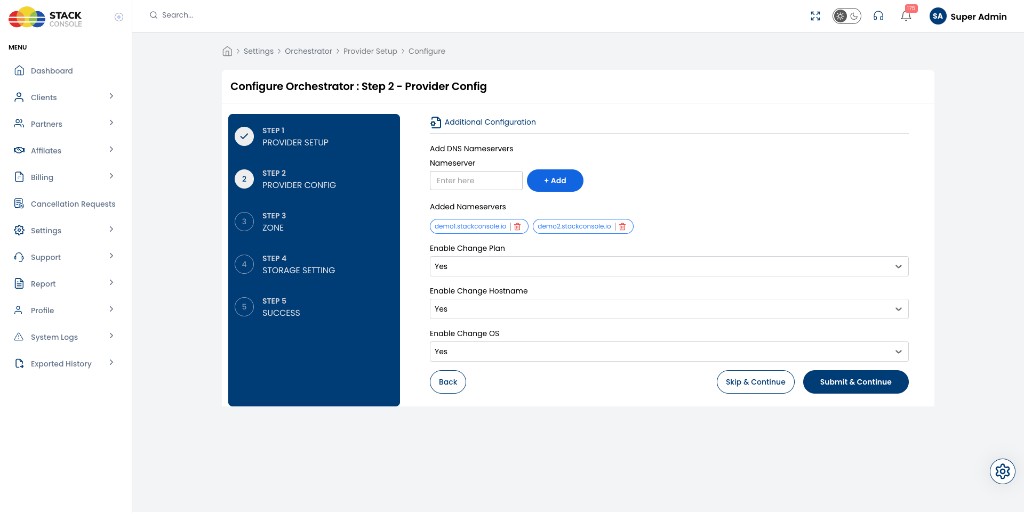
Add DNS nameservers
Nameservers entered here are added to all customer-created zones in CMP.
- Enter each nameserver hostname in Nameserver — for example,
demo1.stackconsole.io - Click + Add
- Repeat for every authoritative NS — for example,
demo2.stackconsole.io
Remove a nameserver with the trash icon on its tag.
These should match the NS hostnames you documented in PowerDNS Requirements — DNS Name Servers.
Click Submit & Continue when all nameservers are added.
Wizard Step 3 — Zone
Map DNS regions to CMP zones so domains are provisioned in the correct location.
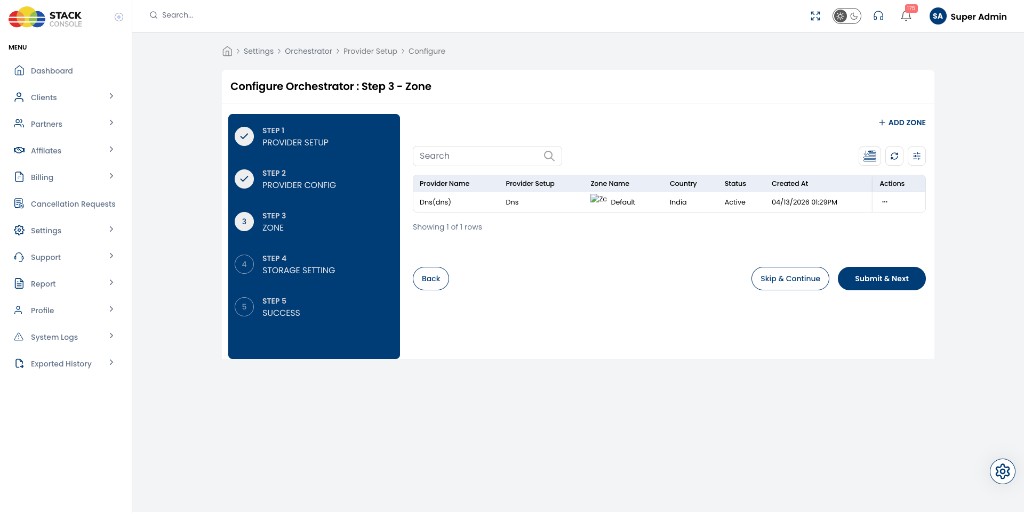
- Click + ADD ZONE
- Configure Zone Name, Country, and Status — for example, Default, India, Active
- Ensure at least one zone is Active
- Click Submit & Next
Zone mapping ensures DNS domains created through CMP are associated with the correct CMP zone / region label shown to customers.
You can also manage zones later under Settings → Orchestrator → Zones.
Storage Setting (skip)
The Storage Setting screen appears in the shared Cloud Provider wizard but does not apply to DNS.
- DNS provisioning uses Dns Domain only — there are no storage categories, tiers, or storage settings to configure.
- Click Skip & Continue to proceed to Success.
Do not add storage settings for the DNS provider unless StackConsole explicitly instructs otherwise for your deployment.
Wizard Step 5 — Success
Confirm the setup completed successfully.
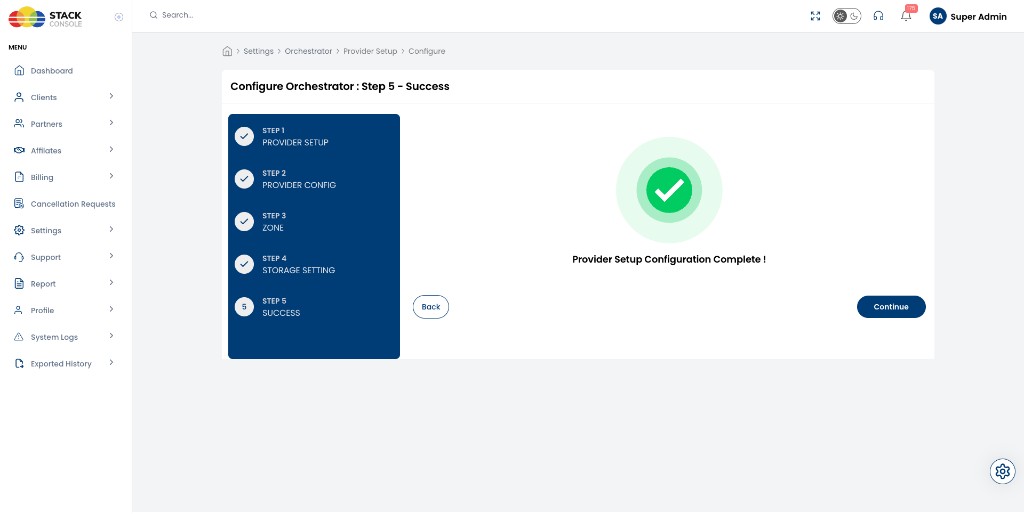
The DNS provider is ready for customer DNS domain management.
Click Continue to return to provider management, or proceed with any remaining billing / package configuration for your DNS product.
Verify the connection
After the wizard, confirm PowerDNS responds from the CMP VM:
curl -s -H 'X-API-Key: YOUR_API_KEY' \
  http://<PDNS_HOST>:8081/api/v1/servers | python3 -m json.tool
A successful response returns server information in JSON. Full checks: PowerDNS Requirements — connectivity verification.