Connecting CMP to OpenStack
Connect CMP to your OpenStack-based cloud so CMP can authenticate (Keystone) and call Nova, Glance, Neutron, Cinder, and related APIs.
CMP uses one OpenStack integration for Upstream OpenStack, RHOSP, Canonical Charmed OpenStack, and VHI. See Supported platforms.
- OpenStack Requirements completed (API reachability, version suffixes, AZ consistency, config values)
- Horizon (or equivalent) access as a user with the admin role on the admin project
- The Keystone (Identity) API endpoint must be reachable from the CMP server
- CMP Super Admin access (for the CMP-side steps)
Which process applies?
| Platform | OpenStack-side prep | CMP-side config |
|---|---|---|
| Upstream OpenStack (2025.1 / Epoxy+) | Part 1 (this page) | Same CMP wizard (documented next) |
| Red Hat OpenStack Platform (RHOSP) | Same as Part 1 | Same as Upstream |
| Canonical Charmed OpenStack | Same as Part 1 | Same as Upstream |
| Virtuozzo Hybrid Infrastructure (VHI) | Different extras (Domain Admin fields) | Documented separately when ready |
Upstream OpenStack, RHOSP, and Canonical Charmed OpenStack use the same Horizon / Keystone preparation and the same CMP connection steps. Complete Part 1 once for whichever of these you deploy.
Why the admin project is required
CMP must use the OpenStack admin project with admin credentials (application credential: admin role + Unrestricted) because that identity performs cloud-level provisioning when customers are registered in CMP.
What admin credentials are used for
After OpenStack is connected in CMP, when a user is registered in CMP, CMP uses the admin connector to create and manage OpenStack resources such as:
- User creation
- Project creation
- Access to zones (availability zones) as needed for setup
- Images (Glance) visibility / association for the tenant
- Flavors availability for the tenant
These operations require admin-level privileges on the admin project. A credential scoped only to a non-admin project cannot onboard tenants correctly.
What happens after the user and project exist
Once CMP has created the OpenStack user and project for that customer, all subsequent customer-triggered API calls use that customer's own credentials — user ID and password — not the admin application credential.
Examples of operations that run as the customer user:
- VM create / manage (Nova)
- Security group create / manage (Neutron)
- Volumes, networks, floating IPs, and other day-to-day resources
CMP registration
       │
       ▼
 Admin connector (admin project + admin / Unrestricted app credential)
       │
       ├── Create OpenStack user
       ├── Create OpenStack project
       └── Wire zones / images / flavors as required
       │
       ▼
 Customer user ID + password
       │
       └── All later API calls (VM, SG, volumes, …)
- Admin connector — tenant onboarding and cloud setup only (admin project).
- Customer credentials — every ongoing workload API call after the user and project exist.
Do not create the CMP application credential under any project other than admin.
Part 1 — Prepare OpenStack (Upstream / RHOSP / Canonical)
Before adding the cloud provider in CMP, collect the Keystone API endpoint and create an application credential with the admin role and Unrestricted enabled on the admin project.
Step 1 — Collect the Keystone (Identity) API endpoint
CMP authenticates through Keystone. You need the Identity service endpoint from OpenStack, and that URL must be reachable from the CMP server (not only from your laptop).
- Log in to Horizon as an admin user.
- In the project switcher, select the admin project only — do not use any other project for the CMP connector.
- Go to Project → API Access.
- In the service list, find Identity and copy the Service Endpoint (Keystone).
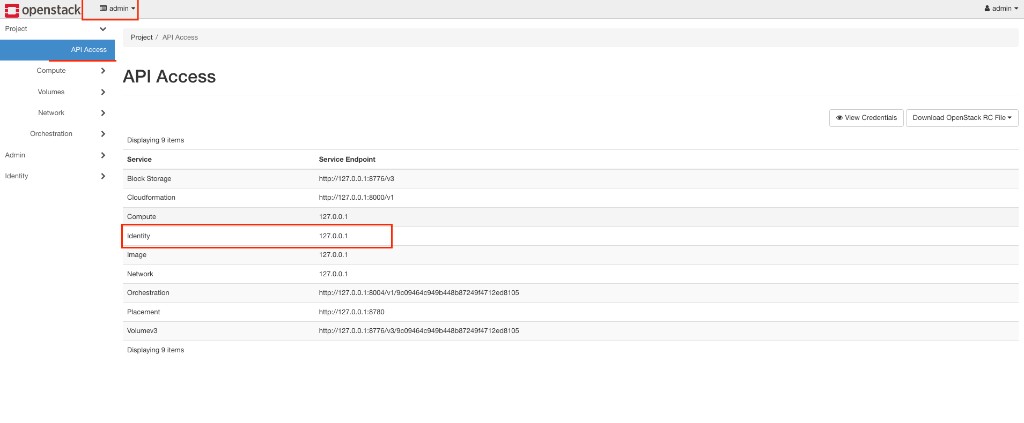
The Keystone URL must resolve and respond from the CMP server (private IP, public URL, or service domain — see OpenStack Requirements). Endpoints that only work as 127.0.0.1 on the controller are not usable by CMP unless you publish a CMP-reachable address for Keystone.
Horizon API Access also lists Compute, Network, Image, Block Storage / Volumev3, Placement, and others. CMP discovers those from the service catalog after Keystone auth. You still need those APIs reachable from CMP — but the value you enter first for connection is the Keystone / Identity endpoint.
Step 2 — Create an application credential
Use an application credential so CMP does not store a long-lived Horizon user password. Create it while the admin project is selected — not any other project.
- Confirm the project switcher shows admin.
- In Horizon, go to Identity → Application Credentials.
- Click Create Application Credential.
- Fill in the form as below, then click Create Application Credential.
Form fields
Name
Required. Display name for the credential. Recommended: CMP Connector.
Description
Optional. Short description. Recommended: CMP Connector.
Secret
Optional. You may set your own secret, or leave empty so Horizon generates one. The secret is shown only once after creation — store it securely. If you lose it, create a new application credential.
Expiration Date / Expiration Time
Optional. Leave empty for a non-expiring (lifetime) credential — recommended for production CMP.
If you set an expiration date/time (UTC), you must rotate/update the credential in CMP before it expires. After expiry, CMP authentication fails and the cloud provider stops working until you create a new credential and update CMP.
Roles
Required for CMP. Select admin.
You may leave other roles unselected. If you select none, Horizon applies all roles you have on the current project — still ensure the credential effectively has admin for CMP.
Access Rules
Optional. Leave empty unless you intentionally restrict API paths. Fine-grained rules can break CMP operations.
Unrestricted (dangerous)
Required for CMP. Enable (checked).
By default, application credentials cannot create additional application credentials or Keystone trusts. CMP needs Unrestricted so the connector can perform the full set of identity and project operations required for multi-tenant management.
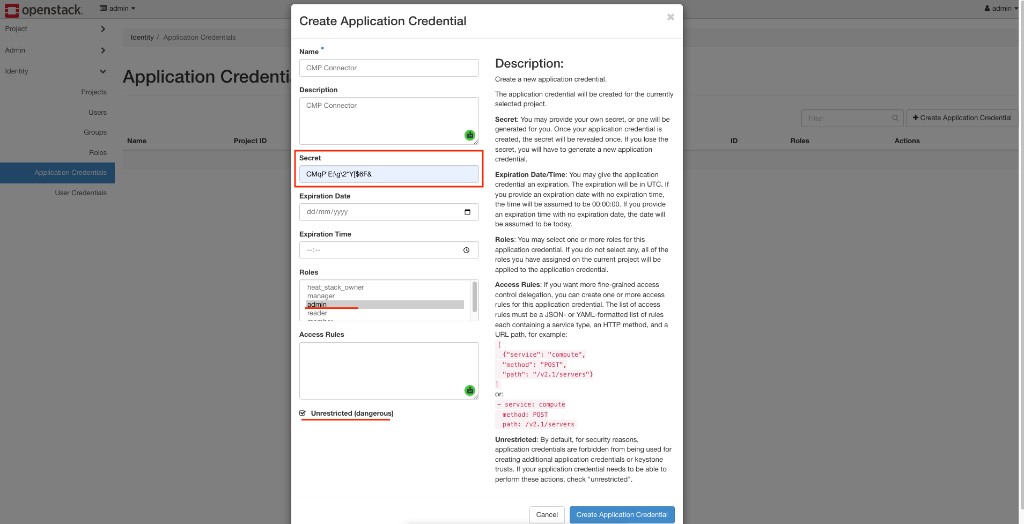
Example values
| Field | Example / guidance |
|---|---|
| Name | CMP Connector |
| Description | CMP Connector |
| Secret | Your own strong secret, or leave blank to auto-generate |
| Expiration Date / Time | Empty (lifetime) — or a future UTC date you will rotate before |
| Roles | admin selected |
| Access Rules | Empty |
| Unrestricted | Enabled |
-
After creation, copy and store:
- Application credential ID (and/or name, as required by CMP)
- Application credential Secret (shown once)
Always use the admin project — never another project — when collecting the Identity endpoint and creating the CMP application credential. Use the admin role and enable Unrestricted.
Why: CMP needs admin privileges to create OpenStack users and projects (and related setup) at registration. After that, day-to-day APIs use the customer's user ID and password. See Why the admin project is required.
Part 2 — Configure OpenStack in CMP
CMP path: Settings → Orchestrator → Provider Setup → Configure (Add / edit OpenStack cloud provider)
The wizard has seven steps. This section documents Step 1 — Provider Setup for Upstream OpenStack, RHOSP, and Canonical Charmed OpenStack (same fields). Leave Is VHI unchecked for these platforms.
| Step | Name | Status in docs |
|---|---|---|
| 1 | Provider Setup | Documented below |
| 2 | Provider Config | Documented below |
| 3 | Zone | Documented — see Wizard Step 3 and Regions & Availability Zones |
| 4 | Template | Documented — see Wizard Step 4 and Configuring images in CMP |
| 5 | Storage Setting | Coming next |
| 6 | Global Quota | Coming next |
| 7 | Success | Coming next |
Before Step 1, complete Part 1: Keystone Identity URL (reachable from the CMP server) and the admin project application credential ID + secret.
Wizard Step 1 — Provider Setup
Establishes the core connection between CMP and OpenStack (Keystone auth and enabled services).
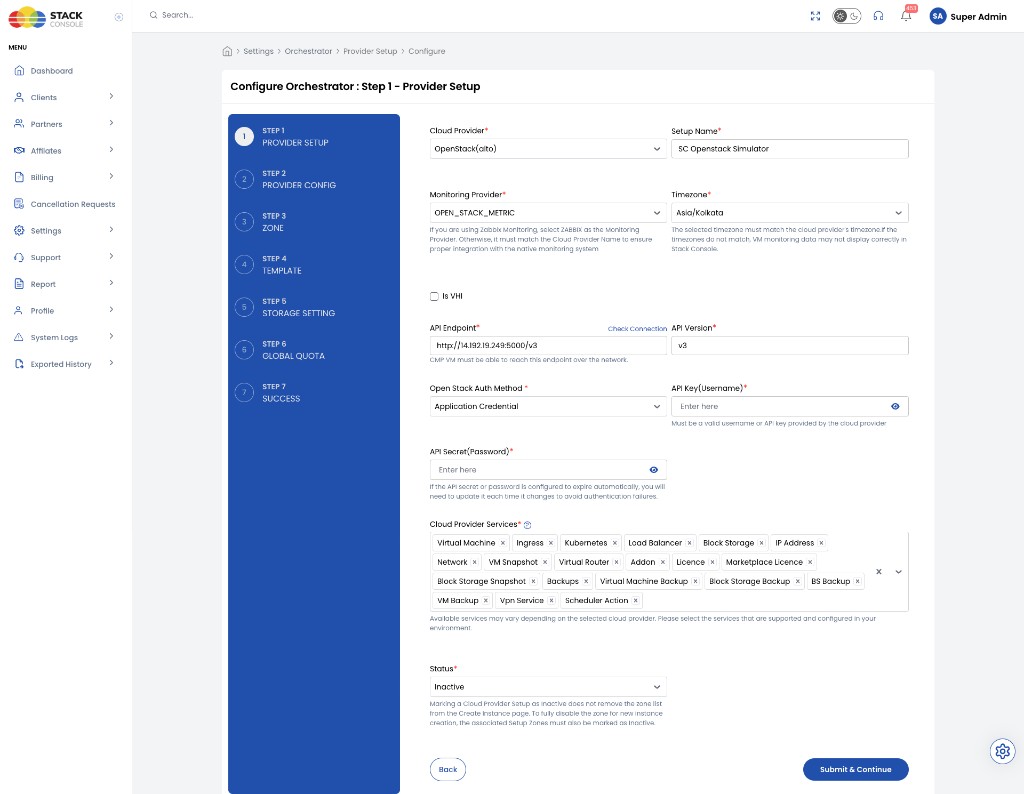
Form fields
Cloud Provider
Required. Select OpenStack (may appear as OpenStack (alto) or a similar internal alias — same provider).
Setup Name
Required. Unique name for this cloud provider setup in CMP (for example SC Openstack Simulator or Prod-OpenStack). Used to distinguish multiple OpenStack setups.
Monitoring Provider
Required. Select OPEN_STACK_METRIC so CMP uses the native OpenStack monitoring integration. The value must match the OpenStack cloud provider monitoring option for metrics to integrate correctly.
Zabbix is not supported for OpenStack in CMP. It is deprecated. Do not select ZABBIX as the Monitoring Provider.
Timezone
Required. Must match the OpenStack cloud / controller timezone (for example Asia/Kolkata). If it does not match, VM monitoring data may not display correctly in Stack Console.
Is VHI
Optional. Leave unchecked for Upstream OpenStack, RHOSP, and Canonical Charmed OpenStack.
Enable Is VHI only for Virtuozzo Hybrid Infrastructure (VHI) deployments. VHI uses additional Domain Admin–related settings documented with the VHI connection flow.
API Endpoint
Required. Keystone (Identity) URL collected in Part 1 — for example https://keystone.example.com:5000/v3 or http://<host>:5000/v3.
Use Check Connection to verify the CMP VM can reach this endpoint over the network before continuing.
The CMP server must reach this endpoint. A Horizon URL that only works as 127.0.0.1 on the controller is not valid for CMP unless you expose a CMP-reachable Keystone address.
API Version
Required. Keystone API version. Use v3.
Open Stack Auth Method
Required. Select Application Credential for Upstream / RHOSP / Canonical when using the Part 1 application credential.
API Key (Username)
Required. For Application Credential auth: enter the application credential ID from Horizon (Part 1, Step 2). Despite the “Username” label, this is the application credential identifier when that auth method is selected.
API Secret (Password)
Required. Application credential secret from Part 1 (shown only once in Horizon). Store it securely.
If the application credential secret or password is set to expire, update this field in CMP before expiry or authentication fails. Prefer a non-expiring credential for production — see expiration guidance.
Cloud Provider Services
Required. Multi-select the services that are supported and configured on your OpenStack cloud. Only enabled services are offered to customers in CMP. Available options depend on the cloud provider; select only what you actually run.
Typical OpenStack-related services include (enable as applicable):
| Service | Notes |
|---|---|
| Virtual Machine | Nova compute |
| Network | Neutron |
| IP Address | Floating / public IPs |
| Block Storage | Cinder volumes |
| Block Storage Snapshot | Cinder volume snapshots |
| VM Snapshot | Instance snapshots (if supported) |
| Load Balancer | Octavia (if deployed) |
| Kubernetes | Magnum (if deployed) |
| Virtual Router | Routing / VR features if exposed in CMP for this cloud |
| Ingress | If used in your environment |
| Backups / Virtual Machine Backup / Block Storage Backup / BS Backup / VM Backup | Enable only if the matching backup capability is configured |
| Vpn Service | If VPN is offered |
| Scheduler Action | Scheduled start/stop/reboot |
| Addon / Licence / Marketplace Licence | Marketplace / licence add-ons if used |
You can enable additional services later by editing the provider. Prefer enabling only services that are ready in OpenStack so customers do not see broken catalogue items.
Status
Required.
| Value | Behaviour |
|---|---|
| Active | Provider is live — customers can use mapped zones/packages for new instances (after later wizard steps are complete) |
| Inactive | Zones are not removed, but new instance creation through this provider is blocked |
Set Active when you are ready to proceed with the remaining wizard steps for a production or test setup.
Finish Step 1
- Fill all required fields and paste the application credential ID and secret.
- Click Check Connection and confirm success.
- Click Submit & Continue to open Step 2 — Provider Config.
Wizard Step 2 — Provider Config
Additional Configuration for OpenStack-specific CMP behaviour. Same fields for Upstream OpenStack, RHOSP, and Canonical Charmed OpenStack.
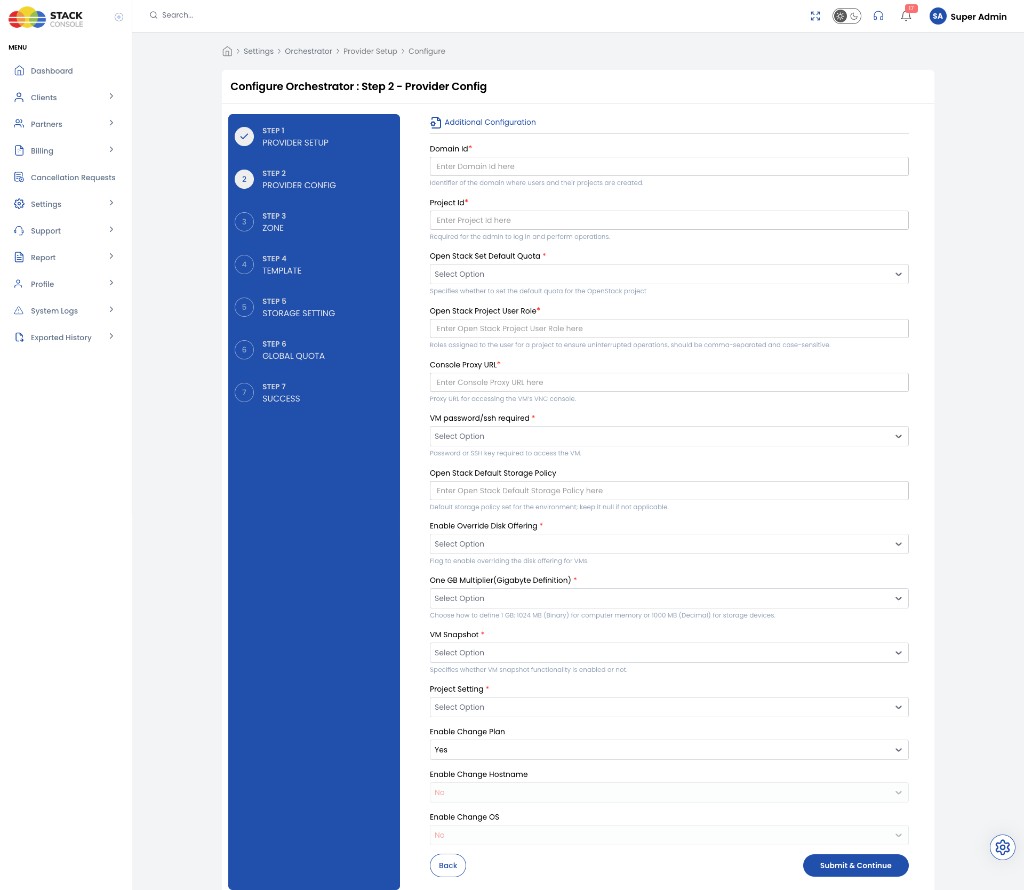
Collect domain_id, project_id, and related values from OpenStack before this step — see Configuration Values Required for CMP.
Form fields
Domain Id
Required. Identifier of the Keystone domain where CMP creates users and their projects. Corresponds to domain_id in the requirements list.
How to find Domain Id in Horizon
- Log in to Horizon as admin, with the admin project selected.
- Go to Identity → Users.
- Open the admin user.
- On the user Overview tab, copy Domain ID.
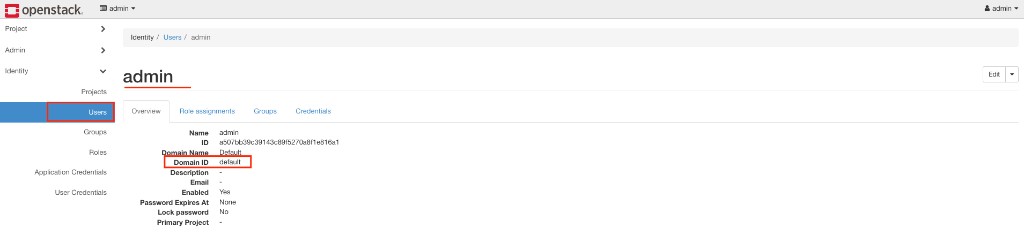
On many Upstream / RHOSP / Canonical clouds the Domain ID is default (as shown above). Always copy the value from the admin user details for your environment — do not assume another domain.
Project Id
Required. OpenStack project ID for the admin connector (the admin project used in Part 1). Required for the admin identity to log in and perform onboarding operations. Corresponds to project_id.
The admin user must have a Primary Project set (the admin project). Without a primary project, admin operations through the OpenStack APIs fail — CMP cannot use the connector correctly even if Domain Id and application credentials look valid.
How to check and set Primary Project
- In Horizon, go to Identity → Users and open the admin user.
- On Overview, check Primary Project.
If it shows - (empty), the primary project is not assigned:
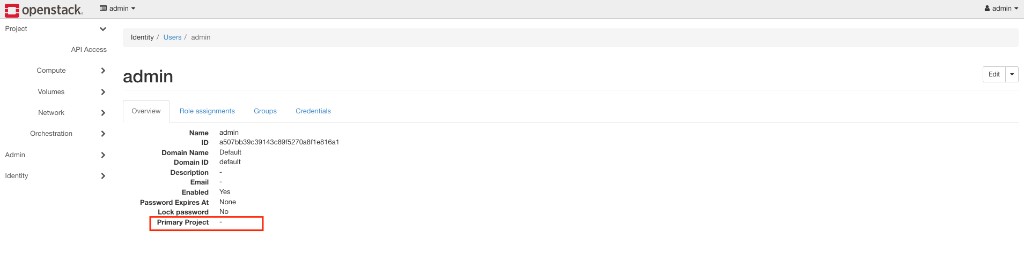
- Click Edit.
- Set Primary Project to admin.
- Click Update User.
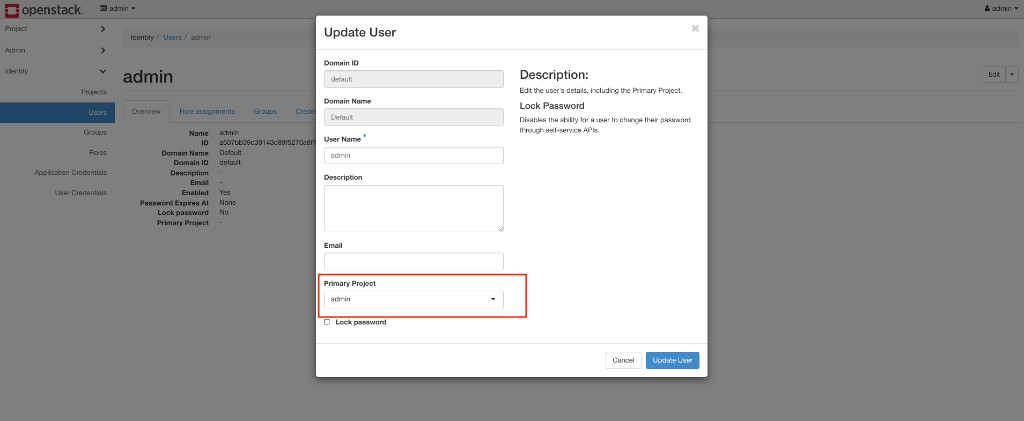
How to copy Project Id for CMP
After the primary project is admin (or already was):
- Go to Identity → Projects.
- Open the admin project.
- On Overview, copy the project ID into CMP Project Id.
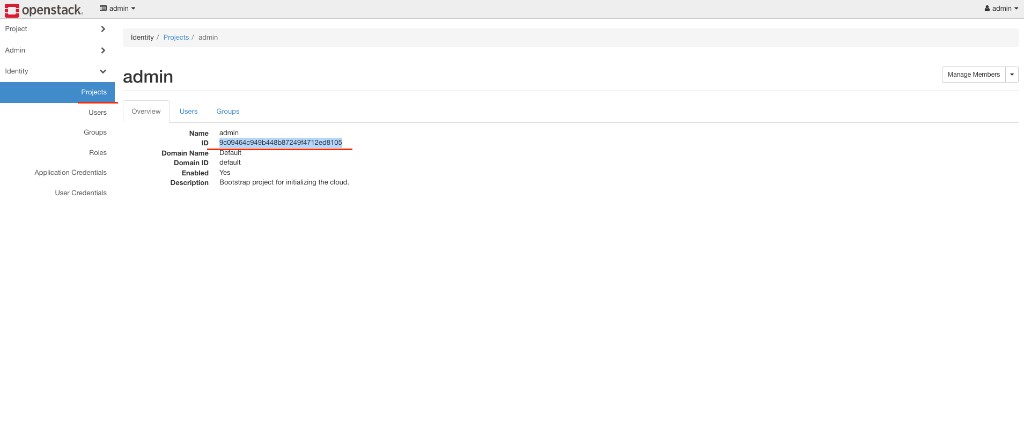
Open Stack Sync Default Quota
Required. Whether CMP syncs project quota between CMP and OpenStack. UI helper text: Specifies whether to set the default quota for the OpenStack project.
When a customer project is created in CMP, CMP creates the matching OpenStack project (one-to-one mapping). Quota can then work in two ways:
| Approach | Behaviour |
|---|---|
| Manage at CMP only | Keep OpenStack project quotas effectively unlimited (or unmanaged); enforce limits in CMP |
| Sync CMP ↔ OpenStack | When quota is set or updated in CMP, the same limits are applied on the OpenStack project |
| Value | Behaviour |
|---|---|
| Yes | Recommended. Sync CMP project quota with the OpenStack project — updates in CMP are pushed to OpenStack |
| No | Do not sync — manage quotas primarily in CMP and leave OpenStack defaults / unlimited as configured |
Set Open Stack Sync Default Quota to Yes so CMP and OpenStack stay aligned and OpenStack-side limits do not silently block provisioning after you change quotas in CMP.
See also Quota Management.
Open Stack Project User Role
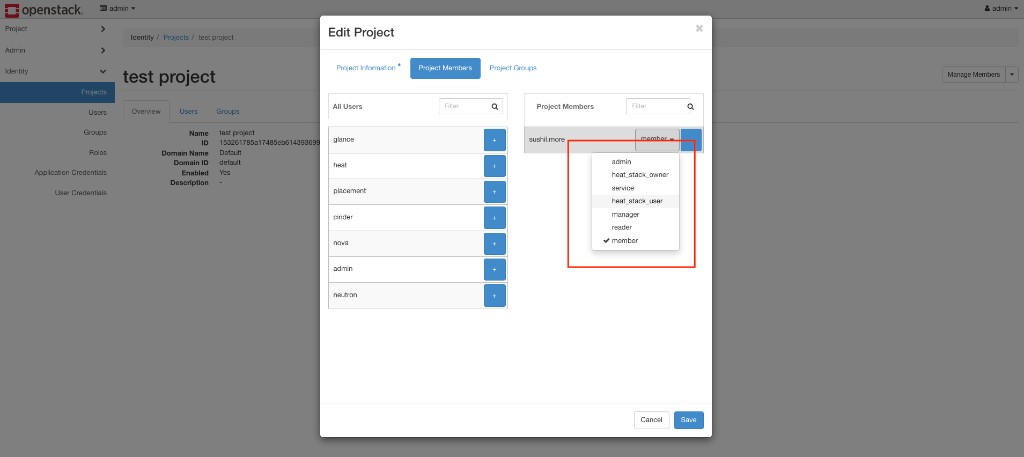
Required. Role(s) CMP assigns to the customer user on their OpenStack project when that project is created (user ↔ project membership). Enter comma-separated, case-sensitive role names exactly as they appear in OpenStack.
Whenever CMP creates a new project for a user and assigns the user to that project, these roles are applied so day-to-day API calls (VM, network, and so on) succeed. Corresponds to open_stack_project_user_role.
How to decide which roles to enter
Include every role required for the services you offer in CMP for this cloud. If a service is enabled but the matching role is missing, customer operations for that service can fail.
| Role (examples) | When needed |
|---|---|
member | Required — baseline project member for normal compute / network / volume operations |
loadbalancer_member (or observer / load-balancer member role as named in your cloud) | When you offer Load Balancer (Octavia) |
heat_stack_owner / Heat orchestrator role (as named in your cloud — for example heat orchestrator) | When you offer Kubernetes / Heat-orchestrated workloads |
At minimum set member. Add further roles only for services you actually enable under Cloud Provider Services (Step 1).
Example
member,loadbalancer_member,heat_stack_owner
Use the exact role names from your OpenStack deployment (names vary by distribution and policy). Virtuozzo (VHI) may need additional roles — see requirements and VHI connection notes.
Where to see available roles in Horizon
- Go to Identity → Projects and open a project (or edit project members).
- On Project Members, open the role dropdown for a user — the list shows roles available in that cloud.
Console Proxy URL
Deprecated — not in use. This field remains on the form for older setups but is not used by current CMP OpenStack console access. You can leave it empty or ignore any existing value; console connectivity does not depend on this setting.
Console Proxy URL is deprecated and unused. Do not treat it as a required operational setting for Upstream / RHOSP / Canonical OpenStack.
VM password/ssh required
Required. Whether password and/or SSH key is required when customers access or provision VMs.
Select the option that matches your image / cloud-init policy (password injection, SSH key, both, or none). Images must support the method you require — see Preparing CMP-compatible images.
Open Stack Default Storage Policy
Optional — backward compatibility. Default volume type (storage policy) for storage operations when a single default is enough. Leave empty / null if not applicable. Corresponds to open_stack_default_storage_policy.
If your OpenStack cloud has multiple volume types and you want one default for storage operations, enter that volume type’s ID or name:
| How you enter it | Guidance |
|---|---|
| Name | Must match the volume type name in OpenStack exactly (case-sensitive) — for example SSD Storage Pool or NVMe Storage Pool |
| ID | Obtain the volume type ID from the OpenStack CLI (Horizon lists names; IDs are typically retrieved via CLI) |
Where to see volume type names in Horizon
Admin → Volume → Volume Types — copy the Name if you configure this field by name.
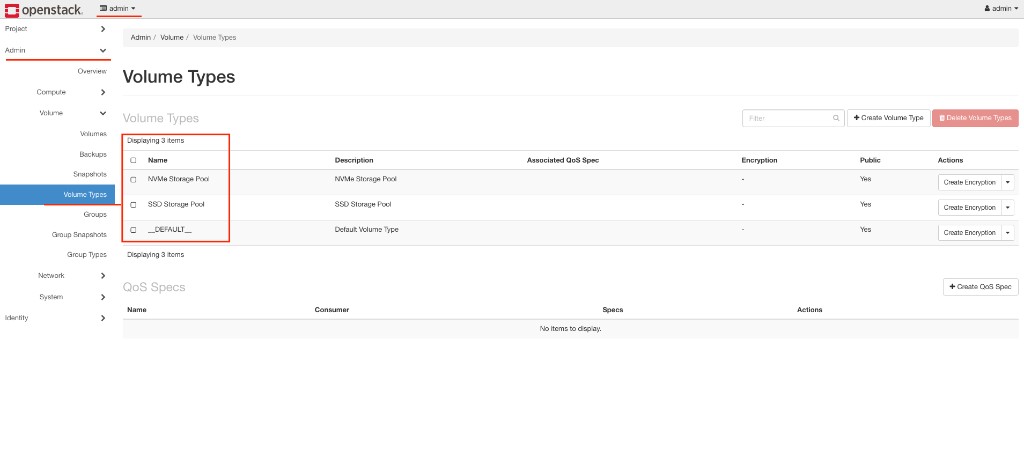
This provider-config default is optional and mainly for backward compatibility. If you have more than one storage type (SSD, NVMe, HDD, and so on), configure them in wizard Step 5 — Storage Setting. End users can then choose the storage they need at provisioning time. See Storage Settings.
Enable Override Disk Offering
Required. Recommended value: Yes.
Flag to enable overriding the disk (root volume) offering for VMs — customers select storage separately from the Nova flavor at provisioning.
| Value | Behaviour |
|---|---|
| Yes | Recommended. Flavor root disk size is ignored (or use 0 on the flavor). CMP shows a separate option to select storage / root disk. |
| No | Root disk follows the size embedded in the OpenStack flavor; no separate storage selection for override |
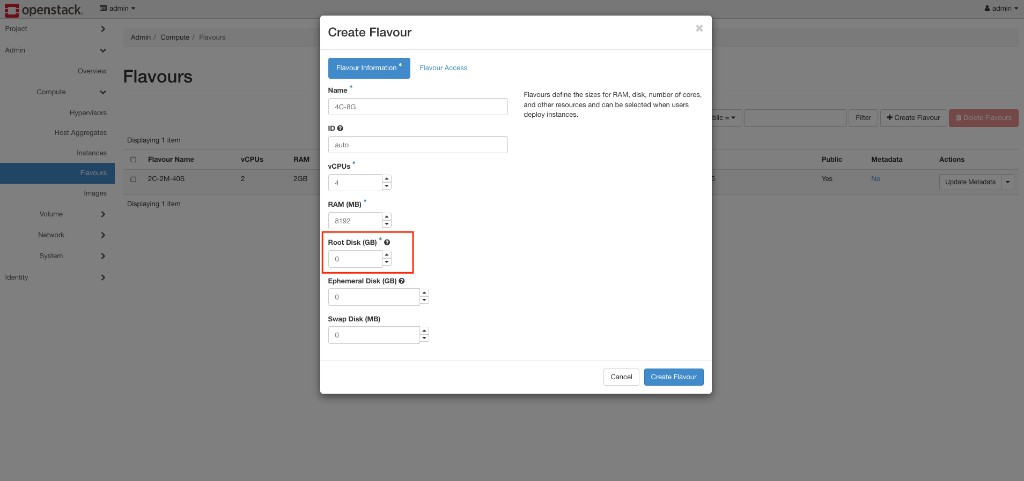
OpenStack flavor guidance when override is Yes
When Enable Override Disk Offering is Yes:
- At flavor create time in OpenStack (Admin → Compute → Flavors), set Root Disk (GB) to
0, or - If the flavor already has a non-zero root disk, that size is ignored by CMP while override is enabled — CMP still presents separate storage selection
Why Yes is recommended
- Stoppable services billing — compute (CPU/RAM) can pause when a VM is stopped only when storage is not bundled inside the compute flavor/package. Override disk keeps compute and storage separable so stoppable billing works as designed.
- Upgrade / downgrade — changing CPU and memory (plan/package resize) is simpler when disk is not locked into the flavor; customers resize compute without being tied to an embedded root disk size.
- Flexible storage — end users pick volume type / size via CMP storage options and Storage Settings / Volume packages.
Choose Yes or No during initial provider setup before production VM packages go live. Switching models later is difficult. Full package mapping: Virtual Machine packages.
One GB Multiplier (Gigabyte Definition)
Required. How CMP defines 1 GB for size calculations on this provider.
| Value | Meaning |
|---|---|
| 1024 | Binary (1 GB = 1024 MB) — common default; see requirements |
| 1000 | Decimal (1 GB = 1000 MB) — storage-device style accounting |
CMP uses this multiplier when converting storage sizes — for example, rate card / package storage is entered in GB, and CMP uses this unit when converting to TB (and related storage math) so billing and display stay consistent.
Match the value to how your OpenStack environment and packages should treat gigabytes. Corresponds to one_gb_multiplier.
VM Snapshot
Required. Whether VM / instance snapshot functionality is enabled for this provider in CMP.
| Value | Behaviour |
|---|---|
| Yes | Customers can use VM snapshot features if OpenStack and your packages support them |
| No | VM snapshot is disabled in CMP for this setup |
Enable only if your hypervisor / storage backend supports instance snapshots reliably.
Project Setting
Required. For OpenStack, use Under Project only — that is the supported (and default) mode. There is no other project-mapping option for OpenStack in CMP.
With Under Project, when a customer creates a project in CMP, CMP creates the matching project in OpenStack — one-to-one mapping.
| Value | Behaviour |
|---|---|
| Under Project | Only supported mode for OpenStack. CMP project ↔ OpenStack project one-to-one; creating a project in CMP creates the same project in OpenStack |
This matches the registration and credential model: admin connector creates the OpenStack project; later APIs use the customer user on that project. See Client Registration Flow and Projects & Credentials.
Enable Change Plan
Required. Controls whether the change plan feature is available for this OpenStack cloud provider / setup. The flag is orchestrator- and provider-specific — it applies only to this provider configuration, not globally across all clouds in CMP.
| Value | Behaviour |
|---|---|
| Yes | Customers can change plan (package) for existing services under this provider |
| No | Change plan is disabled for this provider — use this to turn off plan changes for this OpenStack setup only |
Set No when you need to disable change plan for this orchestrator/provider without affecting other cloud providers.
Enable Change Hostname
Read-only for OpenStack. Changing the VM hostname after create is not supported for OpenStack in CMP. The value is No by default and cannot be changed by the admin.
| Value | Behaviour |
|---|---|
| No | Fixed — customers cannot change hostname on an existing VM from the portal for this OpenStack provider |
Enable Change OS
Read-only for OpenStack. Change OS / image on an existing VM is not supported for OpenStack in CMP. The value is No by default and cannot be changed by the admin.
| Value | Behaviour |
|---|---|
| No | Fixed — customers cannot change OS/image on an existing VM from the portal for this OpenStack provider |
Enable Change Hostname and Enable Change OS are both fixed at No for OpenStack — leave them as shown.
Finish Step 2
- Confirm the admin user has Primary Project = admin, then enter Domain Id and Project Id.
- Set Open Stack Project User Role (at least
member, plus roles for LB / Heat / Kubernetes if offered), quotas, disk/snapshot, and Enable Change Plan as needed. Ignore Console Proxy URL (deprecated). Leave Enable Change Hostname and Enable Change OS as No (read-only). - Click Submit & Continue to open Step 3 — Zone.
Wizard Step 3 — Zone
Add at least one CMP zone mapped to an OpenStack region (and availability zone if used) before continuing.
CMP path (anytime): Settings → Orchestrator → Zones → Add Zone
Full field reference (including Coming Soon, Status, icons — same patterns as CloudStack): Regions & Availability Zones.
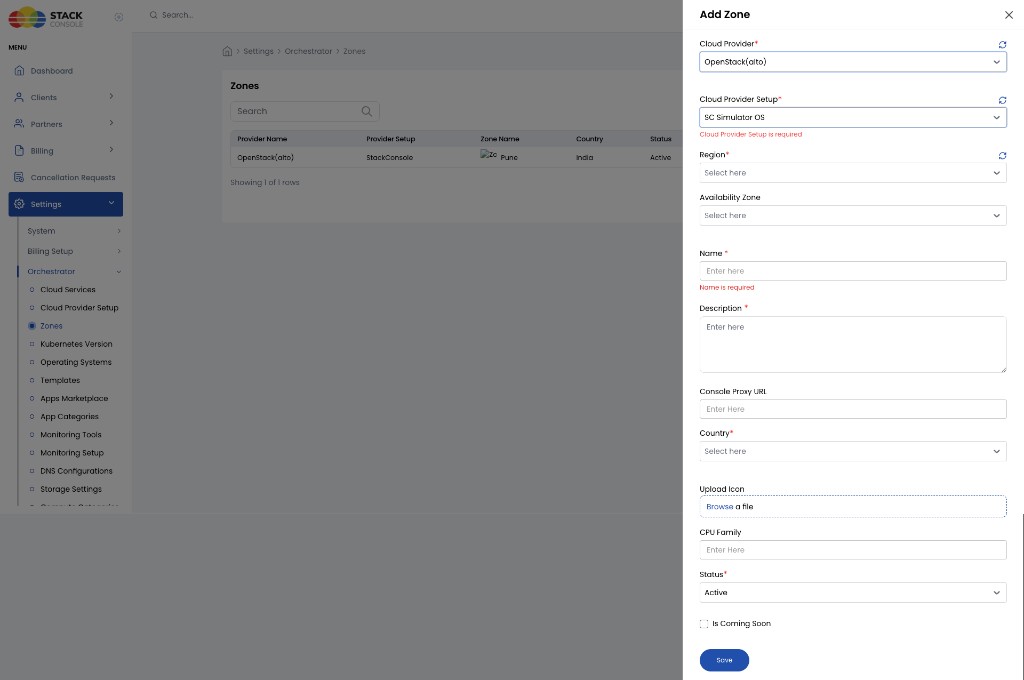
Quick checklist:
- Select Cloud Provider = OpenStack and the correct Cloud Provider Setup.
- Select Region (required) and Availability Zone (optional).
- Set customer-facing Name, Description, Country, Status.
- Leave Console Proxy URL empty (deprecated).
- Click Save, then continue the wizard (or finish remaining zones from Settings → Orchestrator → Zones).
Wizard Step 4 — Template
Map Glance images into CMP using Add Template. Most fields match CloudStack templates.
Full field reference: Configuring images in CMP.
CMP path (anytime): Settings → Orchestrator → Templates → Add Template