DNS Operations (Customer Portal)
End customers manage DNS domains and records from the customer portal after Connecting CMP to PowerDNS is complete.
Customer path: Networking → DNS
CMP does not sell or register domain names. Customers must already own a domain (registered with an external registrar). CMP manages DNS records for that domain on your PowerDNS infrastructure.
Roadmap: Purchasing domain names directly from CMP is planned for a future release.
- PowerDNS is connected in CMP with Dns Domain enabled
- Nameservers are configured in Provider Config — customers see these when creating a domain
- The customer account is active and has access to Networking → DNS
- If DNS is billable on your deployment, DNS Pricing is enabled and an Active package exists
Create DNS Domain
Customers add an existing domain they own to CMP for DNS management.
Path: Networking → DNS → Create DNS (or Create → DNS Domain)
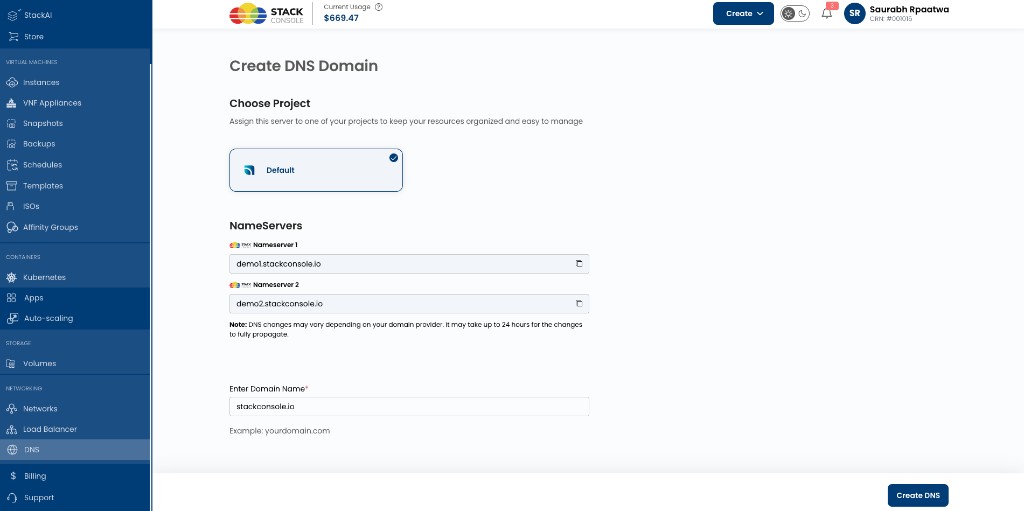
Choose Project
Required. Select the project this DNS domain belongs to — for example, Default.
Assign the domain to a project to keep DNS resources organized with other project assets.
Name servers
CMP shows the authoritative name servers configured for your DNS provider. Customers must set these at their domain registrar so the domain resolves through your PowerDNS deployment.
| Field | Description |
|---|---|
| Nameserver 1 | First NS hostname — for example, demo1.stackconsole.io |
| Nameserver 2 | Second NS hostname — for example, demo2.stackconsole.io |
Use the copy icon next to each nameserver to paste into the registrar's NS configuration.
DNS changes depend on the customer's domain provider. Updates may take up to 24 hours to propagate fully.
These nameservers match those configured in Wizard Step 2 — Provider Config.
Enter Domain Name
Required. The domain the customer already owns — for example, stackconsole.io or yourdomain.com.
Billing (when enabled)
When enable-dns-domain-pricing is enabled and a DNS Pricing package is Active, the create flow includes billing:
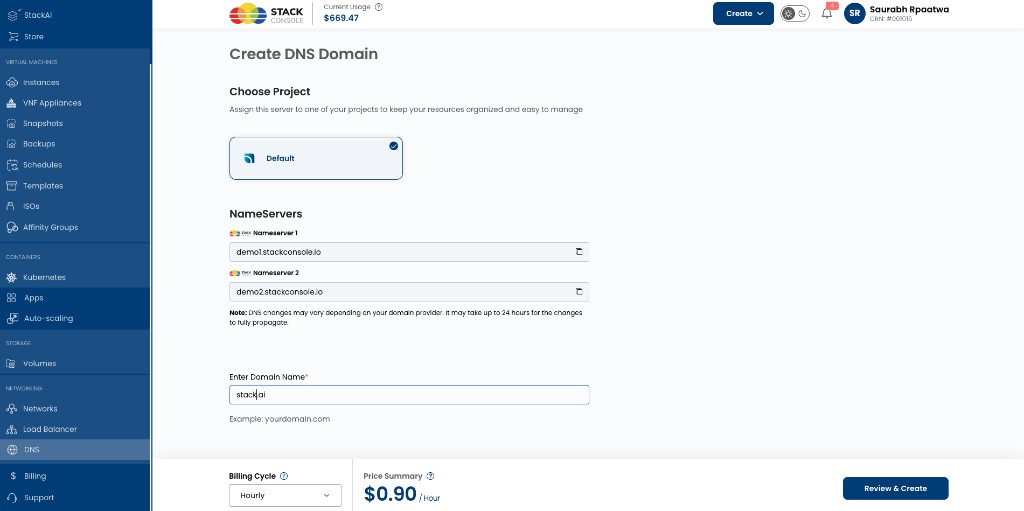
Billing Cycle
Required when billing is enabled. Select the cycle configured on the DNS package — for example, Hourly or Monthly. The price summary updates (for example, $0.90 / Hour).
Click Review & Create to confirm project, nameservers, domain name, and billing before the zone is created.
When DNS billing is disabled (default for many deployments), click Create DNS without a billing cycle step.
Admin setup: DNS Pricing.
Manage DNS
After a domain is created, customers open it to manage DNS records.
Path: Networking → DNS → select a domain → Manage DNS
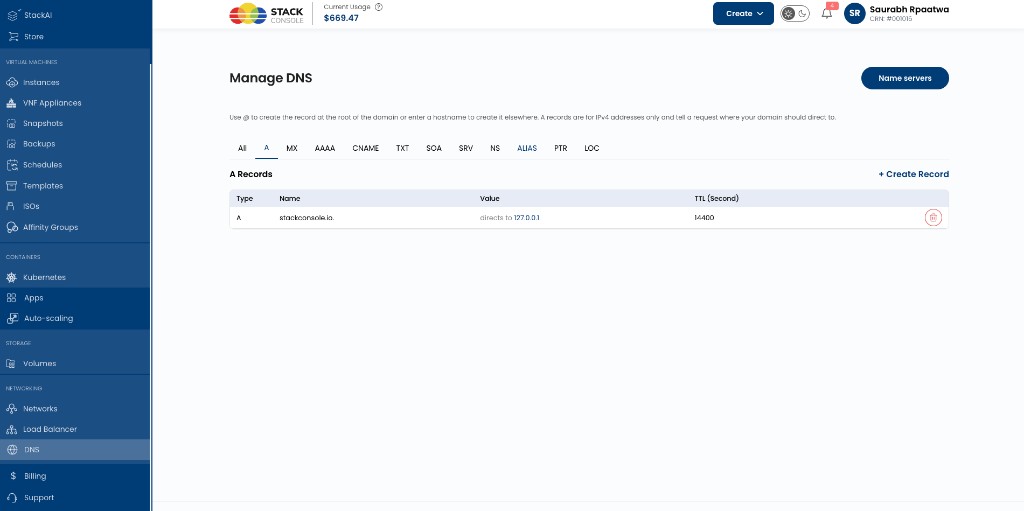
Name servers
Customers can reopen the authoritative name servers at any time from Name servers on the Manage DNS page.
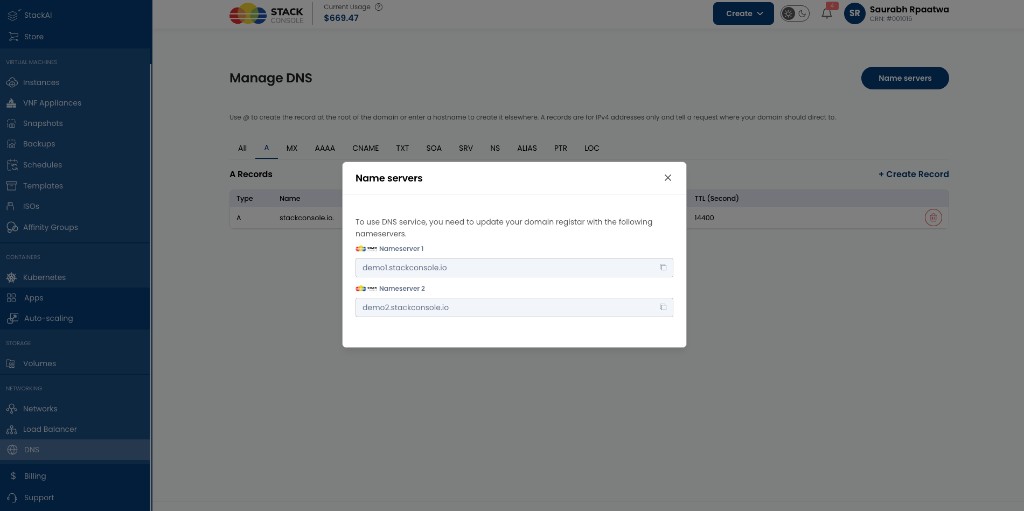
The modal reminds customers to update their domain registrar with the listed nameservers before DNS service will work for the domain.
Record types
Filter records by type using the tabs:
| Tab | Record type |
|---|---|
| All | All records |
| A | IPv4 address |
| MX | Mail exchange |
| AAAA | IPv6 address |
| CNAME | Canonical name |
| TXT | Text |
| SOA | Start of authority |
| SRV | Service |
| NS | Name server |
| ALIAS | Alias |
| PTR | Pointer |
| LOC | Location |
Create a record
- Open Manage DNS for the domain
- Select the record type tab (for example, A)
- Click + Create Record
- Complete the form and save
A record guidance (shown in the UI):
- Use
@to create a record at the root of the domain - Or enter a hostname to create the record on a subdomain
- A records are for IPv4 addresses only — they tell requests where the domain or host should resolve
Record list
The records table shows:
| Column | Description |
|---|---|
| Type | Record type (A, CNAME, MX, …) |
| Name | Hostname or @ for root — for example, stackconsole.io. |
| Content / Value | Target value — for example, directs to 127.0.0.1 for an A record |
| TTL (Second) | Time to live in seconds — for example, 14400 |
| Action | Delete record (trash icon) |
Customers can create, view, and delete records for their domain. Changes are applied to your PowerDNS backend through CMP.
Typical customer workflow
- Register a domain with an external registrar (outside CMP)
- Create DNS Domain in CMP and note the nameservers
- At the registrar, set the domain's NS records to your CMP nameservers
- Wait for propagation (up to 24 hours)
- Open Manage DNS and add A, CNAME, MX, and other records as needed