OpenStack Public Networks
In OpenStack environments, public internet connectivity is delivered through shared external Neutron networks. Cloud providers configure these public networks in OpenStack and sync them to CMP, making them immediately accessible to all customer projects in that region.
Customers can then select from the available public networks when deploying virtual machines, allocating floating IPs, provisioning Kubernetes clusters, or deploying load balancers.
Why configure multiple public networks? If a public network with a specific IP block becomes full or exhausted, the provider can configure a new public network with a fresh IP block in OpenStack and sync it with CMP.
Currently, when a public network's IP pool is exhausted, the administrator must manually disable that exhausted network in CMP to prevent new allocations against it. Automated detection and seamless pool failover between multiple public networks is an active feature in progress.
Overview
OpenStack public connectivity in CMP is managed centrally through Settings → Orchestrator → Networks. Each admin-defined public network corresponds to a shared external Neutron network that is automatically provisioned across every customer project in that region.
Customers interact with synced public networks when they:
- Deploy a Virtual Machine with a public network interface (NIC)
- Acquire a Floating IP from an external pool
- Create a Kubernetes cluster with external access
- Deploy a Load Balancer with a public virtual IP (VIP)
There is no per-customer or per-project OpenStack administrative overhead — once an admin registers and syncs a public network, it appears seamlessly across all customer project consoles in that region.
Part 1 — Administrator Setup
Prerequisites (OpenStack / Neutron)
Before syncing a public network into CMP, ensure the network in OpenStack Neutron meets both mandatory conditions:
| Requirement | Neutron Property | Meaning |
|---|---|---|
| External / Public | router:external = true | Enables gateway routing, external traffic, and floating IP allocation. |
| Shared | shared = true | Makes the network visible and consumable across all customer projects. |
Private tenant networks and external networks with shared = false are filtered out by CMP and will not appear in the admin Add Network dropdown.
Step 1 — Configure the OpenStack region
- In the CMP Admin Panel, navigate to Settings → Orchestrator → Zones (or your region management screen).
- Create or edit your OpenStack region.
shared_network_idis no longer required for OpenStack — public networks are managed through Settings → Orchestrator → Networks. You may leaveshared_network_idblank for new OpenStack regions.
Set open_stack_default_network to false on your OpenStack Cloud Provider Setup. Public networks should originate exclusively from the synced networks configuration rather than the legacy region default network fallback.
Step 2 — Add public networks in CMP
CMP path: Settings → Orchestrator → Networks (or Network Categories)
img/screenshots/cmp-openstack-network-categories.png
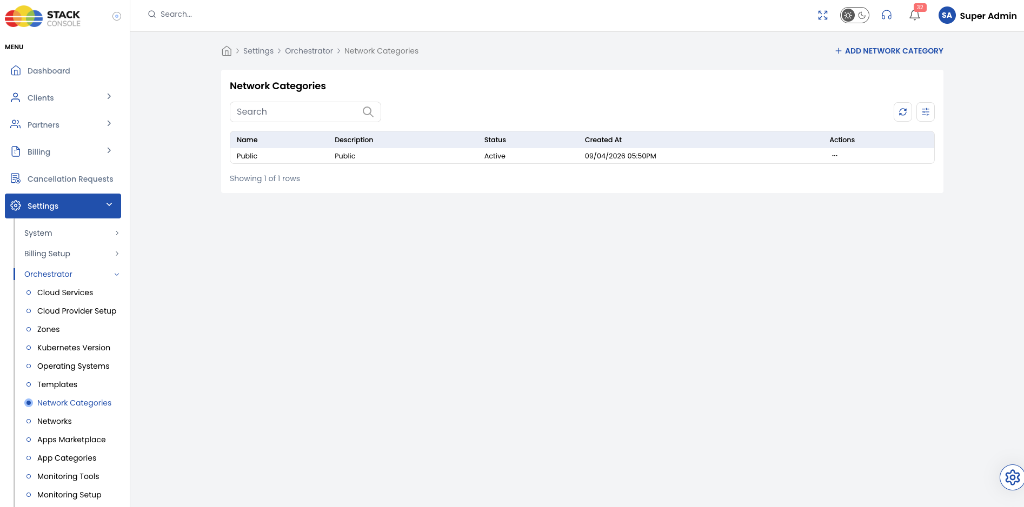
- Navigate to Settings → Orchestrator → Networks.
- Click Add Network.
- Configure the network fields:
Cloud Provider
Required. Select your OpenStack provider — for example, OpenStack (Alto).
Zone / Region
Required. Select the target OpenStack region where this network exists.
Network
Required. Select the OpenStack Neutron network from the dropdown list. Only networks marked shared = true and router:external = true in Neutron are shown.
IP Address Type
Required. Select Public IP.
Network Category
Required. Assign the Public network category.
- Click Save.
What happens after saving
| Event | System Behaviour |
|---|---|
| Admin saves public network | A CMP network record is created with is_public = true. |
| Sync job runs | A background synchronization worker creates a corresponding Public Net in every customer project within that region. |
| Subnets imported | OpenStack subnets and allocation pools are automatically discovered and associated with each customer project network. |
Step 3 — Add multiple public networks (IP block expansion)
Cloud providers frequently need multiple public networks in the same region — for example:
- IP block exhaustion: When the initial public IP block is nearly full, create a new external network with a fresh subnet in OpenStack and sync it to CMP.
- Multiple upstream carriers / transit: Offering premium vs standard internet transit or distinct BGP routing paths.
- Geographic / datacenter segments: Routing public traffic through separate physical gateways.
Each newly added admin public network:
- Syncs automatically to all existing customer projects in the region.
- Syncs automatically to every new project upon account or project creation.
- Requires zero manual per-customer action.
Administrator checklist
- OpenStack external networks have
router:external = trueandshared = truein Neutron. - Public networks are registered under Settings → Orchestrator → Networks.
- Cloud Provider Setup has
open_stack_default_networkset tofalse. - Exhausted networks are monitored and set to Inactive when replacement networks are introduced.
Part 2 — End Customer Experience
What customers see in the portal
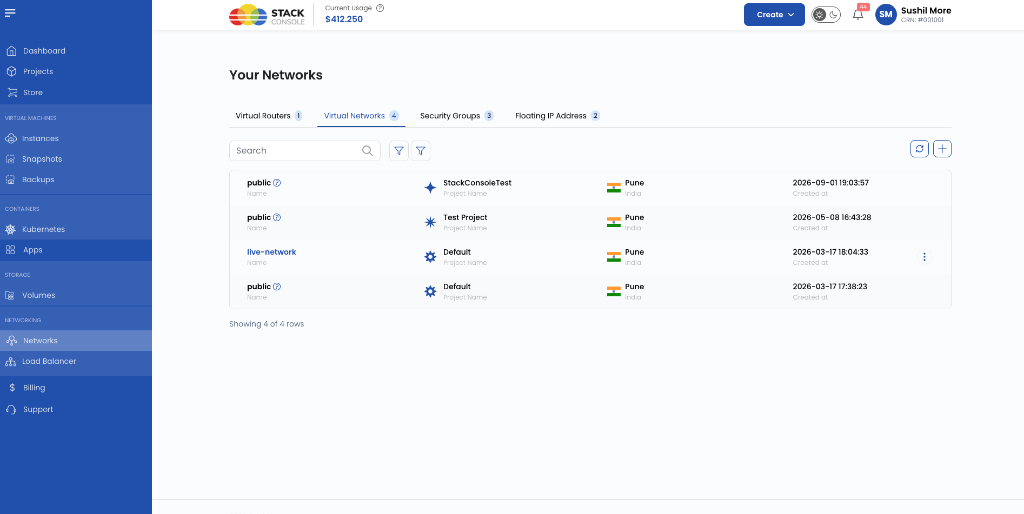
Once synchronized by the administrator, customer projects in that region automatically display the networks under the customer portal's Networks section:
- Navigate to Networks in the customer portal navigation menu.
- Open the Virtual Networks tab.
- All admin-synced public networks (such as
publicandlive-network) appear directly in the inventory across each of the customer's projects (for example,Default,Test Project, andStackConsoleTest), displaying:- Name: The network name matching the admin configuration in CMP.
- Project Name: The project associated with the network mapping.
- Location: The geographic region/datacenter (for example,
Pune, India). - Created at: Timestamp when the network was synced.
img/screenshots/cmp-openstack-customer-networks-list.png
- Subnets and CIDRs are pre-populated directly from OpenStack.
- No customer action is required to "import" or manually request access to the network.
- When a customer creates a new project, all admin public networks for that region are mapped and synced automatically.
Virtual Machines
Deploy VM with public connectivity
When creating a new instance in the OpenStack region:
- On the Create Instance screen, scroll down to the Choose Network section.
- Select the Public Network tab (or All).
- The table lists all synced public networks and subnets available for this region:
- Name: The subnet display name (for example,
public-subnet). - Network Name: The parent OpenStack network name (for example,
public). - Network Address: The network CIDR / address block (for example,
45.145.22.0).
- Name: The subnet display name (for example,
- Select the checkbox next to the desired public network.
- Optionally select private subnet(s) under Current Project Networks if internal east-west traffic is needed.
- Configure security groups and billing cycle, then click Review & Deploy.
img/screenshots/cmp-openstack-customer-choose-network.png
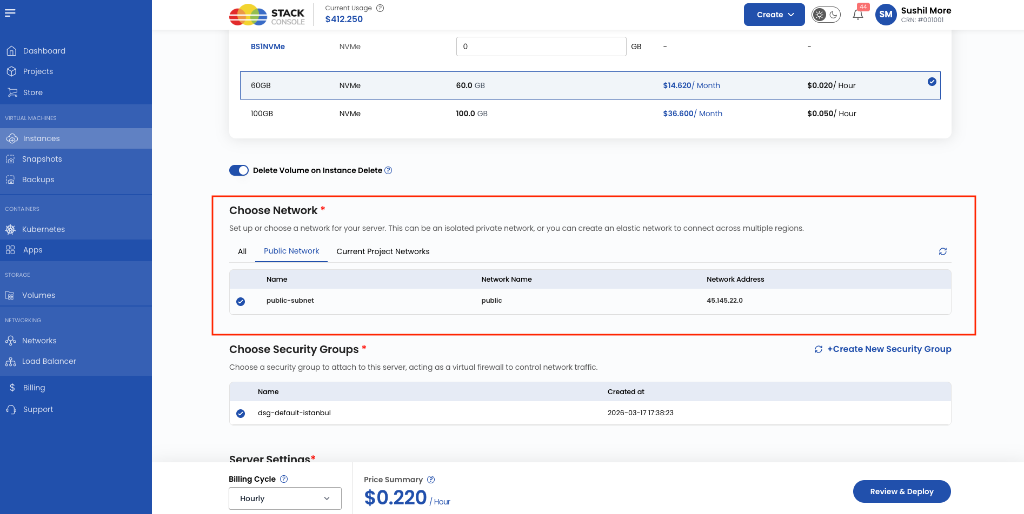
System behaviour:
- The instance receives a network interface (NIC) attached directly to the selected public network.
- If floating IPs are used, an address is allocated from that network's external Neutron pool.
- IP billing applies according to the active rate card for public IP resources.
Attach public network to an existing VM
- Navigate to Virtual Machines and open the target instance.
- Select Attach Network.
- Choose the desired Public Net from the dropdown.
- Confirm the attachment.
The instance receives an additional public interface, and CMP meters the public IP assignment accordingly.
Floating IP (Standalone)
Customers can acquire floating public IPs independently from the customer portal:
- Navigate to Networks in the customer portal navigation menu.
- Select the Floating IP Address tab.
- Click the + (Add) button to open the Acquire IP Address dialog.
- Configure the fields:
- Select Project: Choose the target customer project (for example,
Default). - Select Networks: Select the private network (for example,
live-network).Private network must be attached to a Virtual RouterThe network selected in this dropdown is an isolated private network, not a direct public network. This private network must already be attached to a Virtual Router in the project.
- Billing Cycle: Select the billing cycle (for example, Hourly).
- Select Project: Choose the target customer project (for example,
- Review the Price Summary and click Buy IP.
img/screenshots/cmp-openstack-customer-acquire-ip.png
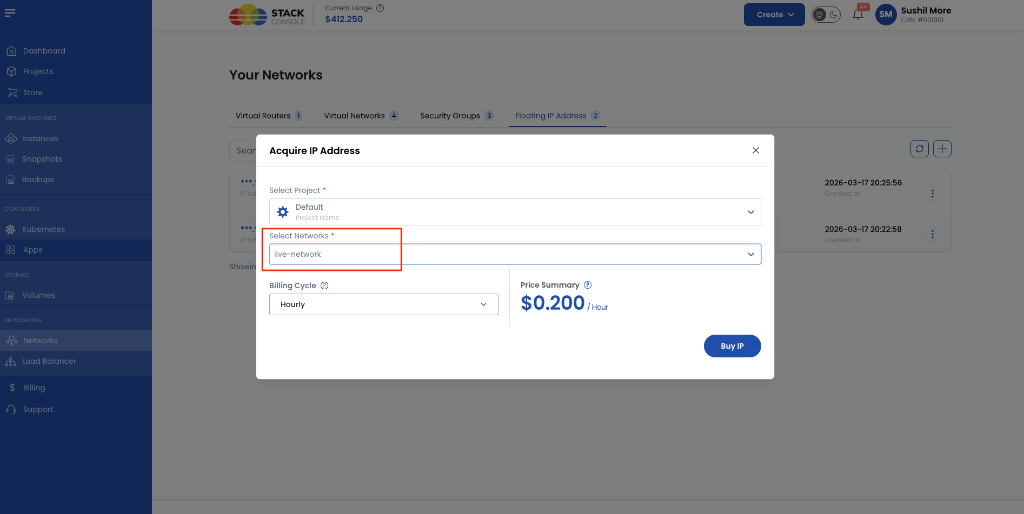
How CMP fetches the Floating IP from the public network
Because the user selects a private network, CMP uses an automated discovery chain to determine which public network pool supplies the IP:
1. User selects Private Network (e.g. live-network)
                    │
                    ▼
2. CMP detects the attached Virtual Router
                    │
                    ▼
3. CMP detects the Router Plan / Package
                    │
                    ▼
4. CMP identifies the assigned Public (External) Network from the Router Plan
                    │
                    ▼
5. CMP allocates the Floating IP from that specific Public Network in OpenStack
- Detect Network: CMP identifies the selected private network.
- Detect Virtual Router: CMP verifies which Virtual Router the private network is connected to.
- Detect Router Plan: CMP looks up the Router Plan (package) governing that Virtual Router.
- Identify External Network: From the router plan, CMP determines the assigned public (external gateway) network.
- Fetch Floating IP: CMP issues the Neutron API call to allocate a floating IP from that resolved public network's external pool.
Kubernetes Clusters
When deploying a Kubernetes cluster in an OpenStack region:
- Select the cluster network and subnet.
- Configure floating IP options (for cluster API endpoint, worker nodes, or master load balancer).
System behaviour:
- If the selected subnet resides on a public network, that network serves as the external gateway.
- If the cluster nodes reside on a private subnet, floating IPs are acquired from the chosen admin public network in that region via the attached virtual router.
- The pricing preview accurately reflects whether public IP charges apply based on the chosen network.
Load Balancers
When provisioning a Load Balancer in the customer portal:
- Navigate to Load Balancer in the customer portal navigation menu and initiate creation.
- Under Select Network *:
- A private network is always required (for example,
live-network, typeVNET). This defines the private network where the load balancer operates and connects to backend member servers.
- A private network is always required (for example,
- Under Select IP Address (Optional):
- Assigning an external IP address is optional. If you are deploying an internal-only load balancer, this section can be skipped.
- If external internet access is required:
- Choose IP Address: If the project already has an available, unassigned Floating IP, select this option and pick the IP from the dropdown to attach it.
- Acquire New IP Address: If no Floating IP is currently available, select this option to automatically allocate a fresh public Floating IP from the pool and map it to the load balancer's internal VIP.
Multiple public networks — selection guide
| Customer Use Case | Recommended Selection |
|---|---|
| Carrier / Routing Preference | Customer chooses the specific Public Net corresponding to the desired transit provider or carrier. |
| Standard Public Workload | Customer selects any available Public Net present in the project. |
| Private App with Public Entry | Deploy instance on a private isolated network, then attach a floating IP from the desired Public Net. |
Customers only see networks that administrators have explicitly registered and verified.
Part 3 — Quick Reference
Admin vs customer responsibilities
| Task | Administrator | End Customer |
|---|---|---|
| Create shared external Neutron networks | Yes (in OpenStack) | No |
| Register and categorize public networks | Yes (Settings → Orchestrator → Networks) | No |
| Sync public networks across projects | Automatic (via background queue workers) | No |
| Select network during VM / FIP / K8s / LB creation | No | Yes (in customer portal) |
| Disable exhausted IP block networks | Yes (manual action currently) | No |
Network types in the customer portal
| Portal Type | Source | Customer Usage |
|---|---|---|
| Public Net | Admin public network (is_public = true) | Public NIC, floating IP, load balancer VIP, Kubernetes external ingress. |
| Isolated / VNet | Customer-created private networks | Internal project communication, database tiers, private multi-tier topologies. |
Single-network mode vs multi-network mode
| Dimension | Legacy Single-Network Mode | Multi-Public Network Mode (Current) |
|---|---|---|
| Region configuration | Single regions.shared_network_id | Configured centrally in Settings → Orchestrator → Networks |
| Network capacity | Hard-limited to one IP pool per region | Scale out across multiple public networks and CIDR blocks |
| Customer selection | None (traffic forced to region default) | Customer chooses the desired public network at creation time |
| Source of truth | Legacy region default | Admin Networks (Settings → Orchestrator → Networks) |
Part 4 — Troubleshooting
| Issue | Likely Cause | Recommended Action |
|---|---|---|
| Network missing in admin Add Network dropdown | Network is not marked both shared and external in OpenStack. | In OpenStack Horizon or CLI, verify router:external = true and shared = true on the Neutron network. |
| Customer cannot see public network in project | CMP background sync job has not run, or project network quota reached. | Verify CMP background workers are running; inspect activity logs; check project network quota in CMP and OpenStack. |
| Duplicate public networks displayed in customer project | Both legacy open_stack_default_network and new admin networks are enabled. | Set open_stack_default_network = false on the OpenStack Cloud Provider Setup. |
| Floating IP allocation fails upon network selection | The selected network's external IP pool is completely exhausted. | Verify the subnet allocation pool in OpenStack Neutron. Add a new public network in OpenStack, sync it to CMP, and mark the exhausted network as Inactive. |
| New customer project missing public networks | Sync job failed on account creation or no public networks exist for that region. | Confirm public networks are Active for that region; verify background workers and activity logs. |