VPC Network
A VPC (Virtual Private Cloud) in Apache CloudStack is a private, isolated part of the cloud with its own virtual network topology. Customers create VPCs in CMP by selecting a VPC package that maps to CloudStack VPC Offering and VPC Network Offering values.
- This page — how VPC works in CloudStack and how CMP exposes it (tiers, ACLs, Source NAT, VPN/private gateway overview, limitations).
- Admin package setup — Virtual Router/VPC packages.
- Provider Config — Connecting CMP to CloudStack (Default VPC ACL Allow ID, Default Network Strategy).
What is a VPC?
In CloudStack, a VPC lets you:
- Define a super CIDR (for example
10.0.0.0/16) for all guest tiers - Create one or more network tiers (subnets) inside that CIDR
- Use a single VPC virtual router for routing, DHCP, DNS, Source NAT, ACLs, and optional VPN / load balancing
CloudStack reference: Configuring a Virtual Private Cloud.
| Building block | Role |
|---|---|
| VPC | Isolated private cloud for one account / project, with a super CIDR |
| Network tier | Guest subnet inside the VPC (own VLAN segment and CIDR); one ACL list per tier |
| VPC virtual router | System VM that connects tiers, public gateway, VPN, and NAT |
| Public gateway / Source NAT | Outbound internet; one Source NAT public IP allocated when the VPC is created |
| Network ACL | Numbered allow/deny rules for ingress/egress on a tier |
| Private gateway | Optional route to a private / enterprise network; Private Gateway Static Routes are managed on the Private Gateway tab |
| VPC static routes | Custom routes at VPC level (CIDR + next hop) without Private Gateway — VPC Static Routes |
| VPN gateway | Optional site-to-site VPN endpoint for the VPC |
| Isolated Network | VPC | |
|---|---|---|
| Structure | Single guest network | Super CIDR + one or more tiers |
| Virtual router | One VR per isolated network | One VPC VR for the whole VPC |
| Offerings | Network offering | VPC offering + VPC guest network offerings |
| Firewall model | Isolated network firewall at public IP level | Network ACL on tiers |
| CMP packages | Network packages (when billing enabled) | Virtual Router/VPC |
See Isolated Network.
How CMP provisions a VPC
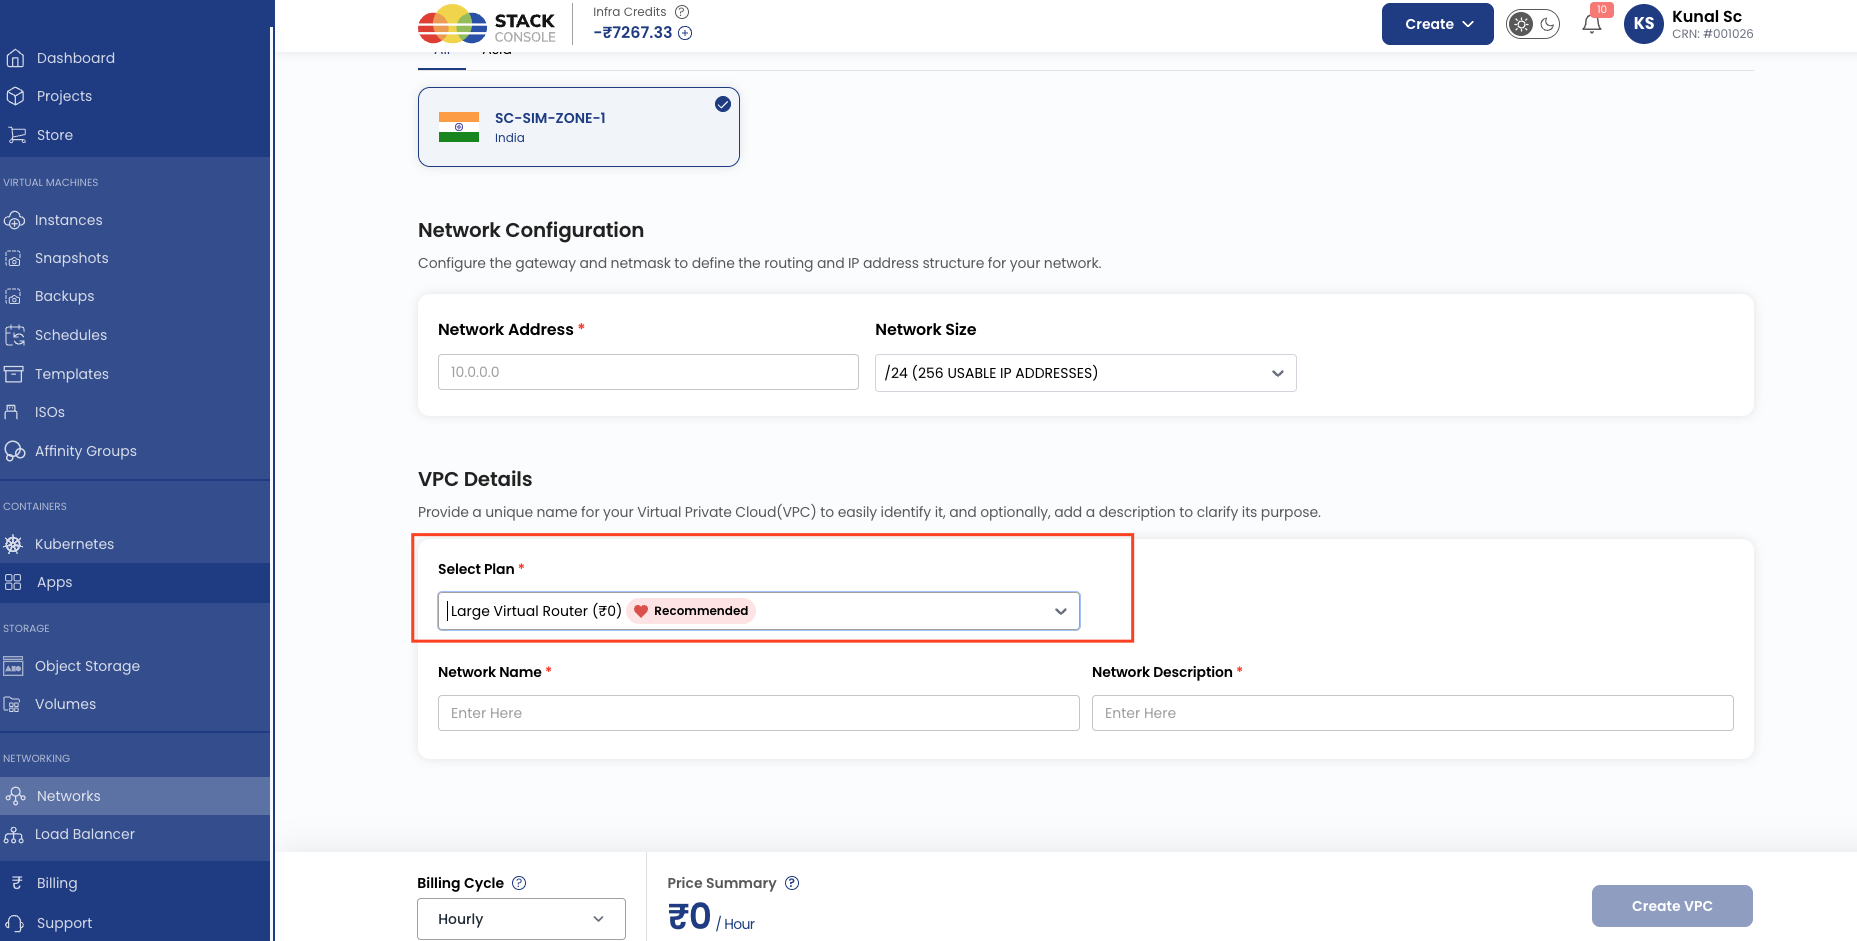
- Enable VPC/Virtual Router in Cloud Provider Setup (Wizard Step 1)
- Set Default VPC ACL Allow ID in Provider Config (Wizard Step 2) so new VPCs get a usable default ACL
- Create CloudStack system service offerings, VPC offerings, and VPC guest network offerings (with User Data and Network ACL)
- Create CMP Virtual Router/VPC packages per zone/tier
- Customer opens Create VPC, selects a package (or CMP auto-selects when only one package exists), and CMP creates the VPC via CloudStack APIs
CMP VPC package
  → CloudStack VPC Offering (+ system service offering = VR size)
  → VPC created (Source NAT IP allocated)
  → Customer adds tiers using VPC Network Offering
  → ACL list applied per tier (default from Default VPC ACL Allow ID, then custom rules)
Default VPC ACL Allow ID
| Field | Purpose |
|---|---|
| Default VPC ACL Allow ID | CloudStack ACL list UUID applied when CMP creates a new VPC |
Obtain the UUID from CloudStack → Network → VPC → ACL Lists (typically a default_allow-style list, or a custom allow list you maintain). Customers can replace or edit ACL rules in the CMP portal after creation.
VPC details page
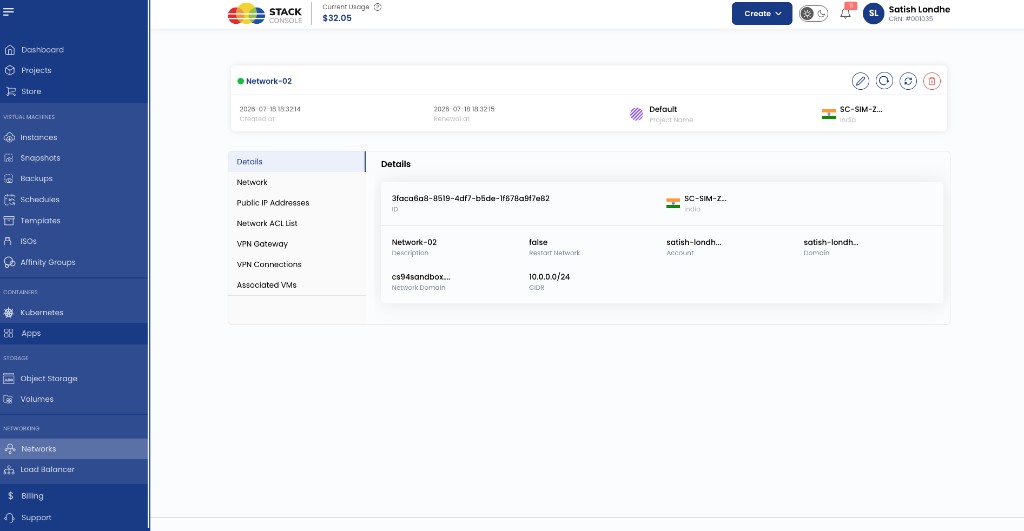
After a VPC is created, open it from Networking → Networks. The details page shows summary actions and tabs for managing the VPC.
Header actions
| Action | Purpose |
|---|---|
| Edit | Update VPC display details where allowed |
| Refresh | Reload status from CloudStack |
| Restart | Restart the VPC / virtual router networking |
| Delete | Delete the VPC (Source NAT public IP is released when the VPC is deleted) |
The header also shows name, status, created/renewal times, project, and zone.
Tabs
| Tab | What customers manage here |
|---|---|
| Details | Read-only summary of the VPC (see fields below) |
| Network | Network tiers (subnets) inside this VPC — add and open tiers |
| Public IP Addresses | Source NAT and acquired public IPs for the VPC |
| Private Gateway | Private gateway and Private Gateway Static Routes (separate from VPC Static Routes) |
| Network ACL List | ACL lists and rules for tiers — see Network ACL |
| VPN Gateway | Site-to-site VPN gateway for the VPC (when the offering supports VPN) |
| VPN Connections | VPN connections to customer gateways |
| Associated VMs | VMs connected to networks in this VPC |
| Static Routes | VPC-level static routes (CIDR + next hop) — see VPC Static Routes |
Network tiers
Customers add tiers from the VPC details view (Network tab) after the VPC exists. Each tier is an isolated guest network inside the VPC.
Tier rules
| Rule | Detail |
|---|---|
| Unique CIDR | Each network tier must have a unique CIDR within the VPC — two tiers cannot share or overlap the same address range |
| Inside VPC CIDR | The tier CIDR must fall entirely within the VPC super CIDR (for example VPC 10.0.0.0/16 → tier 10.0.1.0/24 is valid; 192.168.1.0/24 is not) |
| One VPC only | A network tier belongs to only one VPC — it cannot be shared across VPCs |
Minimum CIDR size /22 | CloudStack rejects guest / tier networks larger than /22 (prefix number must be ≥ 22). See below |
Example: VPC CIDR 10.0.0.0/16
| Tier | CIDR | Valid? |
|---|---|---|
| Web | 10.0.1.0/24 | Yes — unique and inside VPC CIDR |
| App | 10.0.2.0/24 | Yes — unique and inside VPC CIDR |
| DB | 10.0.1.0/24 | No — duplicates Web |
| Ext | 172.16.0.0/24 | No — outside VPC CIDR |
Choosing a VPC super CIDR and non-overlapping tier subnets can be confusing if you are not a networking specialist.
Use a visual subnet calculator to split a network into smaller ranges and see subnet address, netmask, usable IP range, and host counts side by side:
Suggested workflow:
- Pick a private VPC CIDR (for example
10.0.0.0/16) - Open the calculator, enter that network, and Divide until you have tier-sized subnets — typically
/24(must be/22or smaller networks, i.e. prefix ≥ 22) - Assign one unique subnet per tier — each must stay inside the VPC CIDR and not overlap another tier
- Copy the subnet address and mask (or CIDR notation) into CMP when creating each network tier
Other tier behaviour
- Tiers do not freely reach each other by default — Network ACL rules control tier-to-tier and tier-to-public traffic
- All tiers created in CMP for a VPC use the same VPC Network Offering from the package — see Load balancing inside a VPC
Source NAT and public IPs on VPC
CMP provisions VPCs in CloudStack NATTED mode. In that mode, creating a VPC always allocates a Source NAT public IP, which is released only when the VPC is deleted.
CloudStack also offers ROUTED mode (no Source NAT; static or BGP routing instead). CMP does not support ROUTED VPCs. If you need ROUTED networking or any other non-standard VPC setup, contact the StackConsole team.
A public IP can be used for only one purpose at a time.
If the IP is the VPC Source NAT address, it cannot also be used for Static NAT or Port Forwarding (or load balancer rules). Customers must acquire a separate public IP for inbound VM access, Static NAT, Port Forwarding, or LB.
Source NAT IP and deletion
Source NAT IPs are deleted only when the network (VPC) is deleted. This is CloudStack behaviour — not a CMP bug.
| Action | What happens to the VPC Source NAT IP |
|---|---|
| Delete a VM (or all VMs) in the VPC | Source NAT IP stays allocated to the VPC. It continues to appear under the client portal Networking → Public IP Addresses for that VPC |
| Detach / disassociate an acquired public IP from a VM | That acquired IP can be released or reused per normal IP rules — not the Source NAT address |
| Delete the VPC | Source NAT public IP is released back to the public pool |
Deleting instances does not detach or remove the VPC Source NAT IP from the customer’s network view. The IP belongs to the VPC, not to any single VM. Outbound internet for remaining tiers / future VMs still depends on that Source NAT address until the VPC itself is deleted.
- When a VPC is created, CloudStack allocates a Source NAT public IP. It is released only when the VPC is deleted.
- That Source NAT IP handles outbound internet for the VPC. It is not available for VM association, Static NAT, Port Forwarding, or LB.
- A public IP already used for Static NAT, Port Forwarding, or LB on one tier cannot be reused for another purpose (or another tier’s services) at the same time.
- Details: Load Balancer — VPC Source NAT and IP Address packages.
For automated public IP attach during Create Instance, see Default Network Strategy. Manual IP association outside create-instance is chosen by the customer.
Network ACL (VPC firewall)
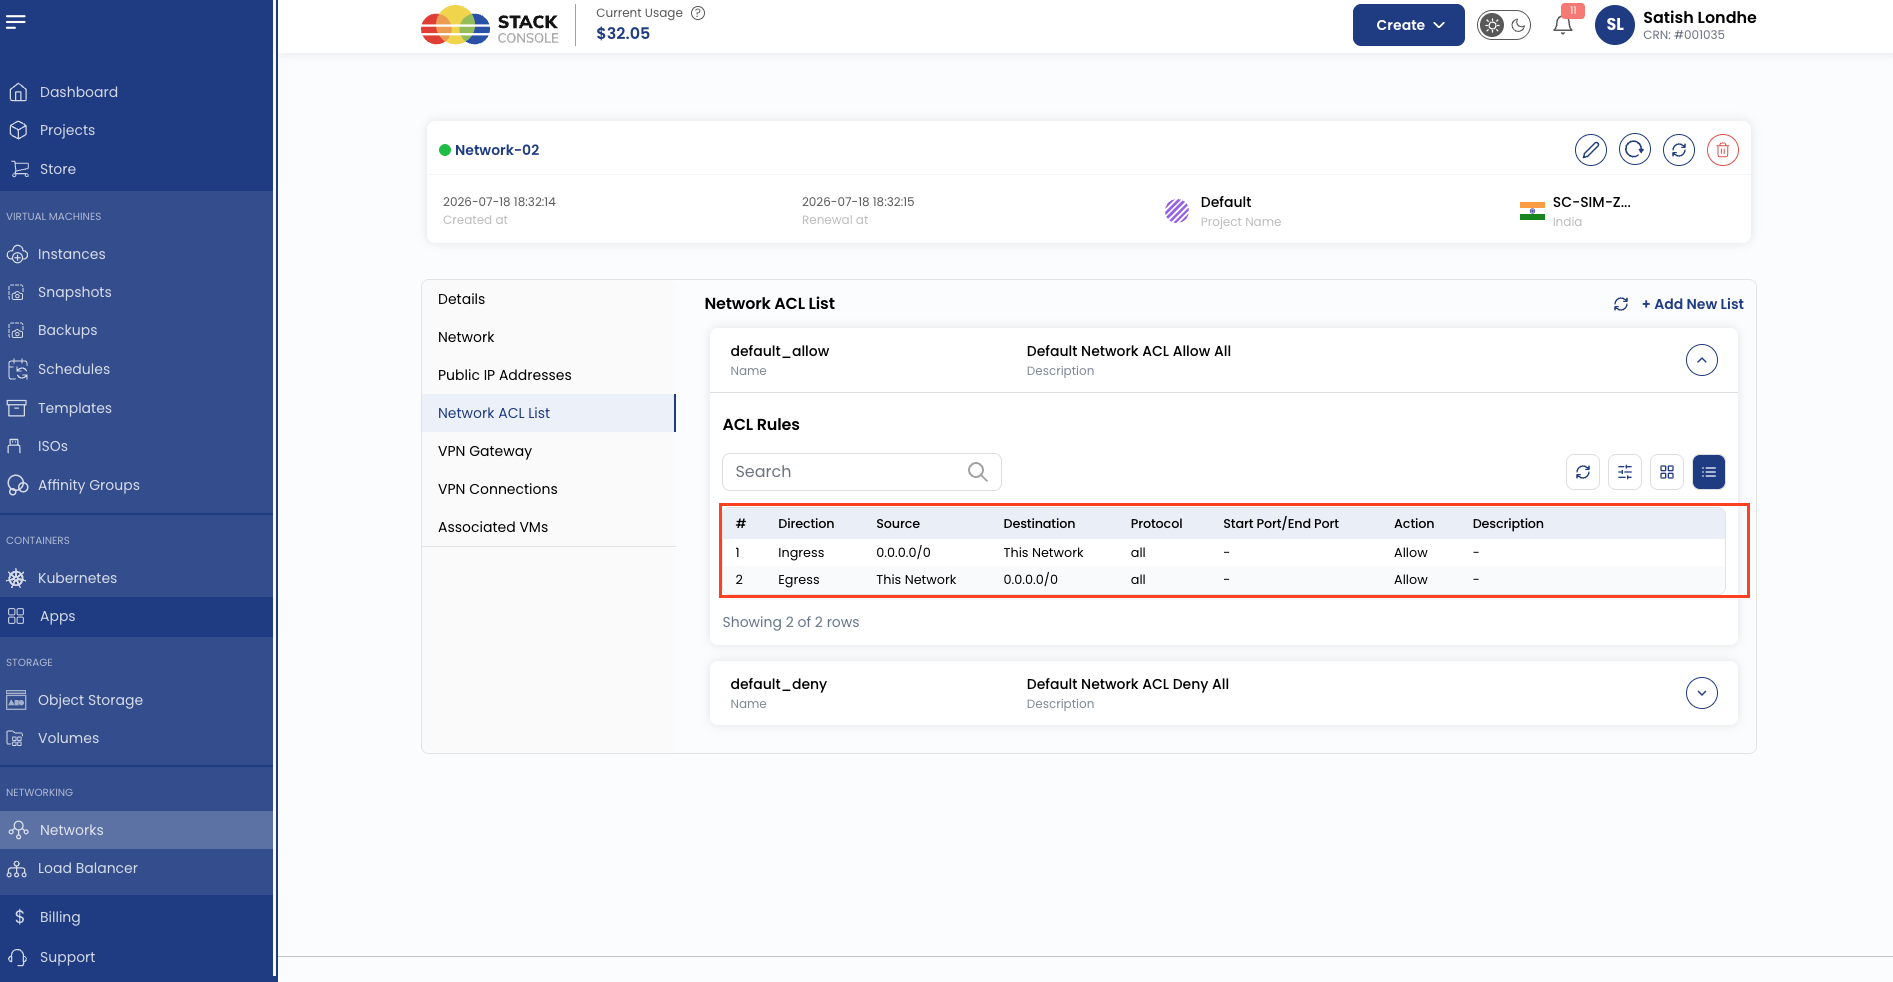
Network ACL is the allow/deny firewall for traffic on a VPC network tier (subnet). The VPC offering and VPC Network Offering must include the Network ACL service.
Important — rules apply to the whole network, not one VM
ACL rules work at the network tier level.
If a tier has many VMs, the same ACL rules apply to all of those VMs. You cannot write a rule that says “only VM-A may talk to VM-B” while other VMs on the same network are excluded.
Think of it as: network ↔ network (or network ↔ outside), not VM ↔ VM.
Example: Web tier has 5 VMs. An ACL that allows outbound TCP 53 to a DNS address applies to all 5 VMs on that web tier — not to one selected VM.
How to read an ACL rule (simple)
| Field | Meaning in plain language |
|---|---|
| Direction | Ingress = traffic coming into this tier. Egress = traffic leaving this tier |
| Action | Allow or Deny |
| Protocol / Port | What kind of traffic (for example TCP 443, TCP 22) |
| CIDR | The other side of the traffic — who may talk to this tier (ingress), or where this tier may talk to (egress) |
Rules are numbered and checked in order (lowest number first). Customers can change that order with drag-and-drop reordering — see Reorder ACL rules.
What you can and cannot do
| You can | You cannot |
|---|---|
| Allow or block traffic for an entire tier | Apply different ACL rules to individual VMs on the same tier |
| Control traffic between tiers (for example Web tier → App tier) | Set source VM and destination VM as two separate fields on one rule |
| Limit by protocol and port | Treat ACL like a classic per-host firewall on each guest |
CloudStack stores one CIDR per rule. For ingress it means “who is allowed in”; for egress it means “where is this tier allowed to go.” There is no separate “from this host and to that host” pair on the same rule.
Reorder ACL rules
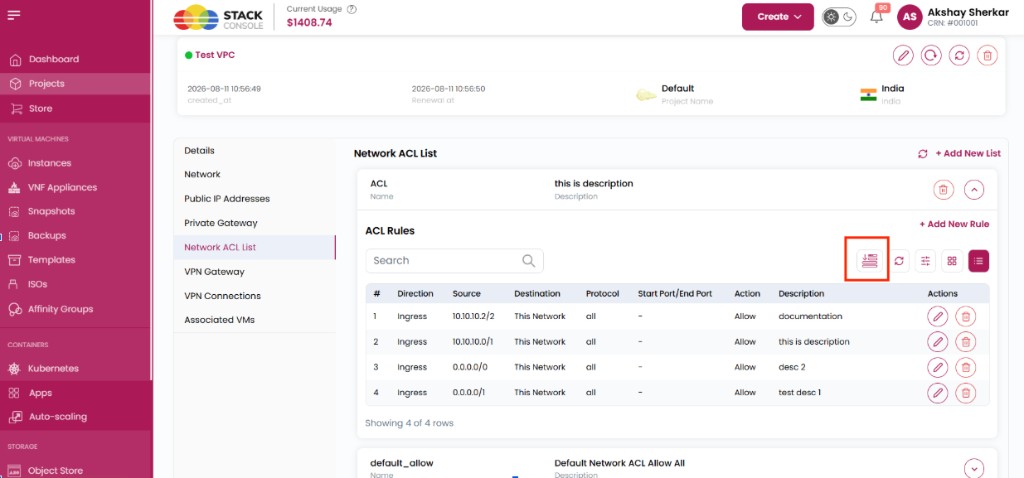
CMP supports drag-and-drop reordering of Network ACL rules so the evaluation order matches what you intend.
Customer path: VPC → Network ACL List → open an ACL → use the reorder control (list icon with arrows) on the rules toolbar.
| Behaviour | Detail |
|---|---|
| Drag-and-drop | Move rules to change their position in the list |
| Automatic renumbering | After a move, CMP renumbers affected rules |
| CloudStack alignment | Ordering matches CloudStack’s native ACL rule order |
| Evaluation order | Lower # is evaluated first — keep that order correct after reordering |
Default ACL rules cannot be moved. CloudStack does not allow reordering rules on default ACL lists (default_allow / default_deny).
Use reordering on custom ACL lists that you (or the customer) created. Default lists remain fixed as CloudStack defines them.
Create / Update Rule form
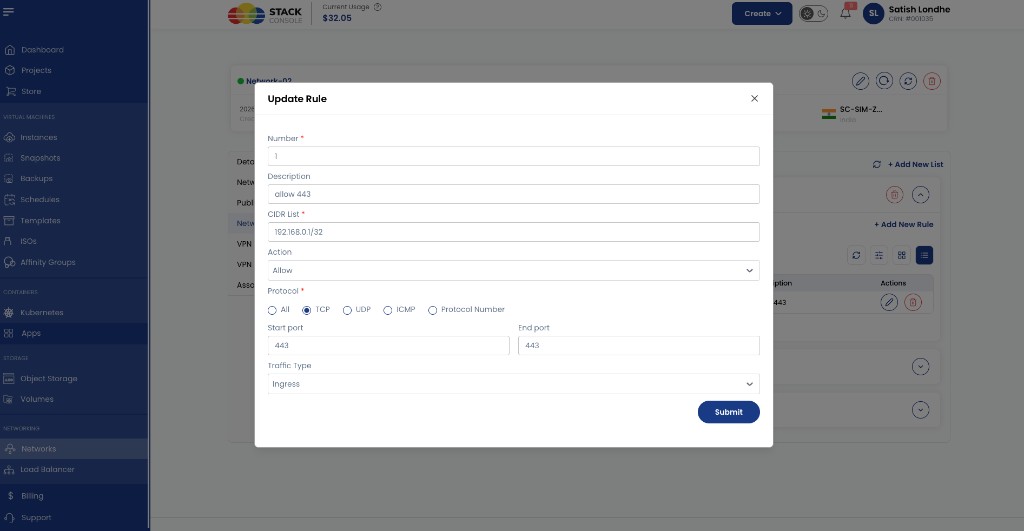
Customers open Network ACL on a VPC network tier, then add or edit a rule. Create and Update use the same fields.
img/screenshots/cmp-vpc-network-acl-update-rule.png
Number
Required. Priority of the rule. Lower numbers are evaluated first. Use unique numbers within the ACL list (for example 1, 2, 3). You can also change order later with Reorder ACL rules instead of editing each number by hand.
Description
Optional. Short note for admins and customers (for example allow 443).
CIDR List
Required. The “other side” of the traffic for this rule. Enter a network or host in CIDR form (for example 192.168.0.0/24 or 192.168.0.1/32).
| Traffic Type | What CIDR List means |
|---|---|
| Ingress | Who is allowed to send traffic into this tier |
| Egress | Where this tier is allowed to send traffic to |
This is a single field — not separate source and destination. Remember rules still apply to all VMs on the tier.
Action
Required. Allow or Deny matching traffic.
Protocol
Required. Choose one:
| Option | Use when |
|---|---|
| All | Match any protocol |
| TCP | Typical web, SSH, databases (ports required) |
| UDP | DNS and similar UDP services (ports required) |
| ICMP | Ping / ICMP (ICMP type/code may apply instead of ports) |
| Protocol Number | Advanced — enter a numeric IP protocol |
Start port / End port
Required for TCP and UDP. Port range to match. For a single port, set both to the same value (for example Start 443, End 443).
Traffic Type
Required.
| Value | Meaning |
|---|---|
| Ingress | Traffic coming into this network tier |
| Egress | Traffic leaving this network tier |
Click Submit to save the rule.
Example (from the form): Number 1, Description allow 443, CIDR List 192.168.0.1/32, Action Allow, Protocol TCP, ports 443–443, Traffic Type Ingress — allows HTTPS into this tier from host 192.168.0.1, for every VM on the tier.
Private gateway and VPN (overview)
| Feature | Purpose in CloudStack VPC |
|---|---|
| Private gateway | Route VPC traffic to/from a private or enterprise network; optional Source NAT on the private gateway; ACL on the private gateway interface; Private Gateway Static Routes managed on the Private Gateway tab — not VPN |
| VPC static routes | Custom routing at VPC level (destination CIDR + next hop) — VPC Static Routes (CloudStack 4.21+) |
| Remote access VPN | Individual users (laptop/PC) via L2TP/IPsec on Source NAT IP — VPC or Isolated network — Remote Access VPN |
| Site-to-site VPN | IPsec between VPN Gateway and VPN Customer Gateway via VPN Connection — Site-to-Site VPN |
Offer VPN only when the VPC offering includes VPN. For laptop → VM, start with Remote Access VPN. For office network → VPC, start with Site-to-Site VPN.
Load balancing inside a VPC
CloudStack documentation states that load balancing can be supported by only one network tier inside a VPC. In practice that applies when tiers use different Public LB network offerings.
In CMP, the Virtual Router/VPC package tightly binds the CloudStack VPC Offering and VPC Network Offering.
When customers add network tiers (subnets) inside a VPC, CMP creates every tier with that same VPC Network Offering. Customers do not pick a different guest network offering per tier.
Because all subnets share one offering, load balancers can be created against more than one tier in the same VPC. CMP does not expose CloudStack Conserve mode controls for this.
- Enable Load Balancer on the VPC offering / VPC Network Offering used by the package
- Use an acquired public IP for LB rules — never the VPC Source NAT IP
Billing
VPC billing is driven by Virtual Router/VPC packages. When pricing, include virtual router capacity, default Source NAT IP, and Network Rate (Mb/s) differentiation between tiers (for example Basic vs High-Performance).