Connecting CMP to WHM
This guide walks through registering a WebHost Manager (WHM) server in StackConsole CMP using the Cloud Provider Setup wizard. Once registered, CMP can query packages, provision customer accounts, manage DNS defaults, and execute lifecycle operations.
Before launching the wizard, confirm that:
- Server Preparation & API Tokens is completed and you have a valid WHM API token.
- Inbound port
2087is open on your WHM server for all CMP application and worker nodes. - You are logged in to the CMP Admin Portal with the Super Admin or authorized infrastructure role.
Accessing Provider Setup
CMP Admin Path: Settings → Orchestrator → Configuration → Provider Setup
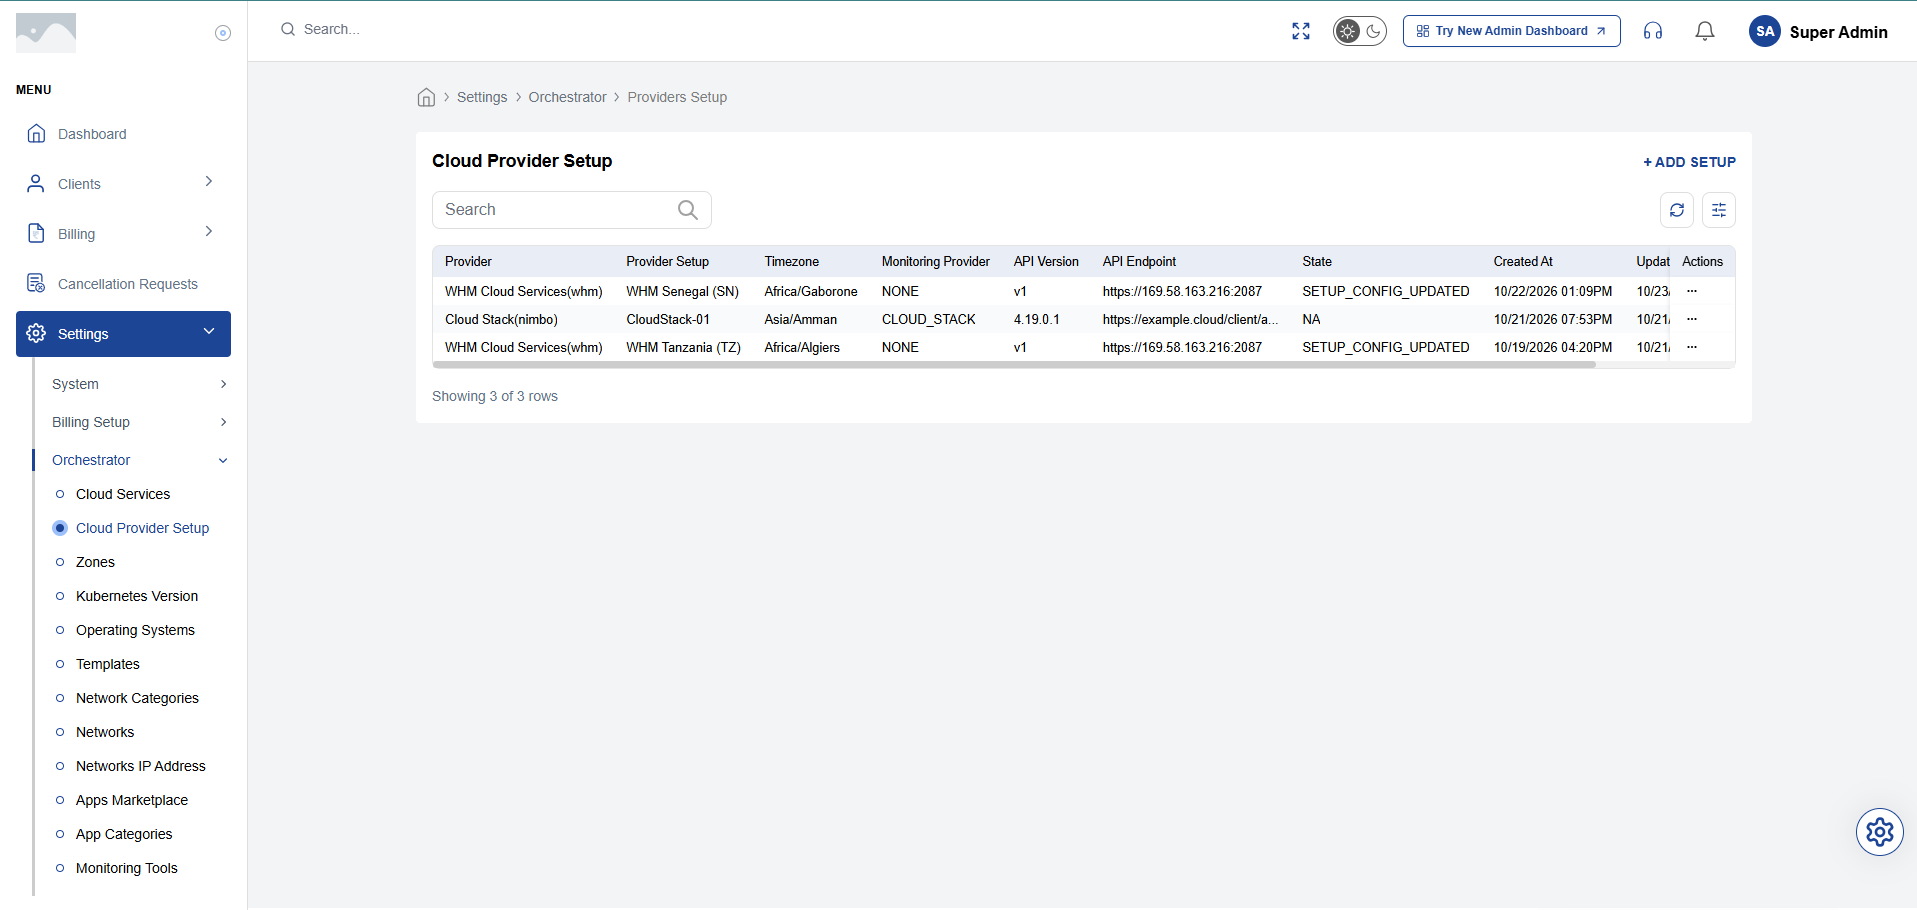
- Navigate to Settings → Orchestrator in the main navigation menu.
- Under the Configuration tab, select Provider Setup.
- Click the + Create button in the top right to start the orchestrator configuration wizard.
Wizard Step 1 — Provider Setup
The first wizard step registers the basic cloud provider metadata, timezone, and monitoring policy.
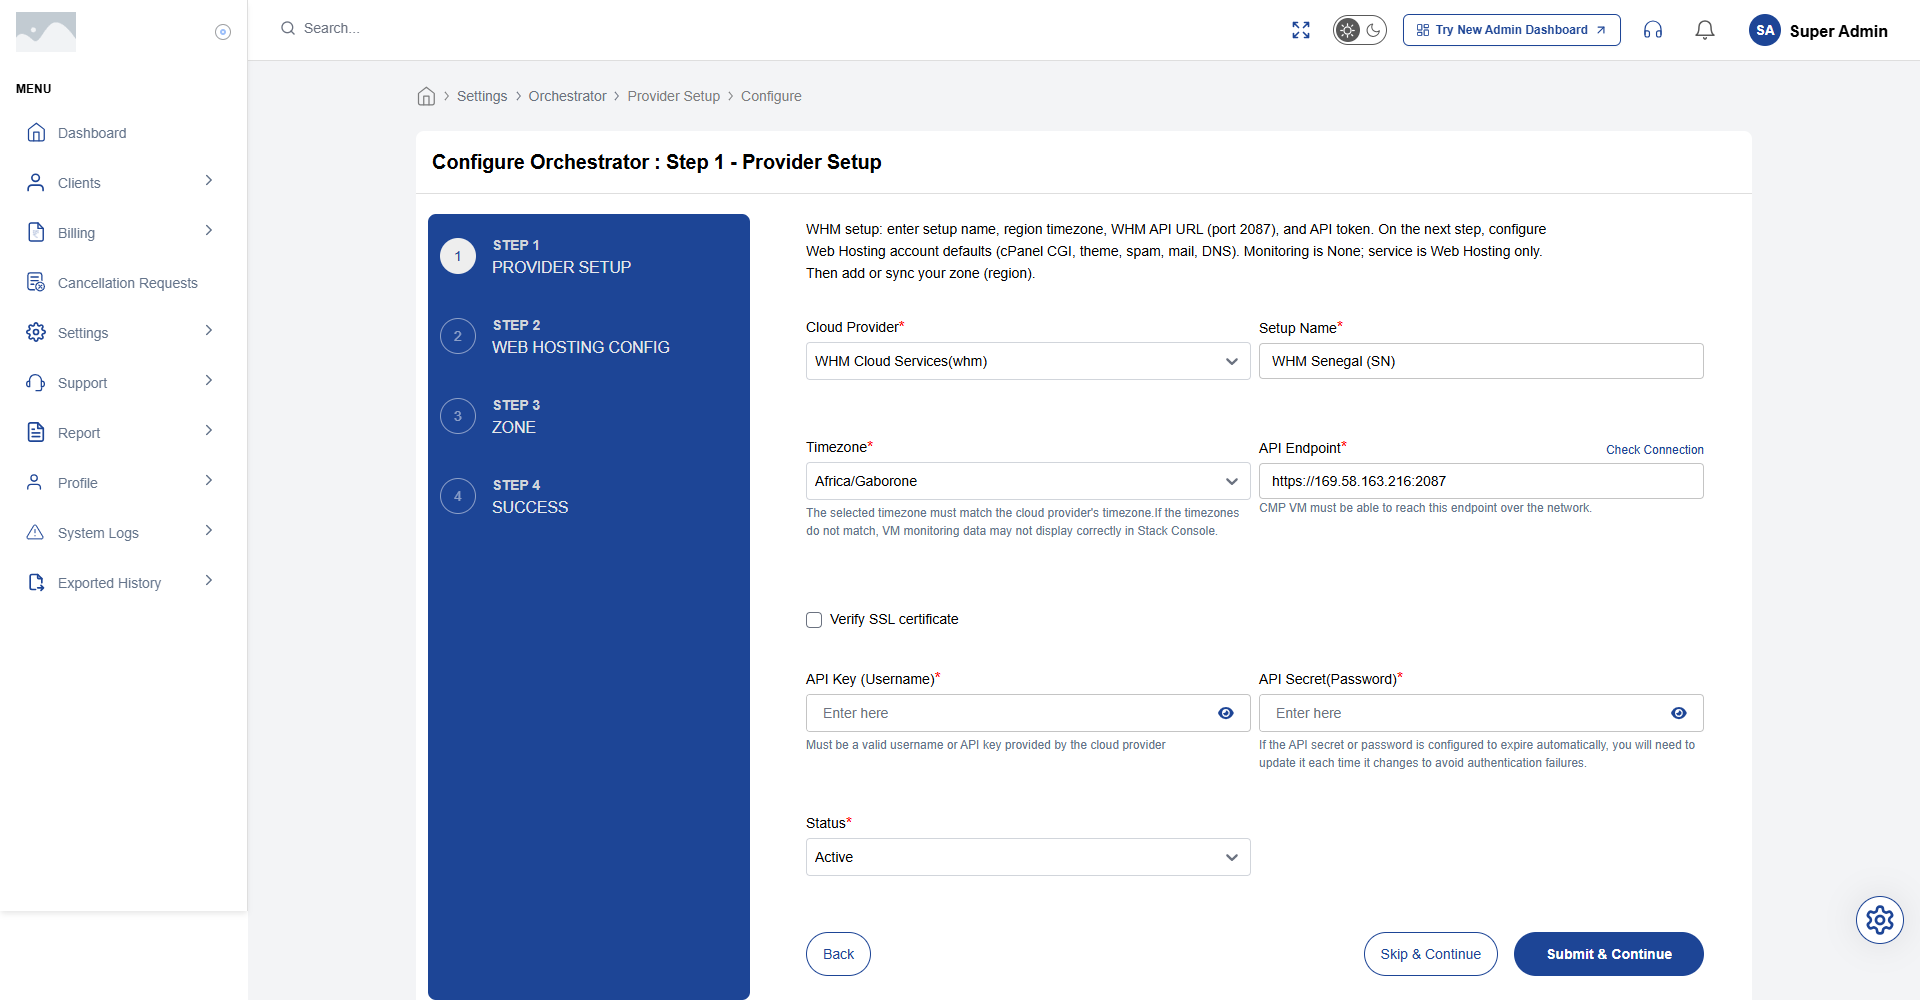
Fields
Cloud Provider
Required. Select WHM Cloud Services (whm) from the dropdown list of supported providers.
Setup Name
Required. Enter an identifiable, descriptive name for this WHM installation — for example, WHM Production, WHM US-East, or WHM Senegal (SN). This name appears in region selectors, rate cards, and billing reports.
Timezone
Required. Select the timezone matching your WHM host server (for example, Africa/Gaborone or UTC). Aligning timezones ensures that provisioning logs, billing cycle cutoffs, and activity timestamps match across CMP and WHM.
Monitoring
Required. Select None for the WHM integration path. WHM uses direct API-based disk usage polling (accountsummary) rather than hypervisor VM metric agents.
Click Next to proceed to the Web Hosting configuration.
Wizard Step 2 — Web Hosting Config
In this step, configure the API connection parameters, credentials, and default cPanel account attributes.
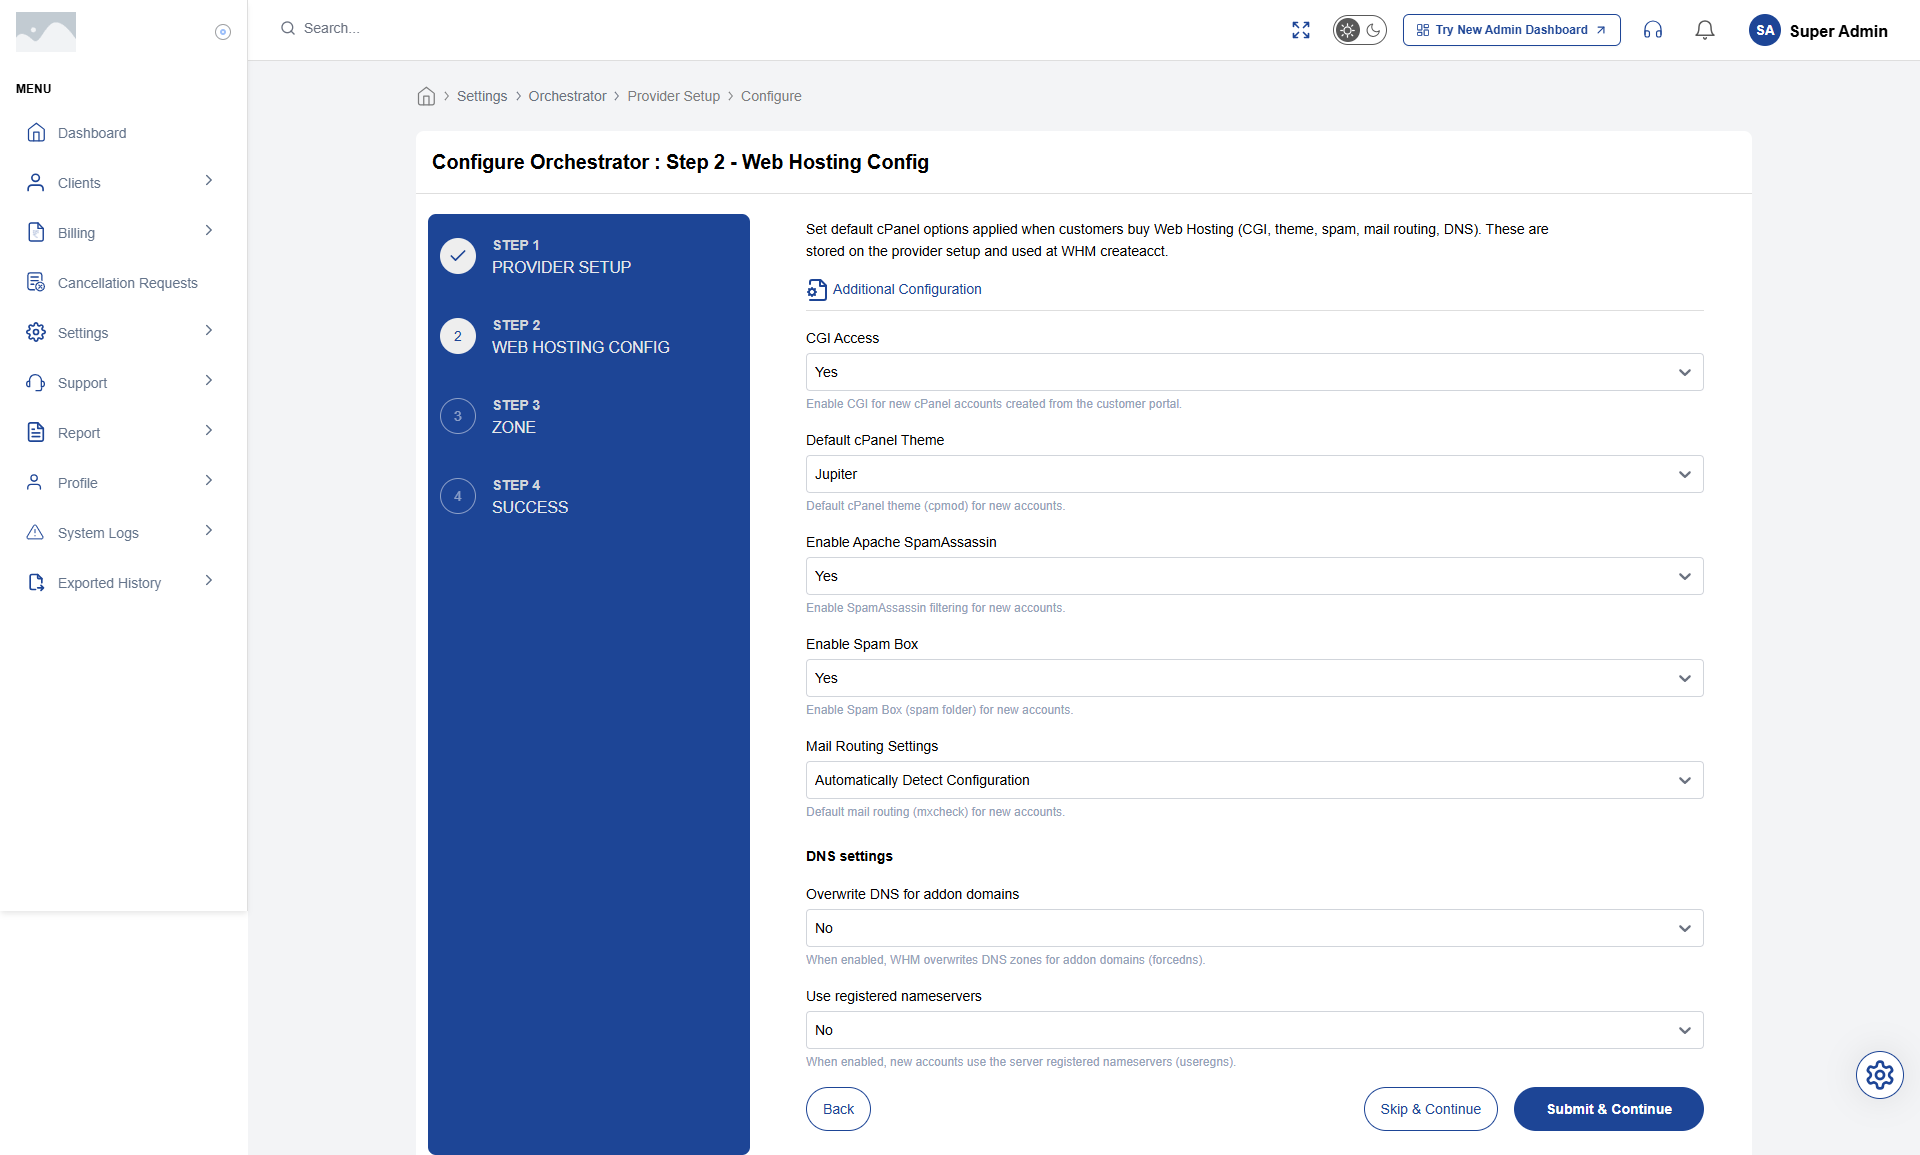
Connection Parameters
API Endpoint
Required. Enter the full HTTPS URL of your WHM server, including the secure administration port 2087.
- Example:
https://169.58.163.216:2087orhttps://whm.yourcloud.com:2087. - Do not omit the
https://prefix or the port number:2087.
Verify SSL Certificate
Required. Yes or No. Set to Yes for all production deployments. When enabled, CMP validates that the server's TLS certificate is valid, unexpired, and signed by a trusted Certificate Authority. Only set to No in isolated testing environments using self-signed certificates.
API Key (Username)
Required. The authorized WHM user associated with the API token (typically root or an authorized reseller account).
API Secret (Password / Token)
Required. The WHM API token generated during server preparation. This input is masked in the browser and encrypted at rest in the CMP database.
Testing Connectivity
Check Connection Button
Click the Check Connection button to validate the configuration before proceeding.
- Under the hood: CMP makes an outbound HTTPS call to the configured endpoint requesting
listpkgs. - Success: A green confirmation message indicates that CMP authenticated and queried the server successfully.
- Failure: A red error banner appears displaying the connection error (e.g., connection timed out, SSL verification error, or 403 Forbidden). See Troubleshooting if the test fails.
Default cPanel Account Options
These settings define the baseline environment applied whenever CMP executes createacct for a new customer hosting order:
CGI Access
Required. Yes or No. Select Yes if customer hosting accounts should have CGI script execution enabled by default.
Default cPanel Theme
Required. The default UI theme applied to new cPanel accounts. Enter Jupiter (recommended cPanel standard).
Enable Apache SpamAssassin
Required. Yes or No. Set to Yes to activate Apache SpamAssassin email filtering for all newly provisioned accounts.
Enable Spam Box
Required. Yes or No. When set to Yes, spam messages identified by SpamAssassin are automatically routed to a dedicated spam mail folder rather than discarded or left in the inbox.
Mail Routing Settings
Required. Select the mail routing method used for new accounts.
- Options:
Automatically Detect Configuration(Recommended),Local Mail Exchanger,Backup Mail Exchanger,Remote Mail Exchanger.
Overwrite DNS for addon domains
Required. Yes or No. Select No (default) to prevent WHM from overwriting existing DNS records when addon domains are configured.
Click Next to proceed to Zone configuration.
Wizard Step 3 — Zone Mapping
In Step 3, link the WHM setup to one or more datacenter regions/zones in CMP.
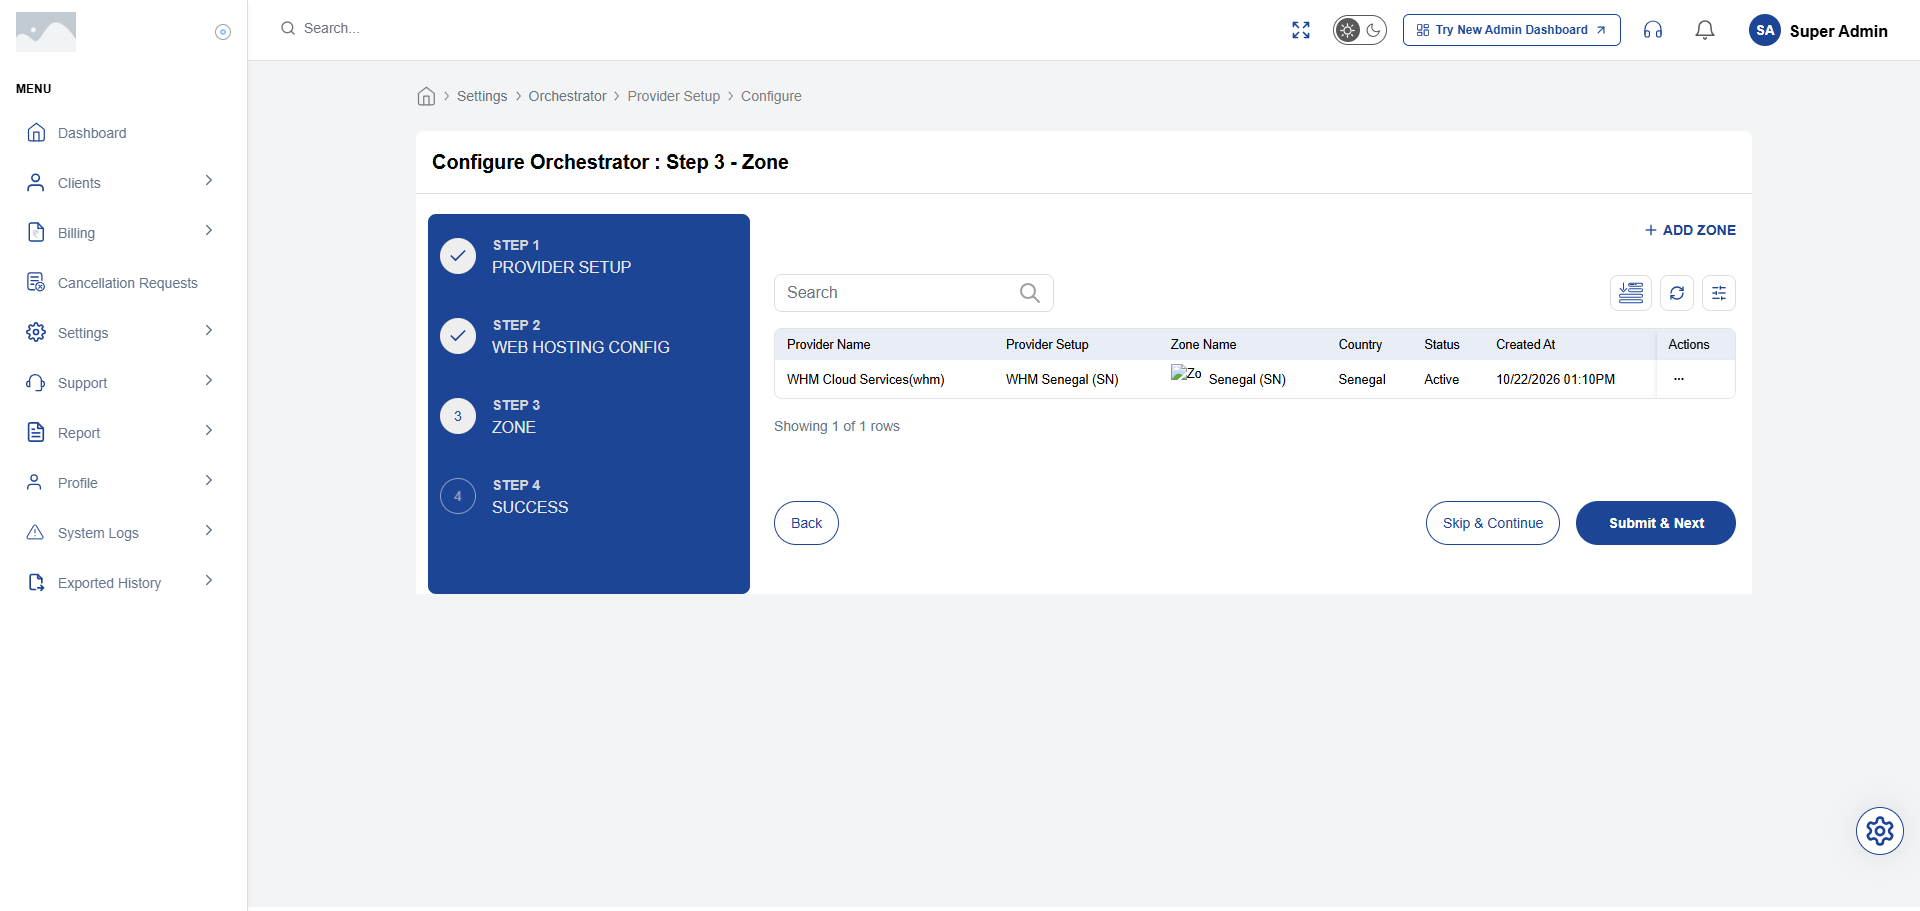
Fields
Zone / Region Selection
Required. Select the datacenter zone(s) where this WHM server provides hosting services (e.g., Default Zone, Region 1, or Senegal DC).
- When customers order Web Hosting from the portal, they select a region. Only packages linked to WHM setups in that region will be available for purchase.
Click Next to finalize the provider setup.
Wizard Step 4 — Success & Verification
Step 4 confirms that the WHM provider was registered successfully.
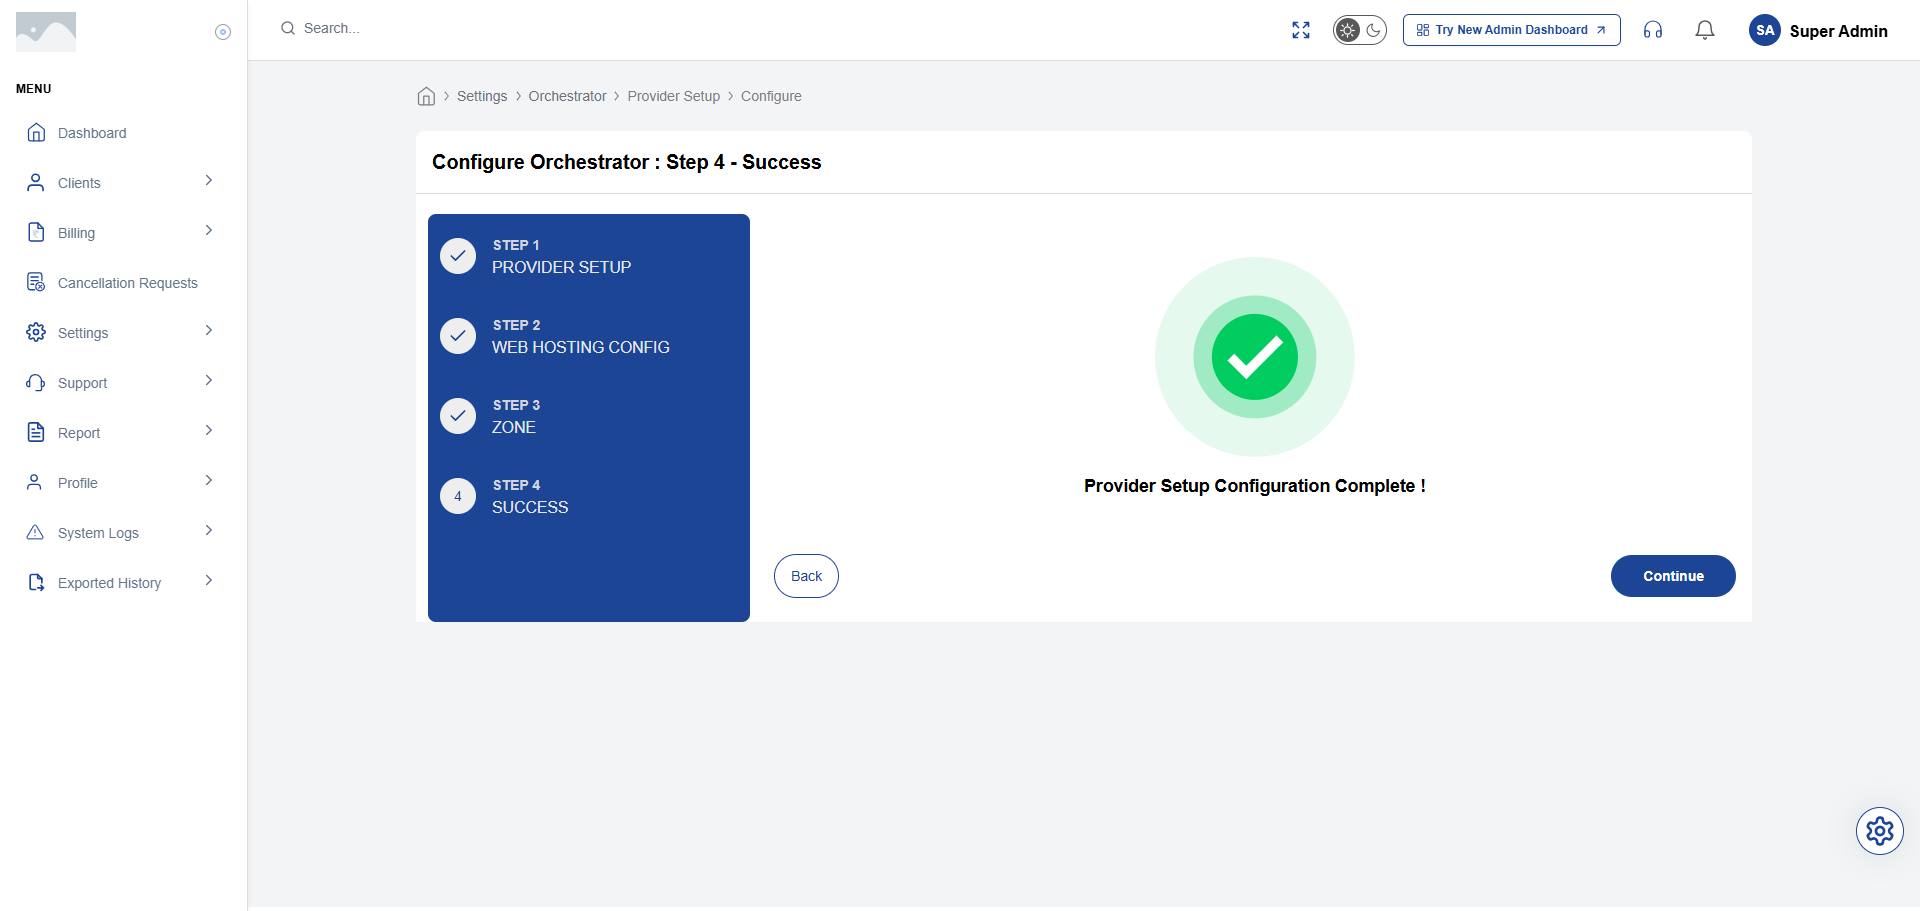
- Review the summary of the configured WHM provider.
- Click Finish to save the provider.
- The new provider now appears in the Cloud Provider Setup list with status Active.
Editing Existing Provider Settings
CMP Admin Path: Settings → Orchestrator → Configuration → Provider Setup → [Select Provider] → Edit
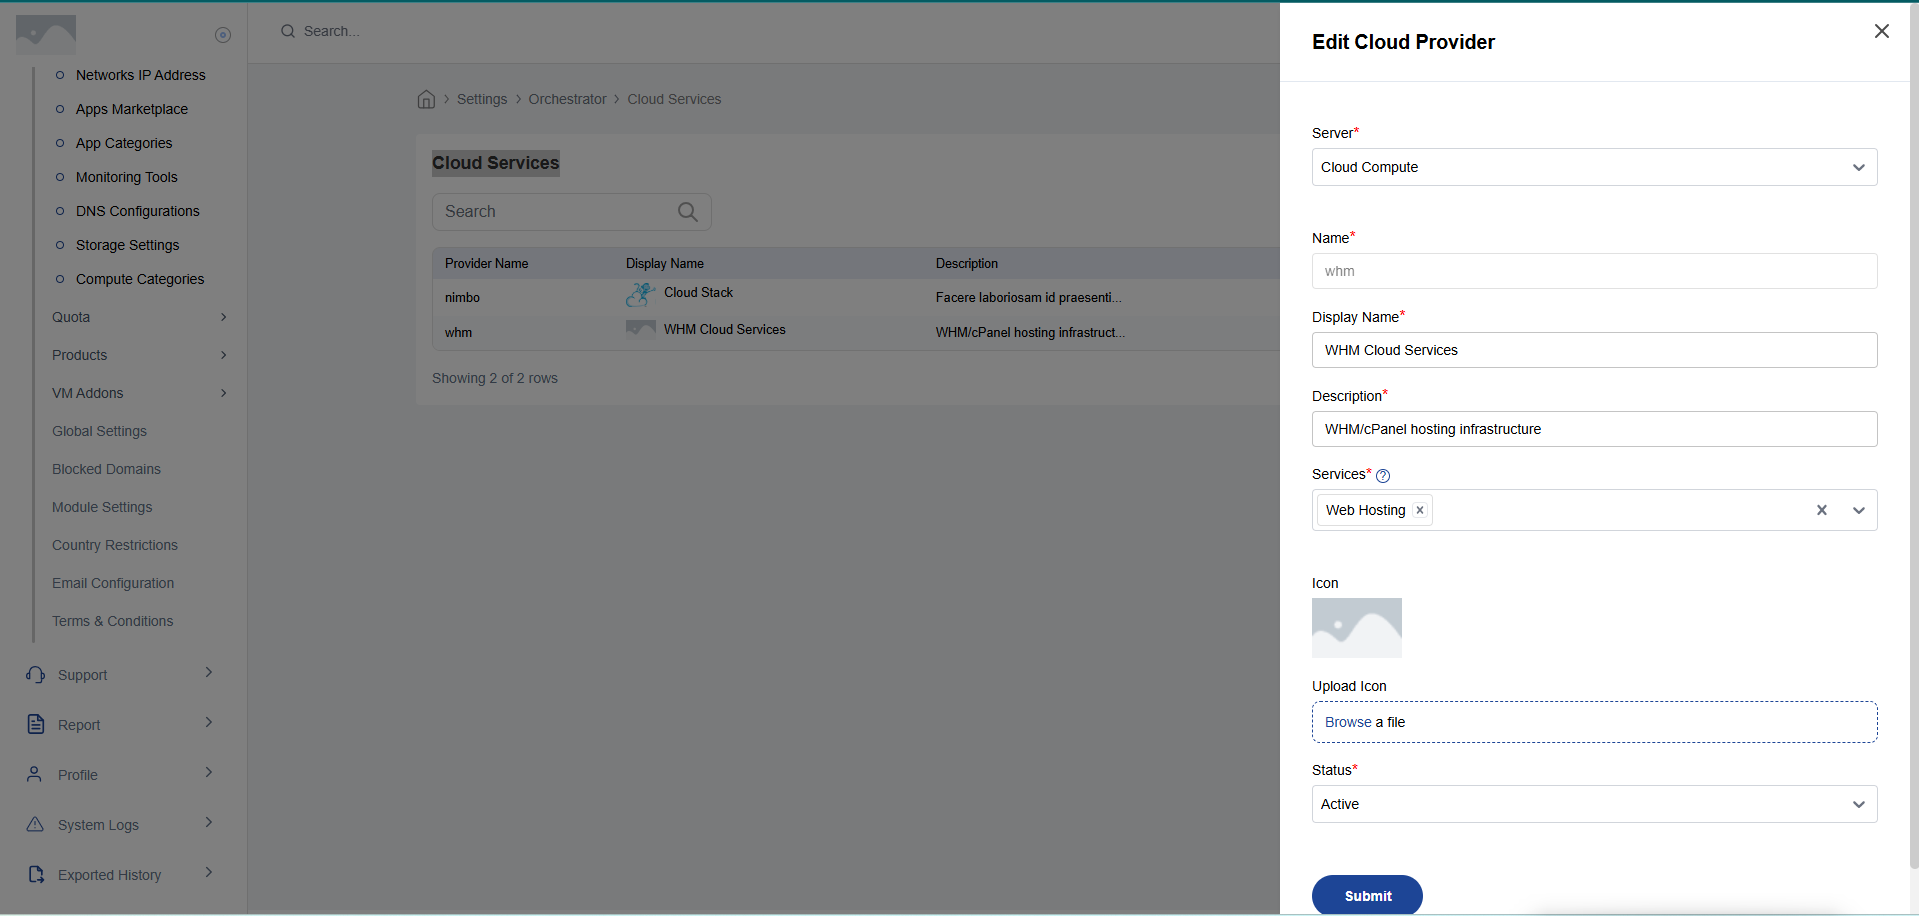
To update API tokens, adjust default cPanel themes, or modify mail routing settings later:
- Open the provider from the list.
- Update the required parameters. Note that credentials remain masked for security.
- Use Check Connection to verify updated credentials.
- Click Save Changes.
Next Steps
Now that WHM is connected, proceed to:
- Package & Plan Configuration — Map WHM packages to sellable CMP hosting plans.
- Client Registration & Rate Cards — Assign hosting plans to customer rate cards.